
Side Dishes
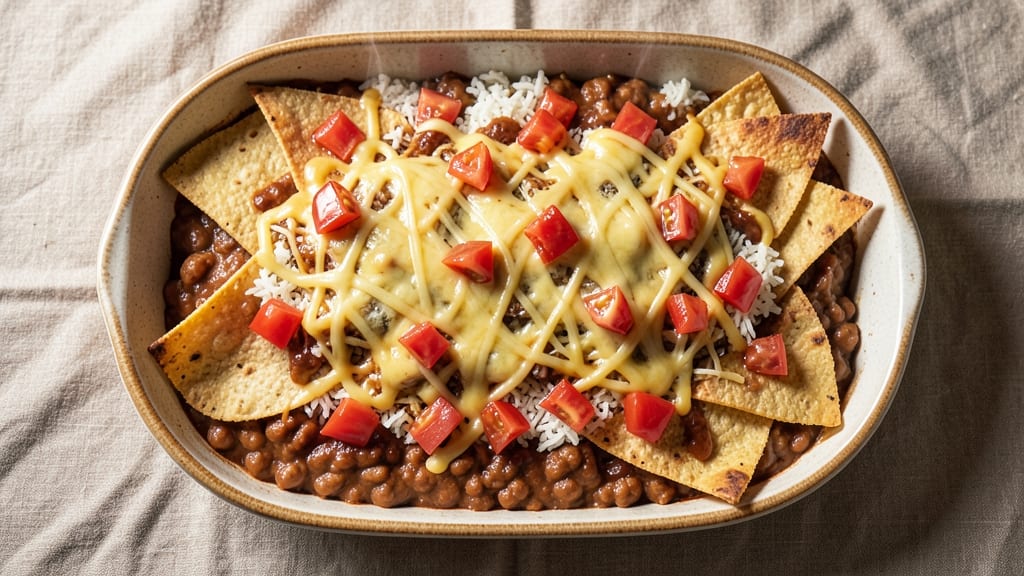
This bean and cheese enchilada casserole delivers all the comfort of a Mexican feast with crispy tortilla edges and melty cheese rivers—no rolling or frying required. 🌟 The secret lies in layering pre-cooked beans, seasoned rice, and a tangy tomato sauce before topping with a lattice of tortillas and melted cheese, creating a textural contrast that makes every bite satisfying.
What sets this dish apart is the balance of convenience and tradition: you can use canned beans and jarred sauce for a quick version, yet the slow baking at 375°F develops deep, savory flavors that rival homemade.
The tortilla lattice creates crispy pockets while keeping the cheese gooey inside, and optional toppings like avocado or sour cream let you customize it to your taste.
By the time it emerges from the oven, you'll have a restaurant-quality casserole with golden, bubbling cheese and crispy tortilla bits that add satisfying crunch. The layers of flavor—smoky beans, tangy sauce, and rich cheese—make this a hearty vegetarian main that's perfect for meal prep or feeding a crowd.
Serve with cilantro-lime rice or a simple salad to round out the meal. Here's how to assemble it perfectly every time.
Ingredients for bean and cheese enchilada casserole
Pantry staples and a few key ingredients transform into a restaurant-style enchilada casserole.
| Ingredient | Amount | Notes |
|---|---|---|
| Canned Refried Beans 🌽 | 2 cups | Vegetarian, no lard added |
| Canned Diced Tomatoes 🍅 | 14 ½ oz | Fire-roasted for depth |
| Enchilada Sauce 🍲 | 2 cups | Jarred or homemade |
| Cooked White Rice 🍚 | 3 cups | Day-old rice preferred |
| Shredded Monterey Jack Cheese 🧀 | 3 cups | Or Mexican blend |
| Flour Tortillas 🌯 | 12 whole | Medium size, 8-inch |
| Canned Black Beans 🌿 | 1 ½ cups | Drained and rinsed |
| Taco Seasoning 🌶️ | 2 tbsp | Store-bought or homemade |
| Olive Oil 🫒 | 2 tbsp | For crisping tortillas |
| Salt 🧂 | 1 tsp | Adjust to taste |
| Garlic Powder 🧄 | 1 tsp | For extra flavor |
| Cilantro 🌿 | ¼ cup | Chopped, for garnish |
| Lime 🍋 | 1 whole | Juiced, for serving |
| Sour Cream 🥛 | ½ cup | Optional topping |
The tortillas are the star—Flour tortillas crisp up beautifully, but corn tortillas work too if you prefer. Grab a family pack from Walmart or Kroger for the best balance of size and price. The cheese matters here: Monterey Jack melts smoothly, but a Mexican blend adds more depth. If you're using pre-shredded cheese, give it a quick stir to break up clumps. For the beans, low-sodium canned beans are ideal—just rinse them well to cut down on excess salt. The enchilada sauce can be jarred (like Herdez) or homemade—both work perfectly.
No enchilada sauce? Tomato sauce plus taco seasoning gets you close. Short on black beans? Pinto beans or kidney beans swap right in. The tortillas can be cut into strips instead of a lattice if you're short on time—just overlap them slightly for extra crispiness. For the seasoning, store-bought taco seasoning works fine, but if you're feeling fancy, toast your spices in a dry pan first for deeper flavor. The lime should be fresh—Mexican limes from the grocery store have more juice than the key limes. If you're making this ahead, assemble it the night before and refrigerate—it'll taste even better the next day.
This casserole reheats beautifully—just 350°F for 20 minutes until bubbly. Leftovers keep for 4-5 days in the fridge, and it freezes wonderfully for up to 3 months. I like to portion mine into individual containers so I can grab and go. The tortilla lattice stays crispy even after reheating, but if it gets soggy, just pop it under the broiler for 2 minutes to revive the crunch. Garnish with fresh cilantro and a squeeze of lime right before serving—trust me, it makes all the difference.
Why You'll Love This Recipe
- One-Pan Magic: I swear by this—just dump everything into a baking dish, sprinkle cheese, and walk away. No chopping, no fuss, no extra pots to wash. The refried beans and tomatoes soften perfectly while the cheese melts into a golden blanket on top.
- Cheesy, Saucy, Addictive: That first bite? The creamy refried beans mixed with tangy tomatoes, all smothered in enchilada sauce and melted Monterey Jack—it’s the kind of dish where I’ll close my eyes and sigh. The rice soaks up all the flavor, so every forkful is packed with goodness.
- Meal Prep MVP: Between us, this is my go-to for busy weeks. Make a big batch on Sunday, and you’ve got lunch or dinner covered for days. It reheats beautifully, and honestly? The flavor only gets better the next day. (Yes, even on a Tuesday night.)
- Budget-Friendly Feast: I’m not joking when I say this feeds six for under $10. Canned beans, rice, and cheese stretch to fill everyone’s plates, and the leftovers? They’re just as welcome the second time around. Plus, no one will guess it’s this easy to make.
Step-by-step instructions for bean and cheese enchilada casserole
Here's how to build layers of flavor and texture that make this casserole irresistible.
🥘 Step 1: Prepare the Bean and Rice Mixture
In a large bowl, combine the 2 cups canned refried beans, 1.5 cups canned black beans, 14.5 oz canned diced tomatoes, 2 tbsp taco seasoning, 1 tsp salt, and 1 tsp garlic powder. Mix everything thoroughly until the seasoning is evenly distributed. You want the beans to be fully coated so every bite has that savory kick.
Next, gently fold in the 3 cups cooked white rice using a spatula. Be careful not to mash the rice—just combine it with the bean mixture. The texture should be chunky with visible rice grains throughout. This layer will form the hearty base of your casserole, so make sure it's well-seasoned and evenly mixed.
🍳 Step 2: Assemble the Casserole Layers
Preheat your oven to 375°F and lightly grease a 9x13-inch baking dish with some of the 2 tbsp olive oil. Spread the bean and rice mixture evenly across the bottom of the dish, pressing down gently to create a compact layer. This helps prevent sinking later when you add the cheese.
Sprinkle 1 cup of the shredded Monterey Jack cheese evenly over the top of the bean mixture. This initial layer of cheese will create that signature melted cheese effect when baked. I like to use a fine-mesh strainer for this step—it helps distribute the cheese more evenly and prevents clumping.
🔥 Step 3: Build the Tortilla Topping Layer
In a separate bowl, mix the 2 cups enchilada sauce with 1 tbsp olive oil. This sauce will help crisp the tortillas and add extra flavor. Cut each of the 12 whole flour tortillas into quarters, then brush each piece lightly with the enchilada sauce mixture on both sides.
Arrange the tortilla quarters in overlapping rows across the top of the casserole, completely covering the bean mixture. This creates that beautiful crisscross pattern that makes the dish look so impressive. Press down gently on the tortillas to help them stick together and maintain their shape during baking.
🧀 Step 4: Add Final Cheese Layer and Bake
Sprinkle the remaining 2 cups shredded Monterey Jack cheese evenly over the tortilla layer. The cheese should melt into delicious rivers when baked, creating that gooey texture we all love. For extra crispiness, I like to broil the casserole for 2-3 minutes at the end—just watch it closely to prevent burning.
Bake the casserole uncovered at 375°F for 25-30 minutes, until the tortillas are golden brown and the cheese is fully melted. You'll know it's ready when the edges of the tortillas are crispy and the cheese has formed beautiful bubbly patches. The internal temperature should reach 165°F when checked with a meat thermometer.
🍽️ Step 5: Rest, Garnish, and Serve
Remove the casserole from the oven and let it rest for 10 minutes before serving. This resting period allows the layers to set slightly and makes it easier to cut clean slices. While it rests, zest the 1 whole lime and chop the 0.25 cup cilantro for garnish.
Cut the casserole into 6 equal portions (about 2x2-inch squares) and serve with the 0.5 cup sour cream on the side. The tortillas should be crispy on top while the cheese inside remains creamy and stretchy. Each bite should deliver that perfect combination of textures—crunchy, cheesy, and hearty all at once.
Pro Tips For Making Bean And Cheese Enchilada Casserole
- DRAIN AND RINSE BEANS: That canned refried beans come packed in oil or saltwater—trust me, you don’t want that greasy or overly salty casserole. Drain them well, then rinse under cold water to cut the fat and even out the seasoning. (Yes, it’s an extra 30 seconds, but your taste buds will notice.)
- LAYER RICE DRY FIRST: Wet rice sticks together like glue in the oven. Spread your cooked rice on a baking sheet and let it dry out slightly (about 10 minutes) before assembling the casserole. It’ll hold its shape better and soak up the sauce without turning to mush.
- SAUCE IT RIGHT: Don’t just dump enchilada sauce over everything—mix a ladle or two into the refried beans first. This ensures every bite gets that rich, tangy flavor instead of just a cheesy top layer. (I used to skip this, and the first few forkfuls were always disappointing.)
- SKIP THE OVERMIXING: Once you add the cheese, resist the urge to stir it into a smooth paste. Let it melt in place—this creates that perfect gooey, stretchy texture instead of a dense, rubbery mess. (Your spatula will thank you.)
Flavor customization for bean and cheese enchilada casserole
Spicy Kick
For a fiery twist, stir in 1 tablespoon of chipotle powder or 2 tablespoons of hot sauce (like Valentina or Cholula) into the enchilada sauce before brushing the tortillas.
Add ½ teaspoon of cayenne pepper to the bean mixture for extra heat. If you love smoky flavors, try ½ teaspoon of smoked paprika in the taco seasoning blend. 🌶️
Creamy Variations
Swap out some of the cheese for ½ cup of sour cream or Mexican crema mixed into the bean layer—this adds richness without overpowering the flavors. For a tangy touch, stir in ¼ cup of diced pickled jalapeños into the sauce before baking.
If you prefer a milder creaminess, fold ½ cup of refried beans into the cheese layer for extra stretch.
Vegetable Boost
Add 1 cup of corn kernels (fresh, frozen, or canned) to the bean mixture for natural sweetness. Stir in ½ cup of diced bell peppers (red or green) for crunch and color.
For a heartier texture, mix in ½ cup of sautéed onions or 1 cup of roasted zucchini. These additions keep the dish vegetarian while adding freshness and nutrients.
Cheese Swaps
Experiment with different cheeses for unique flavors. Try Oaxaca cheese for a stringy, meltier texture or pepper jack for a spicy kick. For a sharper taste, use cotija cheese crumbled on top.
If you're lactose intolerant, dairy-free shredded cheese (like Miyoko's) works surprisingly well—just add a splash of unsweetened almond milk to help it melt smoothly.
Herb Infusions
Brighten the dish with 2 tablespoons of chopped cilantro or 1 tablespoon of chopped parsley mixed into the bean layer. For a more robust flavor, add 1 teaspoon of ground cumin or ½ teaspoon of oregano to the taco seasoning.
Fresh herbs like basil or mint can also be sprinkled on top for a unique twist. These additions elevate the dish without overpowering the main flavors. ✨
Nutrition facts
Frequently asked questions
Can I make this casserole ahead of time?
Assemble the entire casserole in a baking dish, cover tightly with foil, and refrigerate for up to 24 hours before baking. When ready, bake at 375°F for 30-35 minutes (5 extra minutes). The flavors actually deepen overnight, making it even more delicious. For make-ahead convenience, freeze the unbaked casserole for up to 3 months—just thaw overnight in the fridge before baking.
How do I keep the tortillas crispy?
The secret is in the sauce! Brush the tortilla pieces with enchilada sauce mixed with olive oil before arranging them. For extra crunch, bake at 375°F for the full 25-30 minutes instead of cutting time short. If the tortillas soften when reheating, broil for 1-2 minutes at the end to revive the crispiness. Avoid overlapping tortillas too much—leave small gaps for air circulation.
What if I don't have flour tortillas?
Corn tortillas work perfectly too! Cut them into strips about ½-inch wide and arrange them in a single layer (no need to quarter). Brush them lightly with sauce and bake as directed. For a chewier texture, try whole wheat tortillas. If you're short on tortillas, you can also use tortilla chips as a topping—just arrange them in a lattice pattern before adding the final cheese layer.
Can I make this dish without rice?
Yes, but the texture will be different. Replace the rice with 3 cups of cooked quinoa or 3 cups of diced potatoes (parboiled for 10 minutes). For a grain-free option, use 3 cups of cooked cauliflower rice or 3 cups of chopped zucchini (sautéed first). The beans will still provide plenty of heartiness, but the dish will be lighter. Just reduce the baking time by 5 minutes if using vegetables, as they cook faster.
Why is my cheese not melting properly?
Pre-shredded cheese often contains anti-caking agents that prevent smooth melting. For creamy cheese rivers, use block cheese (Monterey Jack or cheddar) and shred it yourself. Also, ensure your oven is fully preheated to 375°F and bake uncovered. If the cheese still doesn't melt, try adding 1-2 tablespoons of milk or water to the cheese layer before baking—this helps create steam for better melting.