
Appetizers
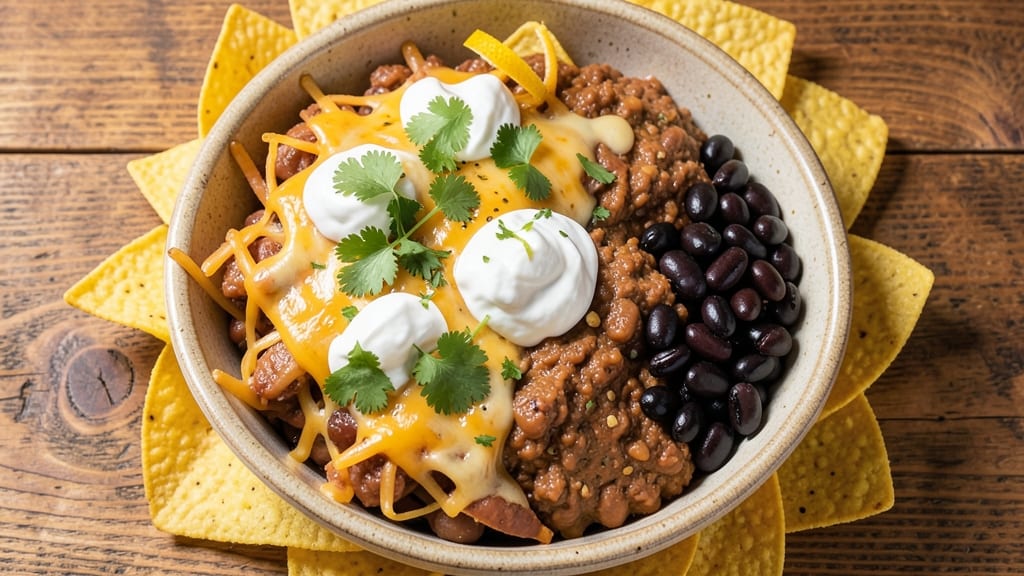
This bean and cheese nacho recipe transforms simple tortilla chips into a crunchy, cheesy masterpiece with layers of flavor and texture. The secret lies in baking the chips until golden and crispy, then piling them high with melted cheese and hearty beans for a satisfying bite every time.
I’ve perfected this method over countless game days and parties—it’s foolproof, vegetarian-friendly, and ready in just 20 minutes.
The magic happens when you layer shredded cheddar and Monterey Jack between the chips, creating rivers of melted goodness that hold everything together. Adding refried beans or black beans adds protein and a creamy contrast to the crispy chips.
The result? A dish that’s hearty enough for a main course but still fun enough to share as an appetizer.
Once out of the oven, the chips stay crispy while the cheese turns golden and bubbly, creating that perfect cheese pull with every bite. Top with fresh jalapeños, sour cream, or guacamole for extra flavor, and you’ve got a crowd-pleaser that’s always a hit.
This recipe is all about balance—crunchy, creamy, and cheesy in every forkful.
Whether you're feeding a crowd or just craving a satisfying snack, these nachos deliver restaurant-quality flavor without the fuss. The best part? You can customize them with your favorite toppings—salsa, avocado, or even a sprinkle of hot sauce. Let’s get started on making these crispy, cheesy stacks!
Ingredients for bean and cheese nacho
Six ingredients make these nachos restaurant-worthy without the fuss.
| Ingredient | Amount | Notes |
|---|---|---|
| Tortilla Chips 🍟 | 6 cups | Sturdy blue corn or thick white corn |
| Shredded Cheddar Cheese 🧀 | 2 cups | Freshly shredded, not pre-shredded |
| Shredded Monterey Jack Cheese 🧀 | 1 ½ cups | Freshly shredded, melts beautifully |
| Refried Beans 🥫 | 1 ½ cups | Homemade or canned, warmed |
| Black Beans 🌱 | 1 cup | Rinsed, drained, warmed |
| Sour Cream 🥛 | ½ cup | Full-fat for best texture |
| Fresh Jalapeños 🌶️ | 2 whole | Sliced thin, seeds removed |
| Avocado 🥑 | 1 whole | Ripe, sliced or mashed |
| Hot Sauce 🔥 | 2 tbsp | For serving, optional |
| Salsa 🍅 | ½ cup | For serving, optional |
| Olive Oil 🫒 | 1 tbsp | For tossing chips |
| Salt 🧂 | ½ tsp | Kosher or sea salt |
| Garlic Powder 🧄 | ½ tsp | For seasoning chips |
The chips are non-negotiable—blue corn or sturdy white corn hold up best to the cheese. Trader Joe's and TostitosKraft or Sargento are my go-tos, but any brand works if it's freshly shredded. Pro tip: slice the cheese yourself—it melts smoother and doesn't get rubbery. The refried beans? Homemade is ideal, but the canned stuff from Goya or Bush's works in a pinch.
No refried beans? Mashed black beans with a splash of oil work perfectly. Short on Monterey Jack? Pepper Jack or Colby Jack are great swaps—they melt just as well. The jalapeños can be pickled or fresh, but fresh has more bite. Trader Joe's sells pre-sliced ones if you're in a hurry. Avocado is optional but adds that creamy, rich contrast. If you're making these ahead, add the avocado last—it browns fast. For extra flavor, toss the chips with a mix of olive oil, garlic powder, and a pinch of salt before baking. It's worth the extra minute.
These nachos are best served immediately after baking—cheese rivers are at their peak. But if you need to prep ahead, assemble everything except the cheese, cover, and refrigerate for up to 4 hours. Bake straight from the fridge (add 2-3 extra minutes). Leftovers? They keep for 3 days in the fridge, but honestly, they won't last that long. For parties, double the recipe—everyone will want seconds. And if someone asks for less cheese? Just smile and say, 'Nachos are a love language.'
Why You'll Love This Recipe
- No-Bake Magic: I swear by this when I’m too tired to turn on the oven. Just layer chips, beans, and cheese—no waiting, no fuss. The refried beans add that creamy texture while the black beans keep it hearty, all melting together like a dream.
- Cheese Love Bomb: That combo of cheddar and Monterey Jack? It’s like a flavor hug. The cheddar gets crispy in spots, while the Monterey Jack stays gooey—every bite has that perfect balance of sharp and smooth.
- Game for Any Gathering: I’ve served these at game nights, potlucks, and even as a quick lunch for my book club. They’re easy to scale—double the chips if you’ve got a crowd, or keep it small for a solo snack night.
- Budget-Friendly Leftovers: This recipe costs next to nothing and turns into even better nachos the next day. The beans soften just enough to soak into the chips, and the cheese gets even gooier when reheated—minimal effort, maximum satisfaction.
Step-by-step instructions for bean and cheese nachos
Let's build these loaded nachos with crispy layers and gooey cheese rivers everyone will love.
Season and Toast the Tortilla Chips
In a large bowl, toss the 6 cups of tortilla chips with 1 tablespoon of olive oil until they're evenly coated. Add the 0.5 teaspoon of garlic powder and 0.5 teaspoon of salt, then mix gently to distribute the seasoning. Spread the chips in a single layer on two large baking sheets.
Place the sheets in a 350°F preheated oven and toast for 8-10 minutes, stirring halfway through. You're looking for chips that are just starting to brown at the edges—this keeps them crispy while preventing them from turning greasy. The aroma will fill your kitchen, signaling they're ready for the next layer.
Layer the Cheese and Beans
Remove the chips from the oven and arrange them in an even layer on a large serving platter. Sprinkle half of the 2 cups of shredded cheddar cheese and all 1.5 cups of shredded Monterey Jack cheese evenly over the chips. The cheese should melt into rivers when heated, so don't skimp on coverage.
Next, spread the 1.5 cups of warmed refried beans over the cheese layer, followed by the 1 cup of warmed black beans. Use a spoon to create small mounds rather than spreading them flat—this creates better texture contrast when the cheese melts. The beans will soak up some of the melted cheese, creating pockets of flavor in every bite.
Melt the Cheese to Perfection
Return the nachos to the oven for 5-7 minutes until the cheeses are fully melted and beginning to bubble. Watch closely during the last 2 minutes—you want golden brown spots forming on the cheese while keeping the chips crispy underneath. If the cheese starts to brown too quickly, move the tray to a lower oven rack.
For the final touch, sprinkle the remaining 1 cup of shredded cheddar cheese over the top. This creates a beautiful cheese crust on the surface while keeping the interior gooey. The combination of cheddar and Monterey Jack gives you that perfect balance of sharp and creamy flavors.
Add Fresh Toppings and Serve
Once the cheese is melted and bubbly, remove the nachos from the oven and immediately top with sliced fresh jalapeños, avocado, and dollops of sour cream. I like to arrange the jalapeños in a circular pattern around the edges for visual appeal, while the avocado adds a creamy contrast to the crispy chips.
Serve immediately with the 0.5 cup of salsa and 2 tablespoons of hot sauce on the side. The heat from the jalapeños and hot sauce will complement the cool avocado and creamy sour cream perfectly. Dig in while the chips are still crispy—this dish tastes best when served right away!
Pro Tips For Making Bean And Cheese Nacho
- Preheat Your Pan: I learned this the hard way—cold pans make soggy nachos. Hit your oven or skillet with 350°F for 5 minutes before adding chips. The cheese melts faster and the chips stay crispy instead of turning into a sad, greasy mess. Trust me, your nachos will thank you.
- Mix Cheeses Mid-Layer: Don’t just dump all the cheese on top—split it. Use half the cheddar and Monterey Jack between layers of beans and chips, then finish with the rest on top. This guarantees every bite has melty cheese, not just the top layer. (Yes, even if you’re impatient like me.)
- Warm the Beans First: Cold refried or black beans make nachos taste dull. Heat them in a small pot with a splash of water or broth for 2-3 minutes until just warm—no need to boil. This keeps them creamy and ensures they blend into the dish instead of stealing the show.
- Layer Chips in Staggered Rows: Skip the flat, even spread—overlap chips in a brick-like pattern. This creates edges for cheese to cling to and prevents a single giant slab that falls apart when you lift it. (Your future self will curse you if you don’t.)
Serving suggestions for bean and cheese nacho
Plating Presentation
Serve these nachos on a large wooden board or slate platter for rustic appeal—the natural wood contrasts beautifully with the vibrant colors of the toppings. Arrange the chips in a sunburst pattern starting from the center, creating a visually striking display.
The golden cheese rivers will naturally flow outward, drawing attention to the heart of the platter. 🌟
Topping Arrangement
Drizzle salsa in a zigzag pattern over the top for color and acidity contrast. Place dollops of sour cream in small circles around the edges, and slice jalapeños into thin rings to scatter like edible confetti.
For a gourmet touch, add avocado slices in a fan shape at one corner. This arrangement makes the dish look as delicious as it tastes.
Serving Style Options
For casual gatherings, serve nachos in individual cast-iron skillets—each guest gets their own crispy, cheesy masterpiece. For parties, use a large baking sheet as a shared platter with serving utensils.
If you're keeping them warm, place the platter on a wire rack over a baking sheet in a 200°F oven to maintain crispiness for up to 30 minutes.
Kid-Friendly Adaptations
Create mini nacho cups by layering chips and cheese in ramekins or small bowls. Let kids add their own toppings—shredded cheese, black beans, and mild salsa—for a fun, interactive snack.
This makes nachos feel like a game while keeping them nutritious. Perfect for game days or birthday parties! 🎉
Dietary Customizations
For vegan nachos, swap cheese for dairy-free shreds (like Violife or Miyoko's) and use cashew sour cream. Keep the beans and jalapeños for protein and heat.
For gluten-free, use corn tortilla chips or plantain chips—just ensure they're labeled gluten-free. Always check labels, as cross-contamination can happen.
Make-Ahead Serving
Assemble nachos without cheese up to 4 hours ahead, then refrigerate. When ready to serve, bake straight from the fridge, adding 2-3 extra minutes to melt the cheese. For freezer prep, assemble fully (including cheese) and freeze for up to 1 month.
Thaw in the fridge overnight, then bake at 375°F for 10-12 minutes to crisp the chips again. 💫
Nutrition facts
Frequently asked questions
Can I make these nachos ahead of time?
Assemble everything except the cheese up to 4 hours ahead and refrigerate. When ready to serve, bake straight from the fridge, adding 2-3 extra minutes to melt the cheese. For freezer prep, assemble fully (including cheese) and freeze for up to 1 month. Thaw overnight in the fridge, then bake at 375°F for 10-12 minutes to restore crispiness.
What's the best way to keep the chips crispy?
Toast the chips in a 350°F oven for 8-10 minutes before adding cheese to remove moisture. Use sturdy blue corn or thick white corn chips—they hold up best. For serving, place the platter on a wire rack over a baking sheet in a 200°F oven to maintain crispiness for up to 30 minutes.
Can I use pre-shredded cheese?
While you can use pre-shredded cheese, freshly shredded melts much better and doesn't get rubbery. The anti-caking agents in pre-shredded cheese can make it clump or not melt as smoothly. If you must use pre-shredded, look for brands labeled "melts well" or use a mix of cheddar and Monterey Jack for better results.
What if I don't have refried beans?
No problem! Warm 1 cup black beans with 1 teaspoon oil and mash slightly for a similar texture. Or use 1 can of refried black beans (like Goya) as a direct substitute. The key is to warm them thoroughly so they blend well with the melted cheese.
How do I make these vegan?
Swap the dairy cheese for dairy-free shreds (Violife or Miyoko's work well) and use cashew sour cream. Keep the beans and jalapeños for protein and heat. For extra flavor, add nutritional yeast to the cheese substitute. The texture will be slightly different but still delicious!