
Salads
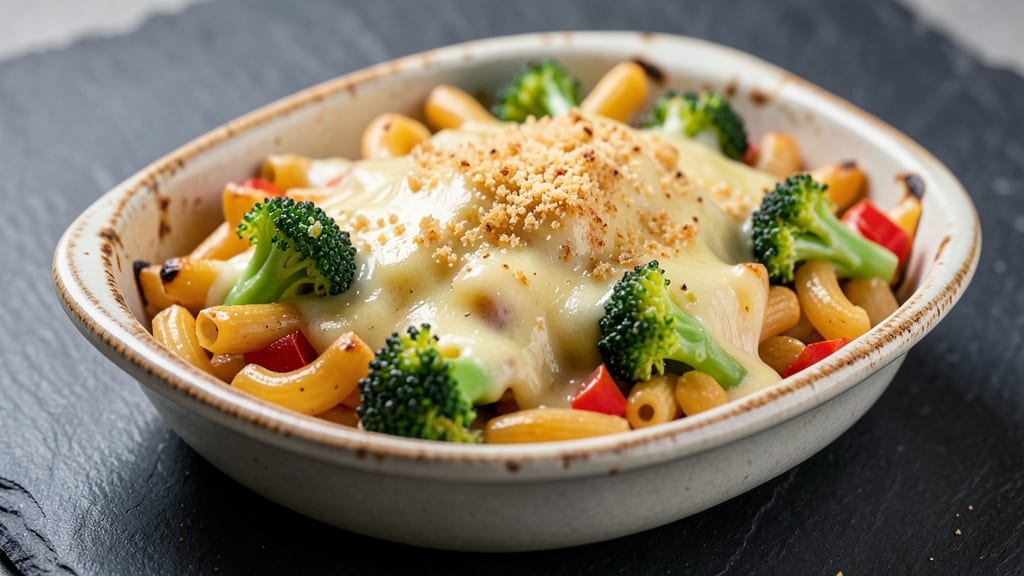
This baked mac and cheese recipe with veggies transforms a classic comfort dish into a nutrient-packed meal without sacrificing that signature creamy, crispy-topped perfection.
After years of perfecting the balance between rich cheese and hidden vegetables, I've developed a version where broccoli and bell peppers melt into the sauce while maintaining their texture—no one will guess they're there.
The secret lies in proper veggie prep and a foolproof baking technique that delivers that coveted golden crust.
What sets this recipe apart is how it elevates simple ingredients into something restaurant-worthy. You'll start with elbow macaroni cooked al dente, then build layers of cheddar, Gruyère, and cream cheese for depth.
The veggies—steamed just until tender-crisp—get mixed into the sauce at the perfect moment, ensuring they add nutrition without overpowering the cheesy goodness. A buttery breadcrumb topping creates that signature crispy texture that makes this dish irresistible.
By the time it emerges from the oven, you'll have a dish that's creamy, cheesy, and packed with hidden vegetables—perfect for a satisfying weeknight dinner or a crowd-pleasing side. The crispy topping gives it that restaurant-quality finish, while the melted cheese creates a velvety sauce that coats every noodle.
This isn't just mac and cheese; it's a balanced, flavorful meal that even veggie-averse eaters will love.
The best part? This recipe scales beautifully for gatherings, and leftovers reheat perfectly. Whether you're feeding a family or meal prepping for the week, this baked mac and cheese delivers on both comfort and nutrition.
Let's get started with the full recipe—your taste buds (and your veggie quota) will thank you.
Ingredients for baked mac and cheese recipe with veggies
Six servings of cheesy perfection with hidden veggie magic—crispy topping guaranteed.
| Ingredient | Amount | Notes |
|---|---|---|
| Elbow Macaroni 🍝 | 1 ½ lbs | Cooked al dente, drained |
| Sharp Cheddar Cheese 🧀 | 2 cups | Shredded, block preferred |
| Gruyère Cheese 🧀 | 1 cup | Shredded, aged for flavor |
| Cream Cheese 🧈 | 8 oz | Full-fat for creaminess |
| Heavy Cream 🥛 | ½ cup | Whole milk for richness |
| Fresh Broccoli 🥦 | 2 cups | Florets, steamed tender-crisp |
| Red Bell Pepper 🌶️ | 1 whole | Diced, roasted for sweetness |
| Garlic Cloves 🧄 | 4 cloves | Minced, fresh preferred |
| Unsalted Butter 🧈 | ½ cup | Melted, for crispy topping |
| Panko Breadcrumbs 🍞 | ½ cup | Toasted for extra crunch |
| Diamond Crystal Kosher Salt 🧂 | 1 ½ tsp | Adjust to taste |
| Ground Black Pepper 🌶️ | ½ tsp | Freshly ground for heat |
| All-Purpose Flour 🌾 | 1 tbsp | For sauce thickening |
| Fresh Parsley 🌿 | ¼ cup | Chopped, for garnish |
The cheeses are non-negotiable here. Sharp cheddar delivers that classic tang, while Gruyère adds nutty depth—both should be freshly grated from blocks. Whole Foods or Wegmans carry excellent aged Gruyère, but any specialty cheese shop will do. For the broccoli and bell pepper, freshness is key—look for vibrant florets and crisp peppers at the store. If you're short on time, frozen steamed veggies (thawed and drained) work in a pinch, though fresh always tastes better. The garlic should smell pungent, not musty—buy it fresh or freeze whole cloves in the freezer for up to 6 months.
No sharp cheddar? Pepper Jack adds a little kick, or Monterey Jack for milder flavor. Swapping Gruyère? Parmesan or Emmental work, though they won't be identical. The heavy cream can be substituted with half-and-half for lighter texture or whole milk for a less rich version. For the veggies, zucchini or cauliflower blend beautifully—just adjust cooking time to maintain tender-crisp texture. The panko topping is essential for that crispy finish, but regular breadcrumbs toasted in butter will work too. If you're watching calories, reduce butter by half and use a sprinkle of nutritional yeast for flavor.
This dish reheats beautifully—cover with foil to prevent drying out. Leftovers keep for 4-5 days in the fridge, though I rarely have any. For meal prep, portion into individual containers and freeze for up to 3 months. The crispy topping loses its crunch when reheated, so broil for 2 minutes after reheating to restore it. Fresh parsley adds a pop of color and freshness—store stems in a jar of water like flowers to keep it fresh longer. The sauce thickens as it cools, so add a splash of milk if it seems too stiff when reheating.
Why You'll Love This Recipe
- One-Pot Magic: I swear by this recipe when I’m too tired to scrub pots—just toss the mac, veggies, and cheeses into one baking dish, mix it all up, and walk away. The Gruyère melts into that golden, stretchy blanket while the sharp cheddar adds bite, and honestly? I’ve never had a baked mac that’s easier to make or cleaner to finish.
- Creamy Cheese Love: Between us, the combo of Gruyère and cream cheese is chef’s kiss—Gruyère’s nutty depth pairs perfectly with the sharp cheddar, while the cream cheese keeps it lusciously smooth. The heavy cream ties it all together, making every bite rich without being heavy. (Yes, even my picky husband asks for seconds.)
- Lunchbox Hero: This isn’t just a dinner dish—it’s my go-to for meal prep. Bake a big batch, slice it up, and pack it in containers for the week. The veggies (broccoli, spinach, or roasted peppers—your pick) stay tender, and the cheesy layers hold up like a dream. My kids actually eat their veggies this way. (Small victories.)
- Budget-Friendly Luxe: Sharp chedddar and Gruyère might sound fancy, but a block of each goes a long way—this recipe feeds four for under $10. The heavy cream and cream cheese add richness without breaking the bank, and leftovers? They’re even better the next day, reheated until bubbly and crispy on top. (Not the prettiest, but the taste makes up for it.)
Step-by-step instructions for baked mac and cheese with veggies
Here's how to create a creamy, cheesy masterpiece with hidden veggies and that perfect crispy topping.
Cook the Macaroni and Prepare the Veggies
Start by boiling the 1.5 lbs elbow macaroni in salted water until it reaches al dente texture—about 1 minute less than the package instructions. Drain thoroughly and set aside. While the pasta cooks, cut the 2 cups fresh broccoli into small florets and dice the 1 whole red bell pepper into small pieces.
In a separate skillet, roast the bell pepper and broccoli with 4 cloves minced garlic over medium heat for 5-7 minutes until the vegetables soften slightly. You're not cooking them fully—they'll finish in the oven. This step develops their natural sweetness and removes any bitterness. Season lightly with ½ teaspoon ground black pepper and set aside.
Build the Ultimate Cheese Sauce
In a large mixing bowl, combine the 2 cups sharp cheddar cheese, 1 cup gruyère cheese, 8 oz cream cheese, and ½ cup heavy cream. I like to shred the cheeses finely so they melt completely—no one wants chewy cheese bits in their mac and cheese. Add the 1 tablespoon all-purpose flour and 1.5 teaspoons diamond crystal kosher salt to help thicken the sauce and balance flavors.
Using a hand mixer or whisk, blend everything together until you have a smooth, velvety cheese mixture. The sauce should be thick but still pourable—like a rich, creamy batter. If it looks too thick, add 1 tablespoon of pasta water to loosen it. This is where the magic happens—the perfect balance of sharp cheddar, nutty gruyère, and creamy texture that makes this dish irresistible.
Combine Everything in a Baking Dish
In a large, oven-safe baking dish (I use a 9x13-inch dish for this recipe), combine the cooked macaroni, roasted vegetables, and cheese sauce. Stir everything together until the macaroni is fully coated in the cheese mixture. You want every bite to be packed with flavor and texture—no dry pasta here!
Spread the mixture evenly in the dish, pressing down gently with a spatula to ensure even cooking. This step is crucial for creating that perfect baked texture throughout. The roasted veggies will be hidden but still contribute their sweet, caramelized flavors to each bite. The dish should look creamy and inviting, ready for the crispy topping.
Create the Crispy Topping
In a small bowl, mix the ½ cup melted unsalted butter with the ½ cup panko breadcrumbs. The butter helps bind the breadcrumbs and creates that golden, crispy crust we're after. Spread this mixture evenly over the top of the mac and cheese, pressing down gently to ensure full coverage.
Here's the thing—I always toast the panko breadcrumbs in a dry skillet for 2-3 minutes before mixing with butter. This extra step adds an amazing crunch that makes the difference between good and spectacular. Bake the dish uncovered at 375°F for 20-25 minutes until the top is deep golden brown and the edges are bubbling.
Rest and Serve with Fresh Garnish
Remove the mac and cheese from the oven and let it rest for 5-10 minutes. This resting period is essential—it allows the cheese to set slightly and makes the crispy topping even more satisfying. While it rests, chop the ¼ cup fresh parsley finely and sprinkle it over the top for a pop of color and freshness.
Serve immediately with a side salad or steamed vegetables. The contrast between the creamy, cheesy mac and cheese and the crispy, golden topping is what makes this dish truly special. Each bite delivers that perfect combination of textures and flavors—creamy, cheesy goodness with hidden veggies and a satisfying crunch on top. Trust me, this is the mac and cheese you'll want to make again and again!
Pro Tips For Making Baked Mac And Cheese Recipe With Veggies
- STEAM FIRST, BAKE SECOND: Drain the cooked pasta, then spread it in a single layer on a baking sheet and let it steam-dry for 5 minutes in the oven at 350°F (175°C). This removes surface moisture so the cheese sauce clings instead of pooling—no more soggy bottoms. (Yes, it’s weird to open the oven twice, but it works.)
- GRATE CHEESE FINE: Skip the food processor for sharp cheddar and Gruyère—hand-grate them over a bowl to catch every last bit of fat and texture. The finer the shreds, the smoother the melt, and you’ll avoid those stubborn, unmelted cheese clumps lurking in your bites. (I learned this the hard way after pulling out a rock-hard chunk.)
- DON’T OVERMIX THE SAUCE: Once the cheese and cream are melted, stir just until combined—no need to go full-on pasta maker. Overworking the sauce incorporates too much air, which can make the top layer dry out faster. A few lumps? That’s fine; they’ll melt into creamy perfection in the oven.
- BROIL FOR THE CRUST: Switch to broil for the last 2–3 minutes, keeping a close eye on it—this is how you get that golden, crispy top without burning the veggies underneath. Watch the edges, not the center, and be ready to pull it out fast. (Your future self will thank you for not walking away.)
Regional styles of these flavors
New England Crispy
In my Boston neighborhood, we take our mac and cheese seriously—especially when we sneak in veggies. The classic New England style here uses extra crispy breadcrumbs on top, almost like a cheesy cornbread crust.
I like to add a pinch of nutmeg to the cheese sauce for that familiar New England warmth. The roasted bell peppers and broccoli get mixed right into the pasta, but the crispy topping makes it feel indulgent. 🌟
Southern Comfort Style
Down South, they love their mac and cheese rich and saucy, often with a touch of smoked Gouda for depth. I swap the Gruyère for smoked cheddar and add a dash of paprika to the breadcrumb topping for a subtle smoky kick.
The veggies here get a little extra love—steamed with andouille sausage (optional) for a Cajun-inspired twist. Serve with a side of collard greens for a true Southern meal. 🔥
Italian-Inspired Twist
My Italian roots come through with this version, where I add sun-dried tomatoes and spinach to the veggie mix. The cheese blend shifts to include Pecorino Romano instead of Gruyère, and I finish with a sprinkle of red pepper flakes for heat.
The crispy topping gets a touch of grated Parmesan mixed into the panko for extra umami. It's like a cheesy lasagna in mac and cheese form! 🧀
Midwest Heartland
In the Midwest, they keep it simple but hearty. This version uses Monterey Jack instead of Gruyère and adds corn kernels to the veggie mix for sweetness.
The breadcrumb topping gets a sprinkle of crushed cornflakes for extra crunch. It's a crowd-pleaser that feels nostalgic and comforting—perfect for potlucks or family dinners. 💛
West Coast Lightness
Out West, they like their mac and cheese lighter but still flavorful. I use half-and-half instead of heavy cream and add roasted zucchini and asparagus to the veggie mix. The cheese blend includes fontina for a milder, creamier flavor.
The crispy topping gets a sprinkle of toasted pine nuts for a nutty crunch. It's a fresher take that still delivers on cheesy goodness. 🌿
Nutrition facts
Frequently asked questions
Can I use frozen veggies instead of fresh?
Frozen broccoli and bell peppers work perfectly—just thaw and drain them well first. For best texture, steam them for 2-3 minutes until tender-crisp before mixing into the cheese sauce. Avoid overcooking frozen veggies, or they'll turn mushy in the oven.
Why did my mac and cheese get watery?
This usually happens when the pasta overcooks and releases too much starch, or the cheese sauce isn't thick enough. Cook pasta al dente (1 minute less than package time) and let it cool slightly before mixing. For extra insurance, stir 1 tablespoon flour into the cheese sauce to help bind it.
Can I make this ahead of time?
Yes! Assemble the dish (without the topping) up to 24 hours ahead and refrigerate. When ready to bake, cover with foil and bake at 375°F for 30 minutes (the extra time compensates for cold start). For the crispy topping, add fresh breadcrumbs and broil for 2-3 minutes at the end.
What's the best way to reheat leftovers?
Cover with foil and warm in the oven at 350°F for 15-20 minutes until heated through. For extra crispiness, broil for 1-2 minutes after removing foil. Microwave reheating works but will make the topping soggy—avoid it if you want that perfect texture.
Can I make this vegan?
You can adapt it! Replace dairy cheeses with vegan cheeses (like Violife or Daiya) and use cashew cream instead of heavy cream. For the crispy topping, try crushed nuts or vegan breadcrumbs with olive oil. The texture will differ, but it can still be delicious with the right ingredients.