
Salads
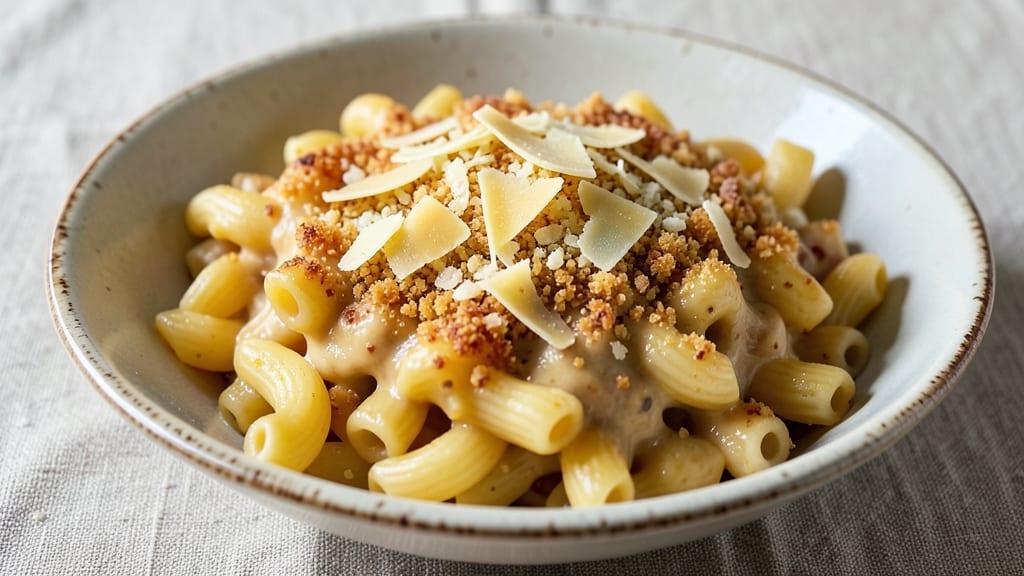
Anthony's Pasta Mac and Cheese delivers that perfect combination of creamy, cheesy goodness with a crispy, golden top—all in one pan. This recipe transforms simple ingredients into a restaurant-quality dish that's surprisingly easy to make at home. The secret lies in the roux and cheese blend, which creates a velvety sauce that coats every noodle perfectly.
What makes this mac and cheese stand out is the crispy breadcrumb topping, achieved by baking the dish until bubbly and golden. The technique ensures the pasta stays al dente while the cheese melts into a smooth, rich sauce.
Whether you're feeding a family or hosting a dinner party, this one-pan wonder is always a crowd-pleaser.
You'll start with elbow macaroni cooked to perfection, then build the cheese sauce from scratch using a roux, heavy cream, and a blend of sharp cheddar, Gruyère, and cream cheese.
The sauce is thickened just enough to cling to the pasta without being gluey, creating that signature creamy texture we all love.
Finish with a layer of buttery breadcrumbs that turn golden and crispy under the broiler, adding texture and flavor. The result is a dish that's comforting, indulgent, and impossible to resist. Ready in about 45 minutes, this mac and cheese is the ultimate weeknight dinner or party favorite.
Ingredients for anthony's pasta mac and cheese
Pantry staples plus a few specialty cheeses make this restaurant-worthy mac and cheese.
| Ingredient | Amount | Notes |
|---|---|---|
| Elbow Macaroni 🍝 | 12 oz | Al dente preferred |
| Unsalted Butter 🧈 | ½ cup | Cold, cubed for roux |
| All-Purpose Flour 🌾 | ½ cup | For roux base |
| Heavy Cream 🥛 | 1 cup | Full-fat for richness |
| Sharp Cheddar Cheese 🧀 | 2 cups | Shredded, block preferred |
| Gruyère Cheese 🧀 | 1 cup | Shredded, nutty flavor |
| Cream Cheese 🧀 | 4 oz | Room temperature |
| Yellow Onion 🧅 | 1 whole | Small, finely diced |
| Garlic Cloves 🧄 | 3 cloves | Minced for flavor |
| Panko Breadcrumbs 🍞 | ½ cup | For crispy topping |
| Salt 🧂 | 1 ½ tsp | Kosher or sea salt |
| Ground Black Pepper 🌶️ | ½ tsp | Freshly ground |
| Mustard Powder 🌶️ | ½ tsp | For depth of flavor |
| Nutmeg 🌿 | ¼ tsp | Freshly grated |
The cheeses are what make this stand out. Gruyère adds that nutty depth while sharp cheddar brings the tang—don't skimp on either. Wegmans or Whole Foods usually have great pre-shredded options, but grating your own makes a huge difference. For the onion, I grab a small yellow from the grocery store's produce section—just one, finely diced. The garlic? Three cloves is perfect—no need to overdo it. And the butter? Cold, cubed cubes make the roux smoother than melting it first.
No Gruyère? Parmesan or white cheddar works in a pinch, though the flavor won't be identical. Pre-shredded cheese gets clumpy—trust me, grate your own. The mustard powder is non-negotiable for that classic mac and cheese bite, but if you're out, a pinch of Dijon mustard in the sauce works. For the breadcrumbs, panko gives the best texture, but regular breadcrumbs toasted in the oven work too. The nutmeg? A tiny amount makes all the difference—don't skip it, but don't overdo it either.
This makes enough for 4 hearty servings, with leftovers that reheat beautifully. Store in an airtight container in the fridge for 4-5 days—the flavor actually improves overnight as everything melds. For freezing, portion into single servings before adding the breadcrumb topping. Freezes for 3 months, though the texture changes slightly after thawing. Pro tip: Make the sauce ahead and reheat gently—it's even better the next day.
Why You'll Love This Recipe
- One-Pot Magic: I swear by this recipe because it’s literally one pot—no extra bowls, no messy strainers. Just melt butter, whisk in flour and cream, toss in the pasta, and let it all simmer until that golden, velvety cheese clings to every noodle like it’s been best friends forever.
- Sharp & Creamy: That sharp cheddar isn’t just in there—it’s the star. The heavy cream keeps it luscious, but the cheese? It cuts through with that perfect tang, so every bite has that oh yeah moment. (Between us, I’ve been known to sneak bites straight from the pot.)
- Weeknight Hero: This is my go-to when I need something fast but still feels fancy. Toss in a handful of breadcrumbs for crunch, or swap the cheddar for pepper jack if you’re feeling spicy. It’s the kind of dish that works for a lazy Tuesday or a dinner party—no one will guess how little effort it took.
- Budget Buster: Elbow mac, butter, flour, cream—these are all pantry staples that won’t break the bank. A single batch stretches to leftovers that reheat like a dream, and the flavor only gets richer the next day. Honestly? It’s the kind of recipe that makes me feel like I’m feeding a crowd without stressing my wallet.
Step-by-step instructions for anthony's pasta mac and cheese
Here's how to make this creamy, crisp-topped masterpiece that's foolproof every time.
🍳 Step 1: Cook the Pasta Al Dente and Sauté the Aromatics
Start by boiling the 12 oz elbow macaroni in a large pot of well-salted water until it's al dente—about 2 minutes less than the package instructions. You want it to have a slight bite when you taste it. While the pasta cooks, heat 0.5 cup unsalted butter in a deep skillet over medium heat. Add the finely diced 1 whole yellow onion and cook for 5 minutes until soft and translucent.
Add the 3 minced garlic cloves and cook for another 30 seconds until fragrant—don't let it brown or it'll turn bitter. Here's the thing: the onion and garlic form the flavor base for your sauce, so take your time and let them cook gently. If you rush this step, the finished dish will taste flat.
🍳 Step 2: Build the Creamy Cheese Sauce
Reduce the heat to medium-low and sprinkle the 0.5 cup all-purpose flour over the onions and garlic. Stir constantly for 1-2 minutes until the mixture forms a smooth, pale roux—this should look like wet sand and smell nutty. Slowly whisk in the 1 cup heavy cream and bring the mixture to a gentle simmer.
Now it's time for the cheeses. Reduce the heat to low and gradually add the 2 cups sharp cheddar cheese, 1 cup gruyère cheese, and 4 oz cream cheese, stirring constantly until completely melted and smooth. If the sauce starts to look too thick, add 2-3 tablespoons of pasta water to loosen it. The sauce should be velvety and coat the back of a spoon—this is where the magic happens.
🥘 Step 3: Combine Pasta and Sauce
Drain the pasta and add it directly to the skillet with the cheese sauce. Stir everything together over low heat for 2-3 minutes until the pasta is fully coated and the sauce has thickened slightly. Season with 1.5 tsp salt, 0.5 tsp ground black pepper, 0.5 tsp mustard powder, and 0.25 tsp nutmeg. The mustard powder adds depth, while the nutmeg gives that classic mac and cheese aroma—don't skip these!
Taste and adjust seasoning if needed. This is your chance to make sure every bite is perfectly balanced—salty, creamy, and just a touch of warmth from the spices. If you're serving immediately, you can skip the next step, but for that perfect crispy topping, keep reading.
🔥 Step 4: Create the Crispy Breadcrumb Topping (Optional but Worth It!)
Preheat your broiler to high. Transfer the mac and cheese to a baking dish and spread it out evenly. In a small bowl, mix together the 0.5 cup panko breadcrumbs with 1 tablespoon melted butter. Sprinkle this mixture evenly over the top of the mac and cheese, pressing down gently with a spatula so it sticks.
Place the baking dish under the broiler for 2-3 minutes until the breadcrumbs turn golden brown and crispy. Watch it closely—it goes from perfect to burnt in seconds! The crispy topping adds texture contrast that makes this dish truly special. Let it cool for 2 minutes before serving to let the topping set slightly.
Pro Tips For Making Anthony'S Pasta Mac And Cheese
- Cook Pasta Al Dente: I learned this the hard way—overcooked macaroni turns to mush in that rich cheese sauce. Pull it out when it’s still slightly firm (about 1 minute less than package instructions) and finish cooking in the sauce. The starch from the pasta will thicken the sauce naturally, and you’ll avoid that sad, gluey texture.
- Melt Cheese Slowly: Dump shredded cheddar into simmering cream all at once, and you’ll end up with grainy bits instead of smooth silk. Instead, whisk in small batches while stirring constantly—about ¼ cup at a time—until fully melted. If it looks too thick, splash in a tablespoon of warm milk or cream.
- Avoid Lumpy Roux: Whisking butter and flour into a roux is where most home cooks mess up. Use a wooden spoon and keep the heat medium-low—if it smells burnt, you’ve gone too far. Cook for exactly 2 minutes, no longer, or you’ll taste raw flour. This is the thing that matters most for that creamy, velvety base.
- Rest Before Serving: Skimp on this step, and your mac and cheese will slide right off the plate. Transfer the finished dish to a warm, covered casserole and let it sit for 5 minutes. The sauce will thicken further, the cheese will set slightly, and you’ll get that perfect pull-apart texture—no sticky mess at the bottom. (Yes, even if you’re impatient like me.)
Perfect pairings for this dish
Classic Side Dishes
Simple steamed broccoli with a squeeze of lemon brightens the richness of this creamy mac and cheese. I toss 2 cups broccoli florets with 1 tablespoon olive oil and ½ teaspoon red pepper flakes, then steam for 5-6 minutes until tender-crisp.
The peppery bite balances the cheesy indulgence perfectly. 🥦
A crisp green salad with a tangy vinaigrette adds freshness to the meal. I combine 4 cups mixed greens with 2 tablespoons balsamic vinegar, 1 tablespoon Dijon mustard, and 3 tablespoons olive oil.
Add ½ cup cherry tomatoes and ¼ cup crumbled feta cheese for extra texture and flavor.
Protein Add-Ons
For a heartier meal, add grilled chicken breast sliced into strips. I marinate 1 lb boneless chicken breast in 2 tablespoons olive oil, 1 teaspoon garlic powder, ½ teaspoon smoked paprika, and ½ teaspoon salt for 30 minutes before grilling.
The smoky flavor pairs beautifully with the creamy mac and cheese.
Crispy bacon is another fantastic addition. I cook 6 slices bacon until crispy, then chop into small pieces. Sprinkle the bacon over the top of the mac and cheese before broiling for that extra layer of savory crunch. 🥓
Beverage Pairings
A cold light beer cuts through the richness of the dish. I recommend a crisp American lager like Bud Light or Coors Banquet—their mild hop profile won’t overpower the creamy flavors. For a non-alcoholic option, try a sparkling lemonade with a hint of mint for a refreshing contrast.
For wine lovers, a Chardonnay with a touch of oak complements the creamy sauce beautifully. Look for a California Chardonnay with notes of vanilla and citrus—it enhances the nutty Gruyère and sharp cheddar. A Riesling with its slight sweetness also works wonderfully, especially if you prefer a fruitier profile. 🍷
Nutrition facts
Frequently asked questions
Can I make this mac and cheese without Gruyère?
If you can't find Gruyère, substitute with 1 cup Parmesan cheese or white cheddar for a similar nutty flavor. The key is to maintain the same total cheese quantity (about 3 cups total) to keep the sauce rich and creamy. Just note that Gruyère adds a unique depth that's hard to replicate.
How do I fix a sauce that's too thick or too thin?
For a thick sauce, stir in 2-3 tablespoons of pasta water gradually until smooth. If it's too thin, simmer uncovered for 2-3 minutes to reduce, or add 1 tablespoon cornstarch mixed with 2 tablespoons cold water while stirring constantly. The sauce should coat the back of a spoon but still be pourable.
Can I bake this mac and cheese instead of broiling?
Yes! Transfer the assembled dish to a 400°F oven for 15-20 minutes until bubbly and the breadcrumbs are golden. Baking gives a slightly softer topping but still delicious. For extra crispiness, broil for 2 minutes at the end. Use an oven thermometer to ensure accurate temperature.
What's the best way to reheat leftovers?
Place leftovers in a microwave-safe dish with 1-2 tablespoons of water or milk and cover loosely. Heat in 30-second intervals stirring between each, until warmed through (90-120 seconds total). For oven reheating, cover with foil and bake at 350°F for 15-20 minutes—this preserves the crispy topping better.
Why did my breadcrumbs not get crispy?
This usually happens from insufficient butter or under-baking. Mix 1 tablespoon melted butter with the breadcrumbs and press them firmly onto the top. For best results, broil on high for 2-3 minutes until golden brown—watch closely to prevent burning! If the topping stays soft, broil for 30 seconds after the initial baking to crisp it up.