
Breakfast & Brunch
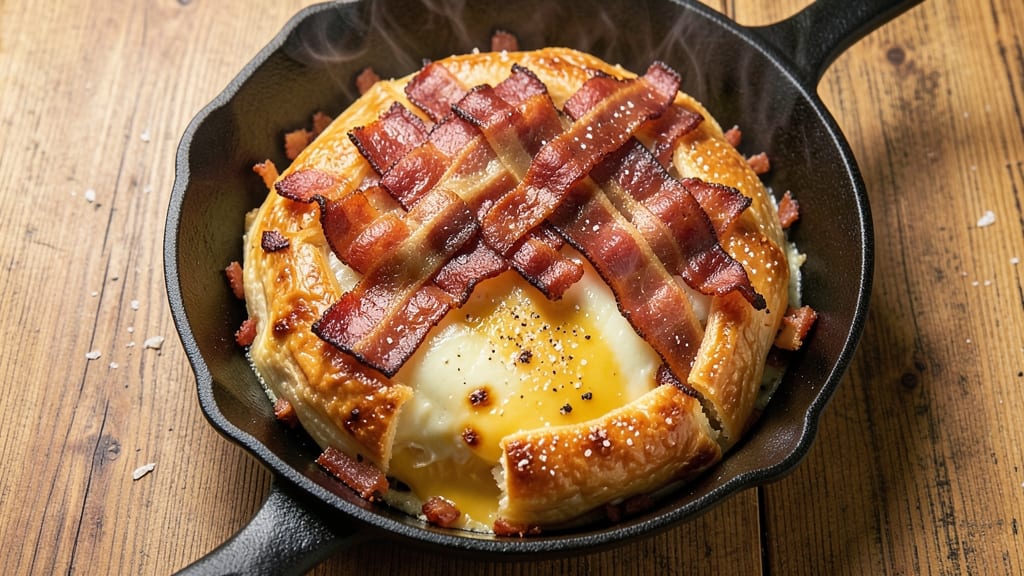
This bacon cheese bomb recipe delivers the ultimate pull-apart indulgence with crispy layers, smoky bacon, and gooey melted cheese—every bite is a game-changer for brunch or appetizers. The secret lies in a perfectly balanced dough that stays golden and crispy while encasing layers of salty, savory goodness.
I've perfected this recipe after countless test batches, ensuring the cheese stays stretchy and the bacon adds just the right amount of crunch.
What sets these apart is the triple-layered construction: a crispy outer shell, tender dough layers, and a filling so rich it practically oozes when you cut in.
Whether you deep-fry for maximum crispiness or bake for a lighter version, the result is always the same—addictive, pull-apart perfection that disappears faster than you can say "second helping." The dough is simple, the filling is foolproof, and the technique is designed to impress even if you're a beginner.
By the time you're done, you'll have a platter of golden, bubbling bacon cheese bombs that look as impressive as they taste. The aroma alone will have everyone gathering around, and the first bite delivers that perfect balance of crispy, chewy, and melty textures.
Serve with a side of ranch or honey mustard for dipping, and prepare for requests to make them again—and again.
This recipe works equally well for weekday breakfasts, weekend brunches, or game-day appetizers, making it versatile enough for any occasion. The beauty of these bombs is that they can be prepped ahead and reheated, so you're always ready for last-minute guests or cravings.
Let's get started on creating your own batch of these irresistible bites!
Ingredients for bacon cheese bomb
Twelve ingredients transform into golden, bubbling bacon cheese bombs that disappear faster than you can say 'second helping.'
| Ingredient | Amount | Notes |
|---|---|---|
| All-Purpose Flour 🌾 | 4 cups | Sifted for light texture |
| Unsalted Butter 🧈 | ½ cup | Cold, cubed for dough |
| Heavy Cream 🥛 | ½ cup | Cold for flaky layers |
| Ice Water 💧 | ¼ cup | Chilled for dough handling |
| Bacon 🥓 | 12 oz | Thick-cut, chopped small |
| Sharp Cheddar Cheese 🧀 | 1 ½ cups | Shredded, aged variety |
| Monterey Jack Cheese 🧀 | 1 cup | Shredded, mild flavor |
| Pepper Jack Cheese 🧀 | ½ cup | Shredded, for heat |
| Granulated Sugar 🍚 | 1 tbsp | For dough sweetness |
| Salt 🧂 | 1 tsp | Diamond Crystal preferred |
| Black Pepper 🌶️ | ½ tsp | Freshly cracked |
| Garlic Powder 🧄 | ½ tsp | For subtle depth |
| Vegetable Oil 🫒 | 2 cups | For deep-frying |
| Cornstarch 🌾 | ¼ cup | For oil clarity |
The cheese blend is where magic happens—sharp cheddar for that classic tang, Monterey Jack for creaminess, and just enough pepper jack to keep things interesting. Trader Joe's has the best pre-shredded blends, but if you're buying blocks, grate them yourself for that perfect pull. The bacon? Thick-cut from Costco gives you the best crunch-to-cheese ratio. Chop it into tiny pieces so every bite has that smoky punch without overwhelming the delicate dough. And that flour? King Arthur or Gold Medal for a lighter texture—don't skimp on quality here.
No thick-cut bacon? Regular bacon chopped extra fine works in a pinch, but it'll be less crispy. Short on sharp cheddar? Extra sharp or pepper jack will work**, but you'll lose that classic flavor. The dough needs to stay cold—chill it between layers for easier handling. For the oil, vegetable or canola is perfect, but stay away from olive oil—it burns too easily. And if you're baking instead of frying, spray the pan with oil and bake at 400°F for 15-18 minutes until golden. The secret to perfect bombs? Don't overfill—keep the cheese ratio tight.
These stay fresh for 3 days in the fridge, but they're best on day one. For make-ahead prep, freeze uncooked dough balls with filling for up to 2 months—just fry straight from frozen. Reheat in the oven at 375°F for 5-7 minutes to revive that crispy shell. And if you're making a crowd version? Double the recipe—they disappear just as fast, but with more leftovers for seconds.
Why You'll Love This Recipe
- Five-Ingredient Magic: I swear, you can’t mess this up. Flour, butter, cream, ice water—basically pantry staples—and bacon. That’s it. No fancy substitutions, no last-minute grocery runs. Even when I’m staring at a half-empty fridge, this recipe saves me.
- Crispy-Creamy Obsession: That first bite? Chef’s kiss. The outside gets golden and shatteringly crisp while the inside stays rich, almost custardy—like a hug from a deep-fried cloud. The bacon adds this smoky, salty punch that makes every forkful feel like a reward.
- Game Day Hero: Between us, this is my go-to for tailgates, movie nights, or when I need to feed a crowd without slaving in the kitchen. Cut them into wedges, and suddenly you’ve got a snack that’s fancy enough for guests but easy enough to make while the game’s on.
Step-by-step instructions for triple-layered bacon cheese bombs
Here's how to assemble these addictive triple-layered bites with perfect crunch and gooey centers.
Prepare the Crispy Bacon Layer
Preheat your oven to 400°F and line a baking sheet with parchment paper. Chop the 12 oz bacon into ¼-inch pieces using a sharp chef's knife. Spread the bacon pieces evenly on the prepared sheet, leaving space between them for crisping.
Bake for 12-15 minutes until the bacon is deep golden brown and fully crisp. Watch carefully after 10 minutes—it cooks quickly and can burn. Transfer the cooked bacon to a paper towel-lined plate to drain excess fat. Let it cool completely before using, about 10 minutes—this prevents soggy layers later.
Make the Triple-Layered Dough
In a large mixing bowl, combine the 4 cups All-Purpose Flour, 1 tbsp Granulated Sugar, 1 tsp Salt, 0.5 tsp Black Pepper, and 0.5 tsp Garlic Powder. Whisk until evenly distributed. Cut in the 0.5 cup Unsalted Butter using a pastry cutter or your fingers until the mixture resembles coarse crumbs with pea-sized butter pieces remaining.
Add the 0.5 cup Heavy Cream and mix until the dough begins to come together. Then add the 0.25 cup Ice Water gradually, mixing just until the dough forms a shaggy mass. Avoid overmixing—this develops gluten and makes the bombs dense. Turn the dough onto a lightly floured surface and knead gently 6-8 times until just combined. Divide into three equal portions.
Assemble the Triple-Layered Bombs
Roll out each dough portion into a ¼-inch thick rectangle on a floured surface. Cut each rectangle into 12 equal squares (you should have 36 squares total). Place one square of dough on a parchment-lined baking sheet. Sprinkle with about 1 tablespoon of the cooled bacon pieces, then top with another dough square. Repeat, finishing with a third dough layer on top.
Press down gently on each assembled bomb to ensure good adhesion between layers. This triple-layer construction creates the signature pull-apart texture. Arrange the bombs on the baking sheet with about 1 inch between each for even baking. Cover with a clean kitchen towel and refrigerate for 30 minutes to firm up the layers.
Create the Gooey Cheese Center
In a small microwave-safe bowl, combine the 1.5 cups Sharp Cheddar Cheese, 1 cup Monterey Jack Cheese, and 0.5 cup Pepper Jack Cheese. Microwave in 20-second intervals, stirring between each, until the cheese is fully melted and smooth—about 1 minute total. The mixture should be pourable but not too runny. If needed, add 1 teaspoon of the 0.25 cup Ice Water to reach the right consistency.
Using a piping bag fitted with a ½-inch round tip, pipe about 1 teaspoon of cheese mixture into the center of each assembled bomb. Be generous but not overflowing—you want a substantial center that creates that signature pull-apart effect. Work quickly as the cheese begins to set as it cools.
Fry to Golden Perfection
In a deep fryer or heavy pot, heat 2 cups Vegetable Oil to 350°F. Stir in the 0.25 cup Cornstarch to help clarify the oil and prevent excessive foaming. Fry the cheese bombs in batches of 4-5 pieces for 2-3 minutes until they rise to the surface and develop a deep golden brown crust. Use tongs to turn them gently for even browning.
Drain the fried bombs on a wire rack set over a baking sheet lined with paper towels. They'll be extremely hot and crispy—let them rest for 2 minutes before serving. The internal cheese should be fully melted and gooey, while the exterior maintains that satisfying crunch. Serve immediately while hot for the ultimate pull-apart experience.
Pro Tips For Making Bacon Cheese Bomb
- Chill the Dough Properly: I learned this the hard way—skipping the fridge or freezer for 30 minutes before rolling makes the dough stickier than a greasy spoon. Cold butter and flour need time to firm up, or your cheese bombs turn into sad, flat pancakes.
- Crisp the Bacon First: Cook the bacon until it’s almost done—just past the bendy stage—and drain it on paper towels. That extra crispiness carries through the dish, and it won’t make your filling soggy when mixed in later.
- Don’t Overmix the Batter: After folding in the bacon and cheese, stir just until combined. Overmixing develops gluten, and your bombs will turn out dense instead of light and fluffy. Think "marbled," not "homogeneous."
- Use Room-Temp Heavy Cream: Cold cream creates lumps that won’t dissolve, no matter how much you whisk. Let it sit for 10 minutes before mixing—your future self will thank you when the filling stays smooth and velvety.
Make-ahead tips for this dish
Prep Ahead
Assemble the dough and bacon layers up to 24 hours in advance—wrap tightly in plastic wrap and refrigerate. This chilling time actually improves the texture by reducing gluten development.
I like to shape them into balls and refrigerate overnight for easier handling later. The cheese filling should be prepared fresh, though, as pre-melting can cause separation. 💫
Freezer Storage
Freeze uncooked, assembled bombs on a parchment-lined tray for 1 hour, then transfer to a ziplock bag for up to 2 months. Thaw in the fridge overnight before frying. For a shortcut, fry straight from frozen—just add 30 seconds to the cooking time.
The dough stays crispy even after freezing, though the cheese center may need a few extra seconds to melt completely.
Baking Alternative
Skip the deep-fryer by brushing assembled bombs with 1 tbsp melted butter and baking at 400°F for 15-18 minutes until golden. The texture will be slightly less crispy but still delicious.
I recommend this method for make-ahead parties—just reheat baked bombs in a 350°F oven for 5 minutes to revive the crunch.
Cheese Prep Shortcut
Save time by using pre-shredded cheese blends (like Trader Joe's 3-Cheese)—just add ½ tsp cornstarch to prevent clumping. For extra gooeyness, microwave the cheese in 15-second bursts, stirring vigorously between each. The cornstarch also helps the filling hold its shape during frying. 🧀
Batch Cooking
Double the recipe and freeze half for future cravings. I like to label bags with the date and cooking method (fry/bake) to avoid confusion later. For parties, arrange frozen bombs on a tray and bake at 375°F for 20-25 minutes, flipping halfway.
The crowd will never know they were prepped ahead!
Reheating Leftovers
Store cooked bombs in a single layer on a wire rack to maintain crispiness. Reheat in a 350°F oven for 3-5 minutes until warmed through. For microwave reheating, place on a paper towel and heat for 10-15 seconds**—this keeps them from getting soggy.
The cheese stays gooey, but the exterior loses some crunch, so I prefer oven reheating whenever possible.
Nutrition facts
Frequently asked questions
Can I make these bacon cheese bombs without deep-frying?
For a lighter version, brush assembled bombs with 1 tablespoon melted butter and bake at 400°F for 15-18 minutes until golden. The texture will be slightly less crispy but still delicious. This method is perfect for make-ahead parties—just reheat baked bombs in a 350°F oven for 5 minutes to revive the crunch.
What's the best way to store leftover bacon cheese bombs?
Store cooked bombs in a single layer on a wire rack to maintain crispiness. They'll stay fresh for 3 days in the fridge. For reheating, use a 350°F oven for 3-5 minutes to revive the crunch. For microwave reheating, place on a paper towel and heat for 10-15 seconds—this keeps them from getting soggy. The cheese stays gooey, but the exterior loses some crunch with microwave reheating.
Can I freeze the assembled bombs before cooking?
Yes! Freeze uncooked, assembled bombs on a parchment-lined tray for 1 hour, then transfer to a ziplock bag for up to 2 months. Thaw in the fridge overnight before frying. For a shortcut, fry straight from frozen—just add 30 seconds to the cooking time. The dough stays crispy even after freezing, though the cheese center may need a few extra seconds to melt completely.
What's the secret to getting the cheese perfectly gooey?
Use a blend of cheeses—sharp cheddar for tang, Monterey Jack for creaminess, and just enough pepper jack for heat. Microwave the cheese in 20-second intervals, stirring between each, until fully melted and pourable. Add ½ teaspoon cornstarch to pre-shredded cheese blends to prevent clumping and help the filling hold its shape during frying.
How do I prevent the dough from getting soggy?
Keep the bacon fully cooled before assembling the layers, and refrigerate the assembled bombs for 30 minutes before frying. Avoid overfilling with cheese—use about 1 teaspoon per bomb to maintain the crispy shell. Also, fry in batches of 4-5 pieces to avoid overcrowding, which can lower the oil temperature and lead to soggy results.