
Appetizers
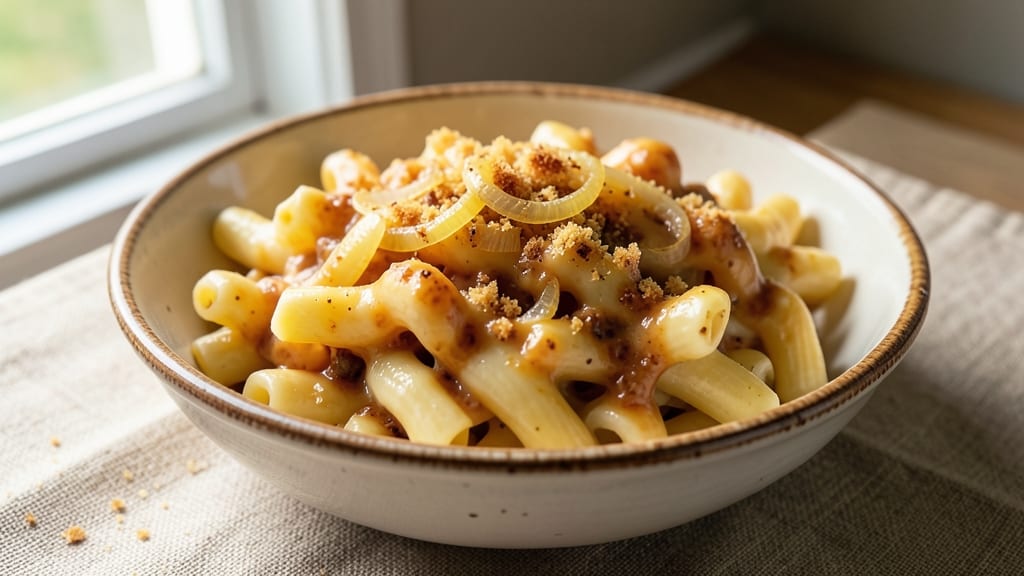
This authentic mac and cheese recipe delivers the creamy, cheesy perfection Southern kitchens are famous for—no shortcuts, no substitutes. The secret lies in a proper roux and sharp cheddar, cooked low and slow until the sauce clings to every noodle like it belongs there.
I've perfected this stovetop version after years of testing, and it's the one that finally convinced my family we didn't need takeout.
What sets this apart is the technique: a slow-cooked roux that forms the foundation, melted cheddar that gets properly emulsified, and just enough cream to create that signature velvety texture without breaking.
We're talking about the kind of mac and cheese that makes you want to eat it straight from the pot—no fancy plating required. The key ingredients are simple but critical: high-quality cheddar, butter, flour, and pasta water (don't skip that!).
By the time you're done, you'll have a pot of golden, bubbling mac and cheese with a sauce so rich it coats every noodle perfectly. The cheese stretches beautifully when you pull it apart, and each bite delivers that perfect balance of sharp cheddar flavor and creamy comfort.
This is the kind of dish that turns ordinary weeknights into special occasions.
Whether you're making it for a family dinner or a holiday gathering, this recipe scales beautifully while maintaining that authentic Southern taste. The stovetop method means no oven required, just one pot to clean when you're done.
Let's get started on making the most comforting mac and cheese you've ever tasted.
Ingredients for authentic mac and cheese
Sharp cheddar, rich butter, and that golden roux—simple ingredients for Southern-style comfort.
| Ingredient | Amount | Notes |
|---|---|---|
| Elbow Macaroni 🍝 | 12 oz | Dry pasta, medium or small shape |
| Unsalted Butter 🧈 | ½ cup | High-quality, cut into small pieces |
| All-Purpose Flour 🌾 | ½ cup | Diamond Crystal preferred (spooned & leveled) |
| Sharp White Cheddar Cheese 🧀 | 2 cups | Shredded, block preferred (not pre-shredded) |
| Heavy Cream 🥛 | ½ cup | Full-fat for best texture |
| Yellow Onion 🧅 | 1 whole | Medium size, finely diced |
| Garlic Cloves 🧄 | 2 cloves | Fresh, minced |
| Salt 🧂 | 1 ½ tsp | Diamond Crystal kosher salt |
| Ground Black Pepper 🌶️ | ½ tsp | Freshly ground |
| Pasta Water 💧 | 1 ½ cups | Reserved from cooking pasta |
| Butter (for serving) 🧈 | 2 tbsp | Melted, optional garnish |
The cheddar is non-negotiable here. Sharp white cheddar from a block (like Sargento or Kraft Natural) melts smoother than pre-shredded—no anti-caking agents to ruin the texture. If you're using pre-shredded, pick the kind without additives. The butter matters too: Plugrá or Land O'Lakes are reliable, but nothing beats European-style butter for flavor. For the onion, yellow onions work best—they caramelize nicely without overpowering. Grab a medium one; you only need about a quarter of it. And that flour? Diamond Crystal measures differently than regular all-purpose, so spoon it lightly into your measuring cup.
No sharp cheddar? Mild cheddar plus a pinch of cayenne gets you closer, but it won't have that signature tang. Running out of butter? Olive oil works in a pinch, though it'll change the flavor slightly. Fresh garlic is ideal, but dried powder at half the amount works if you're in a rush. The pasta water is the secret weapon—don't drain it completely! That starchy water helps emulsify the sauce. If you're feeling fancy, add a splash of whole milk to the cream for extra richness. And if you're serving this to kids (or picky adults), keep some of the shredded cheese on the side so they can add it themselves—it's always more fun that way.
This reheats beautifully—just add a splash of milk or water to loosen it up. Keeps 4-5 days in the fridge, though it's best within 2 days for peak texture. For leftovers, store in an airtight container with a layer of plastic wrap pressed right on top to prevent a skin from forming. Freezes for 3 months if you want to make a big batch for holidays. I always double the recipe when I do this—it disappears faster than you'd think. And pro tip: serve it straight from the pot with crusty bread for dipping. No plates needed.
Why You'll Love This Recipe
- No-Fuss Pasta Night: I swear by elbow macaroni here—it holds the sauce better than those flimsy noodles. No boiling drama, no sticking mess; just dump, cook, and call it a win.
- Sharp Cheddar Magic: That sharp white cheddar? Chef’s kiss. It’s not some powdered nonsense—we’re talking real cheese melted into a velvety roux with butter and flour. The cream ties it all together like a warm hug.
- Potluck Proven: Between us, this is my go-to for gatherings. It’s hearty enough for a crowd but still feels special. Bake it in a cast-iron skillet, and suddenly you’re serving up restaurant-quality comfort food.
- Budget-Friendly Leftovers: Five bucks’ worth of ingredients stretches to feed four for dinner and lunch the next day. Honestly, the way the sauce clings to the pasta? You’ll find yourself sneaking seconds before you even realize it.
Step-by-step instructions for Southern-style stovetop mac and cheese
Here's how to make the creamy, stretchy mac and cheese your Southern grandma would be proud of.
Cook the Pasta Al Dente and Reserve Water
Bring a large pot of water to a rolling boil and add 1 teaspoon of the salt. Once boiling, add the 12 oz elbow macaroni and cook until 1 minute before the package instructions for al dente—this ensures it finishes cooking perfectly in the cheese sauce. Drain the pasta but don't rinse it; the starch clinging to the noodles helps create that signature creamy texture.
While the pasta cooks, keep an eye on the water level. Right before draining, scoop out 1.5 cups of the starchy pasta water into a measuring cup. This golden liquid is liquid gold—it's what transforms a basic cheese sauce into something velvety and rich. If you forget, don't worry; you can always add a splash of milk later, but pasta water has the perfect starch-to-water ratio for this dish.
Build the Roux for Creamy Foundation
In a large, heavy-bottomed pot (like a Dutch oven), melt the 0.5 cup unsalted butter over medium heat. Once the butter has fully melted and starts to foam, add the 0.5 cup all-purpose flour all at once. Stir constantly with a wooden spoon for 2-3 minutes until the mixture turns a light golden brown color and smells nutty—this is called a roux, and it's the secret to that silky texture.
Don't walk away during this step. If the roux darkens too much, it'll taste bitter. You're aiming for a color somewhere between peanut butter and toasted breadcrumbs. Once it reaches this perfect hue, immediately add the finely diced yellow onion and minced garlic cloves. Cook for another 1-2 minutes until the onions soften and become translucent but don't brown.
Create the Cheese Sauce with Proper Technique
Pour in the 0.5 cup heavy cream and stir vigorously to combine with the roux. Let it simmer for 1 minute until it thickens slightly. Now comes the crucial part: gradually add the 2 cups sharp white cheddar cheese, stirring constantly. I like to add about ½ cup at a time, letting each addition melt completely before adding more. This prevents clumping and ensures an ultra-smooth sauce.
Once all the cheese is incorporated, pour in ½ cup of the reserved pasta water and stir until the sauce becomes creamy and coats the back of a spoon. If it's too thick, add more pasta water 1 tablespoon at a time until you reach that perfect, coatable consistency. The sauce should be thick enough to cling to the pasta but still flow smoothly. Taste and adjust seasoning with the remaining 0.5 teaspoon salt and 0.5 teaspoon ground black pepper—this is where the real flavor comes together.
Combine and Finish with Perfect Texture
Add the drained pasta to the cheese sauce and stir gently but thoroughly to coat every noodle. The sauce should cling beautifully, creating that iconic "stretchy" quality that makes this dish so special. Let the mixture simmer together over low heat for 3-5 minutes, stirring occasionally. This final step ensures the pasta absorbs the sauce completely and reaches the perfect temperature—hot but not scorching.
Here's the thing about Southern mac and cheese—it's all about that stretch. If your sauce isn't pulling apart into long, cheesy strands when you lift a spoonful, it needs more pasta water. Keep adding it 1 tablespoon at a time until you achieve that signature texture. The moment you get it right, you'll know—it's like pulling taffy, but with cheese.
Serve with Classic Southern Flair
Transfer the mac and cheese to a serving bowl and let it rest for 2-3 minutes—this allows the flavors to meld perfectly. Garnish with the 2 tablespoons melted butter (if using) and an extra sprinkle of black pepper. Serve immediately while hot, with crusty bread on the side if you're feeling fancy.
This isn't just mac and cheese; it's a comforting hug in bowl form. The sharp cheddar should sing, the pasta should be perfectly al dente, and every bite should deliver that melt-in-your-mouth stretch. And remember, the best mac and cheese gets better the next day—if there's any left, that is! Leftovers actually improve as the flavors deepen overnight.
Pro Tips For Making Authentic Mac And Cheese
- STRAIN THE PASTA WET: Drain your elbow macaroni just until the water’s gone, then immediately return it to the pot with a splash of starchy pasta water. That extra starch acts like a glue—it’s what makes the sauce cling instead of turning your mac and cheese into a sad, dry pile. (Yes, even if it looks weird. Trust me.)
- MELT THE CHEESE LOW: Once you add the shredded cheddar, drop the heat to the lowest setting and let it melt slowly. I learned this the hard way—rushing it makes the sauce break and turn grainy. A gentle simmer keeps everything silky. (And no, you’re not spoiling it by taking your time.)
- SHRED CHEESE FINE: Use a box grater or food processor for the cheddar—not a knife. Big chunks don’t melt evenly and leave you with a lumpy mess. If you’re lazy, buy pre-shredded, but skip the anti-caking stuff; it’s just cornstarch in disguise and ruins texture. (Your future self will notice.)
- TOAST THE FLOUR: Before adding liquid to your butter-flour roux, cook the flour alone for 30 seconds until it’s golden. This step removes the raw flour taste and gives the sauce a deeper, nuttier flavor. (Sounds weird, but it works—my grandmother swore by it, and she was right.)
Essential equipment for authentic mac and cheese
Heavy-Bottomed Pot
A large, heavy-bottomed pot (like a Dutch oven) is essential for building the roux properly. Thin-bottomed pans can't handle the heat needed for that perfect light golden brown color without burning. I swear by my Le Creuset Dutch oven—it distributes heat evenly and prevents scorching.
If you don't have one, a stainless steel pot with thick walls works too. Just avoid nonstick—it can't handle the high heat needed for a proper roux. 🔥
Wooden Spoon
A wooden spoon is your best friend for stirring the roux. Metal spoons can scratch the pot and make cleanup harder, but more importantly, wood helps prevent the roux from sticking while you're constantly stirring. I keep a Oxo Good Grips wooden spoon in my kitchen just for this purpose.
If you don't have one, a silicone spatula works in a pinch, but it won't give you that same smooth stirring action. Pro tip: Soak it in warm, soapy water after use to prevent it from warping.
Fine-Mesh Strainer
While not always mentioned, a fine-mesh strainer comes in handy when you're reserving that pasta water. It helps you capture the starchy water more efficiently without losing too much pasta. I use a OXO Good Grips collapsible strainer—it's sturdy and easy to store.
If you don't have one, a regular colander will work, but you might lose some of that precious starchy liquid. Trust me, that extra starch makes all the difference in the final texture. 💧
Cheese Grater
Using block cheese is key for authentic mac and cheese, and that means you'll need a good cheese grater. A box grater with different hole sizes works best—I like the Microplane for its fine shreds. Pre-shredded cheese contains anti-caking agents that prevent that perfect melt.
If you're using a box grater, shred the cheese right before adding it to the sauce to avoid clumping. And here's a secret: freeze the cheese for 10 minutes before grating to make it easier to shred. It's a game-changer for smooth, even shreds.
Measuring Cups
Precision matters when it comes to measurements in this recipe. Diamond Crystal flour measures differently than regular all-purpose flour—it's lighter and more fluffy. That means you need to spoon it lightly into your measuring cup and level it off.
I use OXO Good Grips measuring cups because they have clear markings and a comfortable grip. For the butter, I prefer a liquid measuring cup so I can see the exact amount.
And don't forget: 1 tablespoon of butter for serving is just enough to add that final touch of richness. 🧈
Optional: Immersion Blender
If you're worried about clumpy cheese, an immersion blender can save the day. After adding the cheese to the sauce, blend it for 10-15 seconds to create a silky-smooth texture.
I don't always use mine, but it's a lifesaver when I'm in a hurry or if I've added the cheese too quickly. Just be careful not to over-blend, or you'll end up with a sauce that's too thin. A Magic Bullet immersion blender is affordable and does the job perfectly.
It's not essential, but it's a great tool to have in your arsenal for those perfect, lump-free results. ✨
Nutrition facts
Frequently asked questions
Why does authentic mac and cheese need a roux?
The roux (butter + flour cooked together) creates the creamy base that makes this dish special. When cooked to a light golden color, it thickens the sauce properly and prevents separation. Skipping it often leads to a grainy or watery texture. Think of it as the glue that holds everything together—it's what gives that signature Southern stretch and creaminess.
Can I make this without heavy cream?
Yes! Replace the ½ cup heavy cream with ½ cup whole milk plus 1 tablespoon melted butter for similar richness. For extra decadence, use ½ cup half-and-half. The cream adds fat content that helps emulsify the cheese, but milk works in a pinch. Just add it gradually to avoid breaking the sauce.
What's the best cheese for authentic flavor?
Sharp white cheddar is non-negotiable for that classic tangy flavor. Avoid pre-shredded cheese (it contains anti-caking agents that prevent proper melting). For extra depth, mix 1½ cups sharp cheddar with ½ cup mild cheddar. If you can't find white cheddar, yellow cheddar works but lacks that signature sharpness. Pro tip: Freeze the cheese for 10 minutes before grating for smoother shreds.
Why does my mac and cheese get clumpy?
Clumps usually happen when cheese melts too quickly or isn't stirred properly. Add cheese gradually (½ cup at a time) and stir constantly over low heat. If it still clumps, use an immersion blender for 10 seconds to smooth it out. Another trick: Mix 1 tablespoon cornstarch with 2 tablespoons cold water and stir into the sauce at the end—it acts as a natural thickener that prevents separation.
Can I make this ahead of time?
Yes! This mac and cheese actually tastes better the next day. Store leftovers in an airtight container with plastic wrap pressed directly on the surface to prevent a skin from forming. Reheat with 1-2 tablespoons milk or water per cup to restore creaminess. For best texture, reheat over low heat and stir frequently. It keeps 4-5 days in the fridge or 3 months frozen.