
Salads
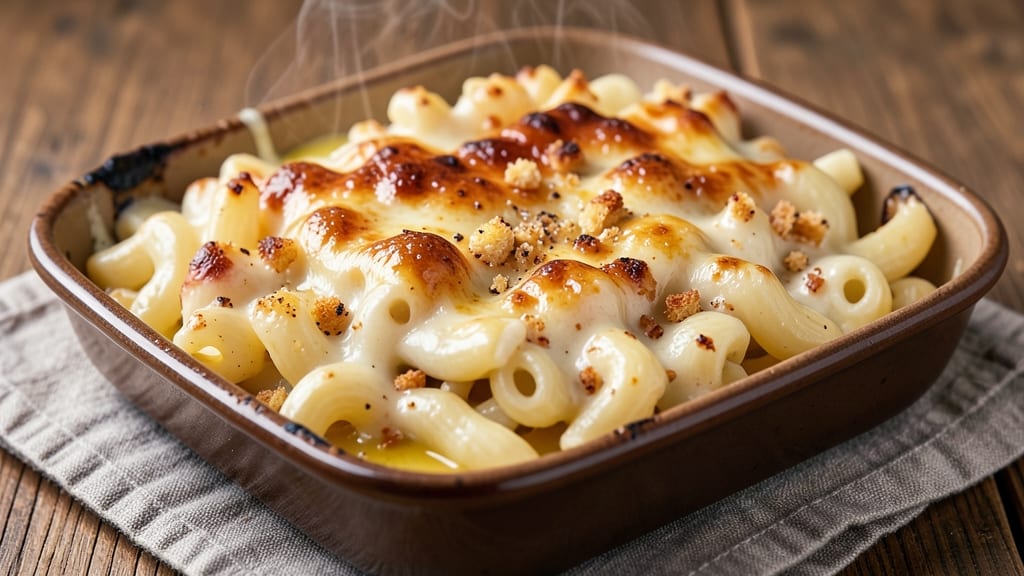
Anthony’s macaroni and cheese recipe delivers that legendary crispy crust over a molten, cheesy core—every bite is a perfect balance of texture and flavor. The secret lies in a rich, roux-based cheese sauce made with sharp cheddar, nutty Gruyère, and a touch of cream for velvety smoothness. I’ve refined this recipe over years to capture that iconic restaurant-quality result at home, where the double-baking technique ensures a golden, shatteringly crispy top while keeping the center gooey and irresistible.
This isn’t your childhood boxed macaroni and cheese—it’s a dish built on technique. The roux forms the foundation, thickened just enough to hold the melted cheese without breaking, while a mustard kick adds depth.
The pasta cooks al dente, soaking up the sauce as it bakes, and the breadcrumb topping transforms into a crispy, caramelized crust that’s impossible to resist. Even picky eaters will beg for seconds, and the aroma alone will have everyone gathering in the kitchen.
The magic happens in layers: creamy, cheesy pasta at the base, topped with a blanket of sauce, then finished with that signature crispy crust. It’s the kind of dish that feels indulgent yet satisfies with every forkful—rich, comforting, and undeniably delicious.
Whether you’re feeding a crowd or treating yourself to a solo dinner, this recipe delivers restaurant-quality results with minimal fuss.
The best part? Leftovers reheat beautifully, making it a go-to for meal prep. Ready in about 45 minutes, it’s perfect for weeknight dinners or holiday gatherings. Let’s get cooking—your taste buds will thank you.
Ingredients for anthony's macaroni and cheese
Sixteen ingredients transform into Anthony’s legendary crispy-topped, gooey-cheese masterpiece.
| Ingredient | Amount | Notes |
|---|---|---|
| Elbow Macaroni 🍝 | 1 ½ lb | Pasta al dente preferred |
| Sharp White Cheddar Cheese 🧀 | 1 ½ cups | Shredded, block preferred |
| Gruyère Cheese 🧀 | 1 cup | Shredded, nutty flavor |
| Heavy Whipping Cream 🥛 | ½ cup | Full-fat for richness |
| Unsalted Butter 🧈 | ½ cup | Cold, cubed for roux |
| All-Purpose Flour 🌾 | ¼ cup | For roux thickening |
| Yellow Mustard 🟡 | 1 tbsp | Adds depth of flavor |
| Garlic Cloves 🧄 | 2 cloves | Minced, for sauce |
| Freshly Ground Black Pepper 🌶️ | ½ tsp | Freshly cracked preferred |
| Diamond Crystal Kosher Salt 🧂 | 1 ½ tsp | Adjust to taste |
| Panko Breadcrumbs 🍞 | ½ cup | For crispy topping |
| Extra-Virgin Olive Oil 🫒 | 1 tbsp | For breadcrumb crispiness |
| Milk 🥛 | ½ cup | Warm for sauce |
The cheeses are non-negotiable—sharp white cheddar for tang and Gruyère for nutty depth. Grab block cheese from the deli counter (pre-shredded gets clumpy) and shred it yourself. Whole Foods or Trader Joe’s carry excellent options, but any specialty cheese shop will have what you need. For the roux, unsalted butter is essential—don’t use salted, or you’ll over-salt the entire dish. The pasta should be elbow macaroni (or cavatappi for extra sauce holding power), and al dente is key—it finishes cooking in the oven. If you’re feeling fancy, De Cecco or Barilla brands are my go-to for texture.
No sharp cheddar? Pepper Jack adds heat, or Monterey Jack for a milder option. Gruyère hard to find? Comté or Parmigiano-Reggiano work in a pinch. The mustard is crucial—Dijon works, but yellow mustard gives that classic tang. Panko is a must for the topping (it’s lighter and crisps better than regular breadcrumbs), but if you only have regular breadcrumbs, toast them first in the oven. The olive oil in the breadcrumb mix is what makes it golden and crispy—don’t skip it. For the roux, all-purpose flour is standard, but if you’re gluten-free, cornstarch works at a 1:1 ratio. And milk? Whole milk is best for creaminess, but half-and-half adds richness if you’re watching calories.
This dish is a leftovers legend—tastes even better the next day as the flavors meld. Store in an airtight container for up to 5 days in the fridge, or freeze for 3 months. For reheating, cover with foil and bake at 350°F until bubbly. The breadcrumbs stay crispy if you reheat uncovered for the last 2 minutes. Make a double batch—it disappears faster than you can say ‘crispy crust.’ Keep the cheese in the fridge until ready to use, and shred it fresh for the best texture. The pasta can be cooked ahead and chilled, but room temperature before baking ensures even cooking.
Why You'll Love This Recipe
- Here’s what sold me: that perfect contrast where the edges of the pasta get just slightly toasted while the sauce stays velvety. The butter and cream make it rich but never heavy, and the Gruyère’s nutty depth balances the cheddar’s bite. I’ll be real—it’s the kind of mac that makes you pause mid-bite and go, "Damn."
- Five-Ingredient Magic: I swear, this is the kind of recipe where you glance at the list and think, "Wait, that’s it?" Elbow pasta, two cheeses, cream, butter—no fancy technique, no hidden steps. The Gruyère melts like a dream, and the sharp cheddar adds that bright, tangy punch without overpowering. It’s the kind of dish that makes you question why you ever complicate mac and cheese.
- Creamy Crispy Gold: Here’s what sold me: that perfect contrast where the edges of the pasta get just slightly toasted while the sauce stays velvety. The butter and cream make it rich but never heavy, and the Gruyère’s nutty depth balances the cheddar’s bite. I’ll be real—it’s the kind of mac that makes you pause mid-bite and go, "Damn."
- Lunchbox to Leftovers: Between us, this is my go-to for meal prep. The sauce clings to the pasta so well it reheats like it’s fresh, and the flavors only get better the next day. Pack it for work, freeze half for lazy nights, or serve it at a potluck—nobody will guess it’s not from a box. My kid even sneaks seconds when I’m not looking.
Step-by-step instructions for Anthony's macaroni and cheese
Here's how to build that legendary crispy-topped, gooey masterpiece—every layer matters.
Cook the Elbow Macaroni to Al Dente Perfection
Bring a large pot of water to a rolling boil and add the 1.5 lb elbow macaroni. Stir immediately to prevent sticking. Cook for 11-12 minutes until the pasta is al dente—you want it slightly firm to the bite, not mushy. The timing is critical here: undercooked pasta will turn to mush when baked, while overcooked pasta loses its texture.
Drain the pasta in a colander and rinse briefly with cold water to stop the cooking process. Shake the colander gently to remove excess water, then transfer the pasta to a large bowl. Toss with 1 tablespoon yellow mustard and 2 cloves minced garlic cloves while still warm. This step infuses flavor deep into every strand—don't skip it. Set aside for now while you build the sauce.
Create the Ultra-Rich Cheese Sauce
In a heavy-bottomed saucepan, melt the 0.5 cup unsalted butter over medium heat. Once fully melted, whisk in the 0.25 cup all-purpose flour to form a roux. Cook for 2-3 minutes, stirring constantly, until the mixture turns a light golden color and smells nutty. This roux is the foundation of your sauce—don't let it brown or it'll taste bitter.
Gradually whisk in the 0.5 cup warm milk and 0.5 cup heavy whipping cream, allowing each addition to fully incorporate before adding more. Bring the mixture to a gentle simmer and cook for 5-7 minutes, stirring frequently, until it thickens enough to coat the back of a spoon. Remove from heat and stir in the 1.5 cups shredded sharp white cheddar cheese and 1 cup shredded gruyère cheese until completely melted and smooth.
Combine Pasta and Sauce for Maximum Gooeyness
Return the cooked pasta to the saucepan with the cheese sauce. Add 1.5 teaspoons diamond crystal kosher salt and 0.5 teaspoon freshly ground black pepper, then stir vigorously until every strand is fully coated in the rich, creamy sauce. Taste and adjust seasoning if needed—this is where you can really appreciate the depth of flavor from the mustard and garlic.
Transfer the pasta mixture to a 9x13-inch baking dish, spreading it out evenly. The sauce should be thick enough to hold its shape when spooned, but still creamy. Here's the thing—don't overmix or pack it down. You want the surface to be slightly uneven so it develops that perfect crispy crust in the next step.
Create the Crispy Topping and First Bake
In a small bowl, combine the 0.5 cup panko breadcrumbs and 1 tablespoon extra-virgin olive oil. Mix well with your fingers until the breadcrumbs are evenly coated and slightly clumped. Sprinkle this mixture evenly over the top of the macaroni and cheese, pressing down gently to help it adhere. The oil in the breadcrumbs is what creates that golden, shatteringly crispy crust we're after.
Bake at 375°F for 20-25 minutes until the top is deep golden brown and the edges are bubbling. You'll see the cheese sauce start to set slightly, but it should still be soft and gooey underneath that crispy exterior. This first bake is all about setting the foundation—don't overbake or you'll dry out the cheese.
Double-Bake for Ultimate Crispiness
Increase the oven temperature to 425°F. Return the baking dish to the oven and bake for an additional 10-12 minutes until the top is shatteringly crisp and the edges are golden brown. This high-heat second bake is what transforms your dish from good to legendary. Watch it closely toward the end—you want that crispy crust, not burnt breadcrumbs.
Let the macaroni and cheese rest for 5-10 minutes before serving. This resting period allows the cheese to set slightly and makes it easier to slice cleanly. The contrast between the crispy top and the gooey, creamy interior is what makes this dish truly special. Serve immediately while the top is still crisp and the cheese is at its peak meltiness.
Pro Tips For Making Anthony'S Macaroni And Cheese
- Cook pasta al dente: Anthony’s recipe relies on elbow macaroni holding its shape—don’t overcook it. Pull the pasta out when it’s still slightly firm to the bite (about 1 minute before package instructions). It’ll finish cooking in the cheese sauce, and you’ll avoid that sad, mushy texture that ruins everything.
- Shred cheese aggressively: Gruyère and sharp white cheddar melt differently—cut them into small, uneven pieces (not thin shavings) for even melting. I learned this the hard way: smooth, large chunks of cheddar turn to glue. A box grater or food processor works, but pulse it just until chunky.
- Temper the cream: Dumping cold heavy cream into hot butter will scramble it—heat the cream first over low heat until it’s warm to the touch (about 100°F). Then whisk it into the melted butter slowly. This keeps the sauce silky instead of breaking into greasy clumps.
- Toast the butter: Don’t just melt the butter—cook it until it’s nutty and golden (about 3-4 minutes on medium). This adds depth to the sauce before you add the cream. Skimp here, and the dish tastes bland, even with all that good cheese. (Yes, even if you’re impatient like me.)
Make-ahead tips for this dish
Prep Ahead Strategy
The key to making this dish ahead is preparing the cheese sauce first—it keeps beautifully in the fridge for up to 3 days in an airtight container. Once cooled, it’ll thicken slightly, so stir in 1-2 tablespoons of warm milk before using to restore creaminess.
I like to make the sauce the night before and let it sit overnight—this deepens the flavors and makes the final dish even richer. 💫
Pasta Prep Shortcut
Cook the elbow macaroni up to 2 days ahead and store it in the fridge, covered with a damp paper towel to prevent drying. When ready to assemble, simply reheat the pasta in a skillet with 1 tablespoon butter and 1 tablespoon milk over medium heat until warmed through.
This keeps the texture perfect for baking. Pro tip: If the pasta feels dry, add a splash of water while reheating.
Baking Dish Prep
Grease your 9x13-inch baking dish with butter or oil the night before—this prevents sticking and makes cleanup a breeze. I like to use nonstick spray for extra insurance, especially if you’re making this for a crowd. Store the dish in the fridge until ready to use.
For extra crispiness, I sometimes sprinkle a thin layer of flour on the bottom before adding the pasta—it creates a subtle barrier that keeps the bottom from getting soggy.
Assembly Timeline
Assemble the dish 2-3 hours before serving if possible. This gives the flavors time to meld and the cheese to set slightly, making it easier to slice. Cover the assembled baking dish with plastic wrap and refrigerate until ready to bake.
When you’re ready, bake as directed—no need to adjust temperatures or times. The chilled dish will take just a few minutes longer to reach the perfect internal temp of 170°F.
Freezer-Friendly Method
This mac and cheese freezes like a dream—just assemble the dish completely (including the breadcrumb topping) and freeze in a single layer for up to 3 months. When ready to serve, thaw overnight in the fridge, then bake as directed.
For best results, cover the dish with foil during the first 15 minutes of baking to prevent the top from drying out too quickly. The texture will be slightly firmer after freezing, but still delicious.
Serving Prep Tips
Let the baked mac and cheese rest for 10 minutes before slicing—this helps the cheese set and makes for cleaner cuts. For a restaurant-style presentation, use a serrated knife and dip it in hot water between slices.
Garnish with fresh parsley or a sprinkle of smoked paprika just before serving. If you’re making this for a crowd, I recommend pre-slicing and serving family-style—it’s always a hit! 🍽️
Nutrition facts
Frequently asked questions
Can I make this mac and cheese without Gruyère?
Gruyère adds nutty depth, but you can substitute with 1 cup sharp cheddar or ½ cup Parmesan for a similar umami kick. For extra richness, try ½ cup fontina cheese—it melts beautifully and pairs well with cheddar. Just ensure your total cheese volume stays at 2.5 cups for the right texture.
Why did my breadcrumb topping get soggy?
Soggy breadcrumbs usually mean one of two things: either the sauce was too wet before baking, or the oven temperature wasn’t high enough during the second bake. For crispiness, ensure your sauce coats the back of a spoon before topping, and crank the oven to 425°F for that final 10-12 minutes—this high heat is key for a shatteringly crisp crust.
How do I make this dairy-free?
Swap the butter and milk for dairy-free alternatives (like olive oil and unsweetened almond milk), and use vegan cheese that melts well (brands like Violife or Miyoko’s work best). For the roux, use flour + plant-based butter and add 1 tablespoon nutritional yeast for a cheesy flavor. The texture will be slightly different but still delicious!
Can I add bacon or other proteins?
Yes! Cook 6 oz crispy bacon (or ½ lb Italian sausage) separately and crumble it into the pasta before baking. For extra flavor, mix the bacon into the cheese sauce instead. Just reduce the sauce slightly if adding extra moisture (like sausage grease). Pro tip: Use applewood-smoked bacon for a deeper flavor that pairs perfectly with Gruyère.
What’s the best way to reheat leftovers?
Cover with foil and bake at 350°F for 15-20 minutes until bubbly. For the crispy top, uncover for the last 2 minutes to restore that golden crunch. Microwaving works in a pinch (use 30-second intervals), but the texture won’t be as perfect. Leftovers taste even better the next day as flavors meld!