
Appetizers
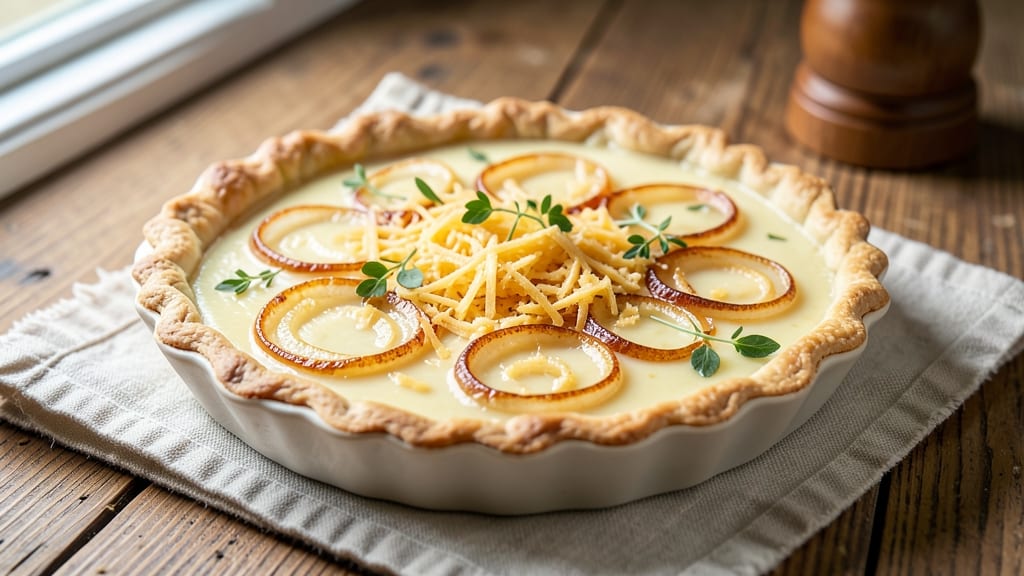
This basic cheese and onion quiche recipe delivers the perfect balance of flaky crust and rich, creamy filling—every bite is a harmonious blend of savory onions and melty cheese. 💛 The secret lies in a well-baked crust that stays crisp while the custardy egg mixture transforms into a velvety, golden center.
Whether you're preparing for brunch or a light dinner, this classic quiche is both satisfying and elegant.
Starting with a simple pie crust (homemade or store-bought), you'll layer it with caramelized onions, sharp cheddar, and a mixture of eggs, milk, and cream. The filling cooks through evenly, creating a texture that's tender yet sturdy enough to slice neatly.
Baking at 375°F ensures the crust stays crisp while the custard sets just right—no soggy bottoms here.
What makes this recipe truly special is its versatility. Swap the cheddar for Gruyère or Swiss for deeper flavor, or add fresh herbs like thyme or chives for brightness. Serve it warm with a crisp salad or chilled with a glass of white wine.
The result? A quiche that feels restaurant-worthy but is simple enough for any home cook.
With just 10 ingredients and 45 minutes of hands-on time (plus baking), this quiche is the ultimate weeknight solution. The filling is foolproof, the crust is foolproof, and the outcome is always impressive. Let’s get baking!
Ingredients for basic cheese and onion quiche
Flaky crust meets caramelized onions and melty cheese—just 10 ingredients for a quiche that wows.
| Ingredient | Amount | Notes |
|---|---|---|
| Pie Crust (Store-Bought or Homemade) 🥧 | 1 whole | Pre-baked or unbaked as preferred |
| Yellow Onions 🧅 | 2 large | Thinly sliced and caramelized |
| Sharp Cheddar Cheese 🧀 | 1 ½ cups | Shredded, block preferred |
| Large Eggs 🥚 | 4 whole | Room temperature for even cooking |
| Whole Milk 🥛 | 1 cup | Full-fat for creaminess |
| Heavy Cream 🥛 | ½ cup | Full-fat for rich texture |
| All-Purpose Flour 🌾 | 2 tbsp | For thickening custard |
| Salt 🧂 | ½ tsp | Kosher or sea salt |
| Black Pepper 🌶️ | ¼ tsp | Freshly ground for flavor |
| Fresh Thyme Leaves 🌿 | ¼ cup | Chopped, optional for brightness |
The crust sets the stage. Store-bought works perfectly if you're short on time, but homemade (like a classic pie crust) adds that extra flakiness. For caramelizing onions, low and slow is key—about 20 minutes until golden and sweet. I grab Yellow Sweet Onions from the grocery store's produce section—they're milder and caramelize beautifully. If you're using a pre-made crust, check the baking instructions to decide whether to pre-bake it or blind-bake it with pie weights. For the cheese, sharp cheddar is non-negotiable—it melts beautifully and adds that tangy kick. Pre-shredded cheese has anti-caking agents, so grating your own is worth the extra minute.
No sharp cheddar? Gruyère or Swiss work beautifully for a different flavor profile. Swap heavy cream for half-and-half if needed, though the texture won't be as rich. Fresh thyme is ideal, but dried thyme at one-third the amount works in a pinch. If you're making this ahead, add a pinch of nutmeg to the custard for extra depth. The custard should be thick but pourable—if it's too thin, whisk in an extra tablespoon of flour. For a vegan version, replace the eggs with a flax egg mixture (1 tbsp ground flaxseed + 3 tbsp water per egg) and use a dairy-free cheese substitute.
This quiche reheats beautifully—just 10 minutes at 350°F to warm through. Store leftovers in an airtight container for up to 4 days in the fridge. For freezing, wrap individual slices tightly in plastic wrap, then place in a freezer bag for up to 3 months. Thaw overnight in the fridge before reheating. The crust stays crisp if you reheat it covered with foil for the first 5 minutes, then uncover to brown. Slice it into neat wedges for serving—it's always impressive when presented well.
Why You'll Love This Recipe
- No-Fuss Assembly: I swear by this recipe because it’s the kind of dish that lets you multitask. Slice onions while the crust bakes—no fancy layering, just scatter, pour, and bake. The eggs do all the work while you sip coffee.
- Sharp Cheese Magic: That sharp cheddar? It’s the star. The way it melts into gooey pockets while the crust stays crispy—honestly, it’s the kind of flavor that makes you forget it’s "just" a quiche. (Yes, even on a Tuesday night.)
- Leftovers That Save: This quiche reheats like a dream—perfect for packed lunches or a lazy afternoon. I make a big one on Sunday, and by Wednesday, I’m still pulling slices out of the fridge. Zero waste, all satisfaction.
- Budget Breakfast Hero: Five ingredients, zero pretension. Store-bought crust? Check. Onions from the pantry? Check. Eggs and milk you already have? Double check. It’s the kind of recipe that turns groceries into a meal without breaking the bank.
Step-by-step instructions for cheese and onion quiche
Here's how to build a classic quiche with a crisp crust and perfectly set filling.
🍳 Step 1: Caramelize the Onions
Heat 1 tablespoon olive oil in a large skillet over medium heat. Add the 2 large yellow onions, sliced thinly, and cook for 15-20 minutes until deeply golden and tender. Stir occasionally to prevent burning, and add a pinch of salt halfway through to draw out moisture.
You'll know they're done when they're soft with caramelized edges and a rich, sweet aroma. Remove from heat and let cool for 5 minutes—this prevents the filling from getting watery when you add it to the crust. The onions should yield about 1 cup of caramelized mixture.
👨🍳 Step 2: Prepare the Filling Mixture
In a large bowl, whisk together the 4 whole large eggs, 1 cup whole milk, 0.5 cup heavy cream, 2 tablespoons all-purpose flour, 0.5 teaspoon salt, and 0.25 teaspoon black pepper until smooth. Add the cooled caramelized onions and 0.25 cup chopped fresh thyme leaves and stir gently to combine.
Fold in the 1.5 cups shredded sharp cheddar cheese using a rubber spatula, making sure the cheese is evenly distributed. The mixture should be thick but pourable. If it's too thick, whisk in 1 tablespoon milk at a time until it reaches a creamy consistency that will just coat the back of a spoon.
🥘 Step 3: Assemble the Quiche
Preheat your oven to 375°F. If using a store-bought pie crust, press it into a 9-inch pie dish and prick the bottom with a fork. For a homemade crust, press it into the dish and crimp the edges. Blind-bake the crust for 8-10 minutes if unbaked, until it's lightly golden and set.
Pour the filling mixture into the prepared crust, spreading it evenly with the back of a spoon. The filling should reach about ¾ inch from the top edge of the crust. Sprinkle any remaining cheese on top for a golden crust. Bake for 35-40 minutes until the center is just set and the top is golden brown.
⏰ Step 4: Rest and Serve
Remove the quiche from the oven and let it rest for 10-15 minutes before slicing. This resting time allows the filling to fully set and prevents it from running when you cut into it. The center should be slightly jiggly but firm to the touch.
Slice into 4 equal wedges and serve warm or at room temperature. The crust should be crisp and flaky, the filling creamy with perfectly melted cheese, and the onions caramelized and sweet. Pair with a simple green salad for a complete meal.
Pro Tips For Making Basic Cheese And Onion Quiche
- Pre-Cook the Onions: Sauté them until deep golden and slightly caramelized—about 15 minutes on medium-low. Raw onions release water and make the quiche soggy; cooked ones add sweetness and texture that store-bought crusts can’t handle.
- Blind-Bake the Crust: Cut slits in the crust, cover with pie weights or dried beans, and bake at 375°F (190°C) for 10 minutes before adding filling. This prevents a gummy bottom, especially with store-bought crusts that often lack structure. (Yes, even if you’re impatient like me.)
- Shred Cheese Coarse: Use a box grater for uneven, jagged pieces—not the fine shreds from a pre-shredded bag. Larger cheese melts slower, creating pockets of gooey goodness instead of a uniform paste. (Your future self will notice the difference.)
- Whisk Eggs Cold: Mix eggs and milk straight from the fridge—room temperature eggs scramble faster and risk curdling before the quiche finishes baking. Cold eggs also create a silkier texture in the final dish. (I learned this after a lumpy disaster.)
Make-ahead tips for this dish
Prep Ahead Strategy
Assemble your quiche filling the night before and refrigerate it in an airtight container. The flavors meld beautifully overnight, and the onions will continue caramelizing slightly, deepening their sweetness.
Just whisk it one last time before pouring into the crust in the morning—no need to preheat the oven until you're ready to bake. 💫
Crust Prep Shortcut
Save time by using a pre-baked store-bought crust like Pepperidge Farm or Pillsbury. Place it in a 9-inch pie dish and refrigerate it overnight. The crust will hold its shape better when you blind-bake it the next day, preventing any soggy bottoms.
I like to brush the crust with 1 tablespoon melted butter before baking for extra crispiness.
Filling Pre-Bake Test
For foolproof results, bake the quiche filling without the crust first. Pour the custard mixture into a greased 9-inch pie dish and bake at 350°F for 25-30 minutes until just set.
Then, transfer the filling to your pre-baked crust. This ensures the filling cooks through evenly and stays creamy, even if the crust takes longer to bake.
Freezing Fully Assembled
Assemble the quiche completely, then wrap it tightly in plastic wrap followed by aluminum foil. Freeze for up to 3 months. When ready to eat, thaw overnight in the fridge, then reheat at 350°F for 20-25 minutes until warmed through.
The crust may need an extra 5 minutes uncovered to crisp up again.
Portioning for Singles
Divide the filling mixture evenly among 4 individual pie crusts (like mini tart shells) for easy single servings. Bake at 375°F for 20-25 minutes until the edges are golden. These bite-sized quiches are perfect for parties or meal prep—just reheat for 5-7 minutes before serving. 🌟
Make-Ahead Garnish
Prep any garnishes ahead of time, like chopped fresh chives or toasted breadcrumbs. Store them in separate airtight containers in the fridge. Just sprinkle them on top of the quiche right before serving to keep everything fresh.
I also like to make a quick balsamic glaze (reduce 2 tbsp balsamic vinegar with 1 tsp honey) to drizzle over the slices when serving.
Nutrition facts
Frequently asked questions about cheese and onion quiche
Can I use a different type of cheese instead of sharp cheddar?
For a richer flavor, try Gruyère or Swiss cheese, which melt beautifully and add nutty depth. You can also mix cheddar with Parmesan for a sharper finish. Just shred it yourself to avoid anti-caking agents that can make the filling grainy.
Why is my quiche filling watery or not setting properly?
This usually happens if the custard is too thin or the oven isn't hot enough. Whisk in 1 extra tablespoon of flour to thicken, and bake at 375°F (not lower) until the center is just set—it should jiggle slightly but not be liquid. For extra insurance, pre-bake the filling without the crust first.
Can I make this quiche ahead of time?
Yes! Assemble the filling the night before and refrigerate it. Bake it fresh in the morning for the best texture. For fully assembled quiche, wrap tightly and freeze for up to 3 months. Thaw overnight in the fridge before reheating at 350°F for 20 minutes to restore crispiness.
How do I prevent a soggy bottom crust?
Pre-bake your crust for 8-10 minutes at 375°F before adding filling. Use a pie dish with a removable bottom, and place a baking sheet underneath to catch drips. For extra crispness, brush the crust with melted butter before baking.
What's the best way to reheat leftovers?
Slice the quiche and reheat individual portions at 350°F for 10-12 minutes, covered with foil. For a crispier top, uncover for the last 2 minutes. Microwaving works in a pinch (30 seconds), but the crust will get soft—best for quick reheating before serving.