
Desserts
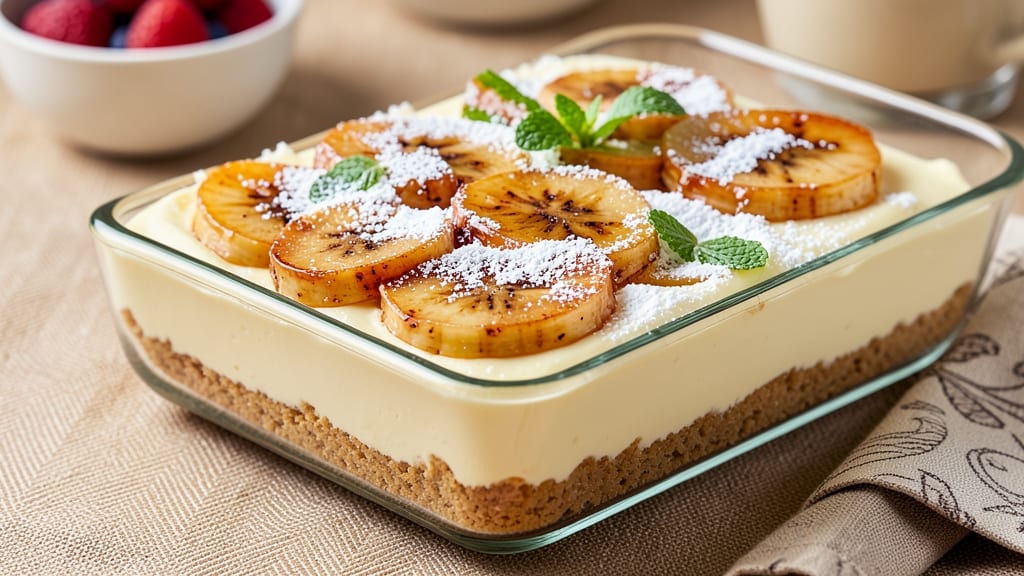
This banana cream cheese bars recipe delivers the perfect balance of crispy crust, creamy filling, and rich banana swirl—all with no-bake shortcuts that make dessert prep effortless. 💛 The secret lies in a buttery graham cracker crust that stays sturdy even after chilling, while the cream cheese layer stays velvety smooth without overmixing.
I developed this version after testing countless combinations, and it’s now my go-to for parties or quick treats.
The triple-layered approach ensures every bite has texture contrast: a buttery base, a tangy-sweet cream cheese center, and a caramelized banana swirl that ties everything together. What’s even better? You can prepare the crust and filling ahead, then assemble just before serving—no last-minute baking stress.
The recipe uses simple pantry staples, yet the result tastes like it came from a bakery.
By the time you slice into these bars, you’ll have golden edges, a creamy interior, and that signature banana swirl that makes them irresistible. The no-bake method means no oven needed, just layering and chilling, which cuts prep time in half.
Perfect for potlucks, lunches, or satisfying a sweet craving without the fuss.
Once assembled, these bars keep well in the fridge for up to 5 days, making them ideal for meal prep or gifting. The flavors only deepen over time, so they’re even better the next day. Here’s how to create this crowd-pleasing dessert with minimal effort—no baking skills required.
Ingredients for banana cream cheese bars
Pantry staples and fresh bananas create triple-layered dessert magic with no oven needed.
| Ingredient | Amount | Notes |
|---|---|---|
| Graham Crackers 🍪 | 2 ½ cups | Crushed into fine crumbs |
| Unsalted Butter 🧈 | ¾ cup | Melted, full-fat preferred |
| Granulated Sugar 🍚 | ½ cup | For crust sweetness |
| Ripe Bananas 🍌 | 2 large | Mashed, slightly underripe for structure |
| Cream Cheese 🧀 | 8 oz | Full-fat, room temperature |
| Powdered Sugar 🍚 | 1 cup | For sweetness and stability |
| Vanilla Extract 🌿 | 1 tsp | Pure, high-quality preferred |
| Heavy Whipping Cream 🥛 | ½ cup | Whipped to soft peaks |
| Salt 🧂 | ¼ tsp | Fine sea salt |
| Chocolate Chips 🍫 | ½ cup | Optional, semi-sweet |
| Mini Marshmallows 🍬 | 1 cup | Optional, for extra fluff |
| Almond Slices 🌰 | ¼ cup | Optional, toasted |
The graham crackers and butter form the sturdy base—Honey Maid or Keebler work best for that classic flavor. Trader Joe's sells pre-crushed graham crackers if you're short on time, but crushing them yourself gives a finer texture. For the bananas, look for slightly underripe ones—they hold their shape better when mashed. I always buy extra bananas and freeze them for smoothies, but these bars use them up perfectly. The cream cheese? Philadelphia brand is my go-to—it's consistently smooth and creamy, but any full-fat block-style cheese works if you grate it yourself.
No powdered sugar? Granulated sugar works at double the amount, but it won't be as stable. Running short on vanilla? Almond extract at half the amount gives a nice twist. For the whipped cream layer, heavy whipping cream must be coldCaramel bits or crushed pretzels add fun textures. The optional toppings can be mixed and matched—toasted nuts add crunch, marshmallows add fluff, and chocolate chips keep it classic. If you're making these ahead, skip the toppings until serving so they stay fresh.
Assemble the crust first, press it firmly into the pan, then chill for 30 minutes to set. The filling can be made a day ahead—just store it in an airtight container in the fridge. Once assembled, these bars need 4 hours in the fridge to fully set, but they're even better after overnight chilling. They keep for 5 days in the fridge, wrapped tightly. For parties, I like to cut them into squares and arrange on a platter with a dusting of powdered sugar—instant crowd-pleaser. Freezing isn't recommended as the texture changes, but you can freeze the filling separately for up to 2 weeks if needed.
Why You'll Love This Recipe
- I’ll be real: this recipe uses things I already have. Overripe bananas? No problem. A block of cream cheese gathering dust? Perfect. Even the graham crackers are usually in my pantry. It’s the kind of dessert that turns a “what’s for dinner?” panic into a “here’s something sweet” win without breaking the bank.
- No-Fuss Layers: I swear by this recipe because it’s basically a no-brainer assembly. Crush graham crackers with butter and sugar—no food processor needed—and press them into a pan while the kids (or your dog) watches. The filling? Just mashed bananas and softened cream cheese whipped together in seconds. Honestly, the hardest part is waiting for it to chill.
- Creamy Crunch Magic: That contrast? Chef’s kiss. The buttery graham crust stays perfectly crisp at the edges while the banana-cream cheese filling melts into a velvety, slightly tangy layer. The sugar caramelizes just enough to give it this subtle sweetness that makes you want to cut yourself another slice—even if you just ate one.
- Lunchbox Hero: Between us, these bars are my go-to for school lunches, office snacks, or when I need a dessert that won’t survive a 10-minute car ride. Wrap them in parchment, toss in a container, and they hold up for days. My kid’s teacher actually asked for the recipe after tasting one—high praise, right?
Step-by-step instructions for banana cream cheese bars
Here's how to build these triple-layered desserts with zero oven time.
👨🍳 Step 1: Create the Graham Cracker Crust
Preheat your oven to 350°F and line an 8x8-inch baking pan with parchment paper. In a food processor, pulse the 2.5 cups graham crackers until you achieve fine crumbs—think sand-like texture, not coarse pieces. This ensures an even, crisp base.
In a medium bowl, melt the 0.75 cup unsalted butter in 30-second bursts in the microwave, stirring between each interval. Mix the melted butter with the graham crumbs and 0.5 cup granulated sugar until fully combined. Press this mixture firmly into the prepared pan, using the back of a spoon to compact it evenly. Bake for 8-10 minutes until golden at the edges, then let cool completely before proceeding.
👨🍳 Step 2: Prepare the Banana Cream Cheese Filling
In a medium mixing bowl, mash the 2 large ripe bananas with a fork until smooth—you want a thick, spreadable consistency. Add the 8 oz cream cheese (at room temperature), 1 cup powdered sugar, 1 tsp vanilla extract, and 0.25 tsp salt. Beat with an electric mixer on medium speed until completely smooth and creamy, about 2 minutes. This mixture should be thick enough to hold its shape when spread.
Spread the banana cream cheese filling evenly over the cooled graham cracker crust, using a spatula to smooth the top. Press gently to eliminate any air bubbles. If you're using the optional 0.5 cup chocolate chips, sprinkle them evenly over the filling now—this creates pockets of molten chocolate when served.
🥘 Step 3: Assemble the Whipped Cream Topping
In a chilled mixing bowl, whip the 0.5 cup heavy whipping cream to soft peaks using a hand mixer. This means the cream holds its shape when the whisk is lifted but still has a slight sheen. Gently fold in the 1 cup mini marshmallows (if using) and the 0.25 cup almond slices (if using) with a spatula, being careful not to deflate the cream. The marshmallows should be evenly distributed throughout.
Spread this whipped cream mixture evenly over the banana layer, creating a smooth, even top. Use the back of a spoon to press down gently—this helps the layers adhere and prevents the topping from sliding off when cutting. For extra flair, lightly toast the almond slices in a dry skillet for 1-2 minutes before folding them in if you prefer a nuttier flavor profile.
⏰ Step 4: Chill and Set
Cover the assembled bars tightly with plastic wrap and refrigerate for at least 4 hours—overnight is even better. This chilling time is crucial as it allows all the layers to fully set and meld together. You'll know it's ready when the top is firm to the touch and the edges hold their shape when cut.
Once set, run a sharp knife around the edges to loosen the bars from the pan. Cut into 12 equal squares (about 2x2 inches each) and serve immediately or store covered in the fridge for up to 5 days. The contrast of the crispy graham crust, creamy banana filling, and fluffy whipped cream topping makes each bite a perfect balance of textures and flavors.
Pro Tips For Making Banana Cream Cheese Bars
- Mash Bananas First: I learned this the hard way—skip the "just slice and toss" approach. Mash the ripe bananas with a fork until smooth before mixing with cream cheese, or you’ll end up with uneven texture in your bars. A few lumps in the filling? That’s fine, but a gloppy mess isn’t.
- Chill the Cream Cheese: Sounds weird, but it works: pull the cream cheese out of the fridge 10 minutes before mixing. Cold cream cheese whips into a grainy paste—no one wants that. Let it soften just enough to blend smoothly with bananas and sugar, or your bars will taste like they’re fighting a losing battle.
- Press Graham Crust Firm: Don’t just dump the crumbled graham crackers and butter into the pan. Press the base hard—like you’re trying to make it the bottom of a fort. Pack it down so it holds shape when you cut slices, or your bars will crumble into sad little piles. A glass or measuring cup works great for this.
- Bake Until Set, Not Brown: The filling’s done when the edges look set and the center jiggles just slightly—like a wobbly Jell-O. Overbaking turns the cream cheese layer rubbery, and no one’s here for that. Check at 20 minutes, then bake 2-3 more until the top is golden but still slightly springy.
Serving suggestions for leftovers
Plating Presentation
Arrange the bars on a white marble slab or wooden board for an elegant touch—the contrast makes the golden edges pop. I like to dust the top with powdered sugar using a fine-mesh sieve for a snowy effect.
For extra flair, add edible gold leaf or crushed pistachios along the edges. 💛
Cut the bars into 2x2-inch squares for neat portions, but leave some whole for dramatic presentation. Stack two squares slightly offset for a layered look, or create a tiered platter with smaller bars surrounding larger ones. Serve with warm vanilla bean ice cream on the side for scooping.
Garnish Ideas
Fresh banana slices on top add vibrant color and a hint of freshness. Toast slivered almonds in a dry pan for 1-2 minutes until golden, then sprinkle over the bars. For a tropical twist, add toasted coconut flakes or dried mango pieces.
Drizzle caramel sauce or chocolate ganache over the bars for a decadent finish. I love using Nutella for a quick, kid-friendly option. Store-bought toppings like sprinkles or crushed Oreos add playful contrast to the creamy layers.
Serving Suggestions
Pair these bars with iced coffee or chilled milk to balance the richness. For a festive touch, serve them at holiday gatherings or birthday parties—they’re always a hit with kids and adults alike. 🎉
For a brunch spread, arrange the bars alongside yogurt parfaits and fresh berries. They also make a great lunchbox treat—wrap individual bars in parchment paper for a portable dessert. The no-bake method ensures they stay fresh even in warm weather.
Nutrition facts
Frequently asked questions
Can I make these bars without whipped cream?
Replace the whipped cream layer with 1 cup of Greek yogurt mixed with 1 tablespoon honey for a lighter option. For extra richness, try mascarpone cheese mixed with 1 teaspoon vanilla—it stays creamy without needing chilling. Just spread it evenly over the banana layer before adding toppings.
Why did my graham cracker crust turn crumbly instead of crispy?
This usually happens if the butter wasn't melted enough or the crumbs weren't pressed firmly. First, ensure the butter is fully melted and liquid. Second, press the mixture into the pan with even pressure—use a glass to compact it. Bake for 1-2 extra minutes if needed, then let it cool completely before adding fillings.
How do I store leftovers to keep them fresh?
Wrap the bars tightly in plastic wrap or aluminum foil, then place them in an airtight container. They'll stay fresh in the fridge for 5 days. For longer storage, freeze the assembled bars (without toppings) for up to 1 month. Thaw overnight in the fridge—never at room temperature.
Can I use a different crust instead of graham crackers?
Yes! Try a butter cookie crust (crushed Oreos + melted butter) or a nut-based crust (almond flour + coconut oil). For a gluten-free option, use crushed gluten-free graham crackers or pecan pie crust mix. Just ensure the crust is sturdy enough to hold the creamy layers—press it firmly and chill before adding fillings.
What if my bananas are too ripe and mushy?
Mash them anyway—they'll still work! For extra structure, mix in 1 tablespoon cornstarch or 1 teaspoon lemon juice to thicken the filling. If the bananas are overly brown, reduce the powdered sugar slightly (3/4 cup instead of 1 cup) to balance the sweetness. The cream cheese will help stabilize the texture.