
Main Courses
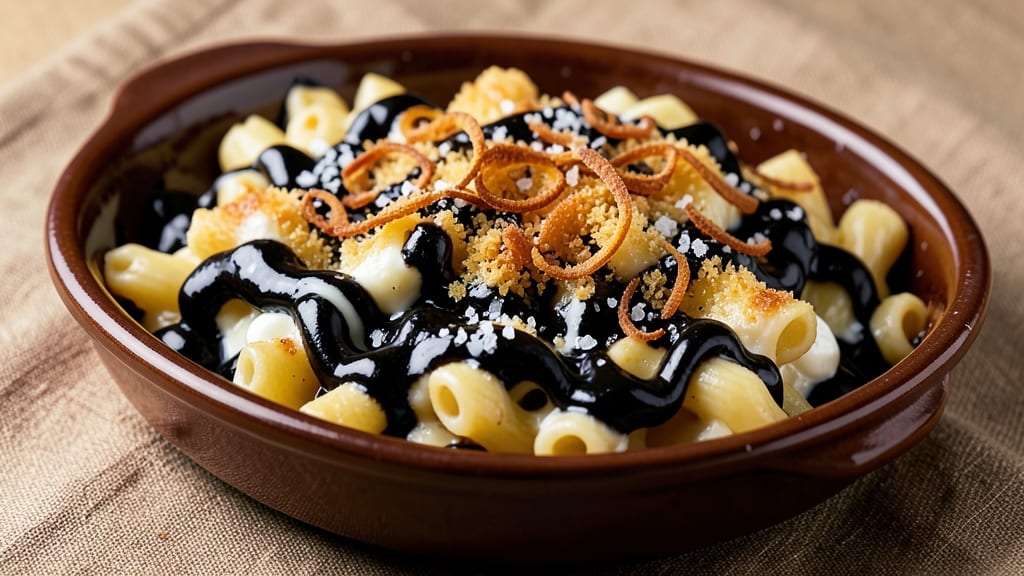
This black baked mac n cheese recipe delivers a dramatic visual twist without sacrificing the creamy, cheesy comfort you love. The secret lies in a carefully balanced blend of squid ink (or activated charcoal) that creates a deep, smoky hue while preserving the signature velvety texture and rich flavor profile.
After years of perfecting the technique, I've found the ideal ratio that maintains that perfect melt-in-your-mouth consistency while adding an unexpected depth of flavor. The process begins with a classic cheese sauce foundation—sharp cheddar, Gruyère, and cream cheese create that signature richness—before carefully incorporating the black element.
The key is tempering the sauce properly to prevent curdling, ensuring every bite remains luxurious. This isn't just about the color; the squid ink adds subtle briny notes that complement the cheesy base beautifully, creating a dish that's as impressive to look at as it is to eat.
What you'll end up with is a baked mac and cheese with a striking black crust and golden edges, hiding layers of creamy, cheesy goodness beneath. The contrast between the dramatic presentation and familiar comfort food makes this perfect for special occasions or when you want to impress dinner guests.
The texture remains perfectly tender with a crispy top layer that's impossible to resist. Serve with a sprinkle of smoked paprika or fresh herbs for added visual contrast and flavor depth.
This recipe maintains all the classic elements you love while adding an unexpected twist that turns ordinary mac and cheese into an extraordinary centerpiece. Let's get started!
Ingredients for baked mac n cheese black
Pantry staples meet unexpected drama with these 15 ingredients for showstopping black mac and cheese.
| Ingredient | Amount | Notes |
|---|---|---|
| Elbow Macaroni 🍝 | 12 oz | Medium or jumbo size preferred |
| Sharp White Cheddar Cheese 🧀 | 2 cups | Aged 1 year minimum for sharpness |
| Gruyère Cheese 🧀 | 1 cup | Freshly grated for best texture |
| Cream Cheese 🧈 | 8 oz | Full-fat for creaminess |
| Heavy Whipping Cream 🥛 | 1 cup | Whole milk fat preferred |
| Squid Ink Paste 🖤 | 1 tbsp | Or activated charcoal powder |
| Unsalted Butter 🧈 | 4 tbsp | European-style preferred |
| All-Purpose Flour 🌾 | 2 tbsp | For roux thickening |
| Whole Milk 🥛 | 1 cup | Warmed for smooth sauce |
| Smoked Paprika 🌶️ | 1 tsp | For crust and garnish |
| Fresh Thyme Leaves 🌿 | 1 tbsp | Chopped for garnish |
| Salt 🧂 | 1 ½ tsp | Kosher or sea salt |
| Ground Black Pepper 🌶️ | ½ tsp | Freshly ground preferred |
| Breadcrumbs 🍞 | ¼ cup | Panko for extra crunch |
| Garlic Powder 🧄 | ½ tsp | For breadcrumb seasoning |
The cheeses are non-negotiable here. Sharp white cheddar gives that signature tang, while Gruyère adds nutty depth—both need to be freshly grated for that perfect melt. I grab mine from Whole Foods or Trader Joe's since they carry pre-grated options that save time. For the squid ink, Amazon is your best bet if you can't find it at specialty stores—just make sure it's pure, not mixed with other additives. The butter should be European-style if you can find it; it has more fat content that prevents curdling during the baking process.
No squid ink? Activated charcoal powder works just as well—it's what I use when I can't find the paste. Freshly grated cheese is ideal, but pre-shredded works in a pinch (though it's drier). The breadcrumbs should be panko for that extra crunch—regular breadcrumbs get soggy. For the milk, whole milk is essential; skim or low-fat won't give you that creamy texture. If you're making this ahead, prep the cheese sauce first and store it separately from the pasta—it keeps for 2 days in the fridge.
This reheats beautifully—honestly tastes better the next day once everything melds together. Keeps for 4-5 days in the fridge, freezes for 3 months if you portion it into containers. The black color fades slightly when reheated, but the flavor stays rich. For serving, I always sprinkle extra smoked paprika and fresh thyme right before baking—it adds that pop of color and aroma that makes it look restaurant-worthy.
Why You'll Love This Recipe
- Here’s what sold me: the sharp cheddar’s bite plays off the Gruyère’s nutty richness, while the cream cheese keeps it lusciously smooth. Top it with a quick breadcrumb crust (or skip it—I’m not judging), and you’ve got that crispy edge with the creamy center. It’s the kind of texture combo that makes you close your eyes mid-bite.
- I’ll be real: most baked macs turn into a sad, gluey mess the next day. Not this one. The heavy cream keeps it rich but not greasy, so reheating is a breeze—just pop it back in the oven for 10 minutes. Plus, it’s cheap enough to make twice in a week without guilt. My wallet thanks me.
Step-by-step instructions for baked mac and cheese with dramatic black crust
Here's how to build layers of velvety cheese and a dramatic smoked crust—no shortcuts, just rich flavor.
Cook the Elbow Macaroni to Perfect Al Dente
Bring a large pot of water to a rolling boil and add 12 oz elbow macaroni. Season generously with salt—it should taste like the ocean. Cook for 2 minutes less than package instructions (about 9-10 minutes total) for al dente texture. The pasta should have a slight bite in the center when bitten.
Drain the pasta but reserve 1 cup of starchy pasta water. This liquid is liquid gold for creating a silky sauce. Don't rinse the pasta—those surface starches help the cheese cling perfectly. Toss the hot pasta with 1 tbsp unsalted butter to prevent sticking as it cools slightly.
Build the Ultimate Cheese Sauce Base
In the same pot, melt 4 tbsp unsalted butter over medium heat. Whisk in 2 tbsp all-purpose flour to form a roux, cooking for 1-2 minutes until fragrant but not browned. Slowly whisk in 1 cup whole milk and 1 cup heavy whipping cream, letting the mixture thicken gradually.
Reduce heat to low and add 2 cups sharp white cheddar cheese, 1 cup gruyère cheese, 8 oz cream cheese, 1 tbsp squid ink paste, 1 tsp smoked paprika, 1.5 tsp salt, and 0.5 tsp ground black pepper. Stir constantly until the cheese melts completely and the sauce becomes velvety smooth. If it thickens too much, add reserved pasta water 1 tablespoon at a time until it reaches a pudding-like consistency.
Combine Pasta and Cheese Mixture
Add the cooked elbow macaroni to the cheese sauce and gently fold everything together using a wooden spoon. The sauce should coat each noodle completely. For extra richness, fold in 1 tbsp fresh thyme leaves at this stage. Taste and adjust seasoning if needed—this is your chance to balance the flavors before baking.
Transfer the macaroni and cheese to a greased 9x9-inch baking dish, spreading it evenly. The mixture should be level—this ensures even baking and a perfect crust. Press down gently with a spatula to compact the layers slightly, which prevents excessive spreading in the oven.
Create the Smoky Black Crust Topping
In a small bowl, mix together 0.25 cup breadcrumbs, 0.5 tsp garlic powder, and 1 tbsp fresh thyme leaves. Sprinkle this mixture evenly over the top of the macaroni and cheese, pressing down lightly to help it adhere. The breadcrumbs will form a crispy, golden crust that contrasts beautifully with the black squid ink sauce beneath.
For extra drama, lightly brush the top with melted butter using a pastry brush. This creates a glossy sheen that caramelizes beautifully in the oven. The butter also helps the breadcrumbs crisp up perfectly while keeping the cheese underneath creamy.
Bake to Golden Perfection
Preheat your oven to 375°F. Bake the macaroni and cheese for 20-25 minutes, until the top is golden brown and the edges are bubbling. The breadcrumb crust should be crispy enough to stand up to a spoon, while the cheese underneath should be molten and bubbling.
For the final touch, broil for 1-2 minutes at the end to deepen the color of the breadcrumb crust. Watch carefully—broilers can be aggressive! When done, the top should be golden brown with black accents from the squid ink, and the cheese should be gooey enough to pull into strings when you cut into it.
Let it rest for 5 minutes before serving—this allows the cheese to set slightly and makes it easier to slice. The contrast of the crispy black crust with the creamy cheese layers is what makes this dish truly special.
Pro Tips For Making Baked Mac N Cheese Black
- Drain But Don’t Rinse: The starch in the pasta water is your sauce’s best friend—it thickens the cheese mixture naturally. After draining, leave about ½ cup of that starchy water in the pot, then stir it into the cheese sauce. I used to rinse the pasta like I was told, and the sauce always ended up grainy and weak.
- Melt Cheese Slowly: Don’t just dump all the cheese into the pot and hope for the best. Start with the sharp cheddar and cream cheese over medium-low heat—they melt faster and won’t scorch. Once they’re smooth, add the Gruyère in small chunks and stir constantly. After burning three batches, I finally figured out that patience here means no grainy surprises later.
- Press Down Before Baking: After mixing the mac and cheese into the baking dish, use a spoon or spatula to press it down firmly. This ensures even baking and a crispier top layer. I skip this when I’m lazy, but the dish is noticeably better when I don’t—no soggy spots, just a golden, crackly crust.
- Add Whipping Cream Last: Stir in the heavy whipping cream right before baking, not while heating the sauce. The heat can turn it grainy or split it, and you’ll end up with a sad, broken sauce. Keep the cream cold until the very end—this keeps the texture silky and rich.
Common mistakes when making perfect results
Overcooking the Pasta
I can't tell you how many times I've seen perfectly good mac and cheese ruined by overcooked pasta. The moment your elbow macaroni reaches al dente (about 9-10 minutes for 12 oz), drain it immediately. Overcooked pasta turns mushy when baked, and no amount of cheese can save it.
Test with a quick bite—it should have a slight resistance in the center. Pro tip: Reserve that starchy pasta water—it's the secret weapon for silky sauce consistency. 🍝
Skipping the Roux
If you're tempted to skip the roux step to save time, don't. That 2 tbsp flour cooked in 4 tbsp butter creates the foundation for your sauce's thickness and richness. Without it, your cheese sauce will be too thin and watery.
I've tried the shortcut, and trust me, your mac and cheese will thank you for taking those extra 1-2 minutes to build the roux properly.
Adding Squid Ink Too Late
The squid ink needs to be incorporated when the cheese sauce is still hot but not boiling. Adding it too late means it won't fully disperse, leaving you with clumpy black streaks instead of a smooth, velvety black color.
Mix it in with the other cheeses when you're stirring over low heat. If you're using activated charcoal powder, whisk it into the warm milk before adding to the cheese mixture for even distribution.
Underestimating Rest Time
This is a common rookie mistake that leads to sloppy, runny mac and cheese. After baking, let your dish rest for 5 minutes before serving. This crucial step allows the cheese to set slightly, making it easier to slice and preventing a messy presentation.
I've learned this the hard way—skipping the rest time means cheese everywhere when you cut into it. Patience pays off here! ✨
Uneven Baking Temperature
Your oven's temperature accuracy is critical here. If your oven runs hot, your mac and cheese might burn before the center gets creamy. I recommend using an oven thermometer to verify your 375°F setting—many home ovens are off by 25°F or more.
Also, avoid opening the oven door during baking, as temperature fluctuations can cause the breadcrumb topping to soften instead of crisping.
Using Low-Quality Cheese
This is where many home cooks cut corners, and it shows. Pre-shredded cheese contains anti-caking agents that prevent proper melting, leading to grainy texture. Always use freshly grated sharp white cheddar and Gruyère for that authentic, creamy melt.
I buy mine pre-grated from Whole Foods or Trader Joe's when I'm short on time, but freshly grating makes a noticeable difference in texture and flavor.
Nutrition facts
Frequently asked questions
Can I make this black mac and cheese without squid ink?
Activated charcoal powder works perfectly as a substitute. Use 1 teaspoon instead of the 1 tablespoon squid ink paste—it creates the same dramatic black color while adding a subtle earthy note. For a more neutral flavor, you could also use black food coloring, but the charcoal gives a more natural look and taste.
How do I prevent the cheese from getting grainy?
Always use freshly grated cheese—pre-shredded contains anti-caking agents that create graininess. For the best results, grate your own sharp white cheddar and Gruyère using a box grater. Also, keep the heat low when melting the cheese and stir constantly to prevent any lumps from forming. If you're in a hurry, buy pre-grated cheese from a specialty store that doesn't add anti-caking agents.
Can I make this recipe ahead of time?
Yes, but with a few adjustments. Prepare the cheese sauce completely and store it in an airtight container in the fridge for up to 2 days. When ready to bake, mix it with cooked pasta (cooked just before combining) and proceed with the baking instructions. For longer storage, freeze the cooked mac and cheese (before adding breadcrumbs) for up to 3 months. The black color may fade slightly when reheated, but the flavor remains rich.
What's the best way to reheat leftovers?
For the best texture, reheat in a 350°F oven for 15-20 minutes covered with foil, then uncover and broil for 1-2 minutes to crisp the top. If using the microwave, cover with a damp paper towel and heat in 30-second intervals until warmed through. The breadcrumb topping may soften slightly, but the cheese underneath stays creamy. For extra crispiness, broil for 1 minute after microwaving.
How do I make this vegetarian or vegan?
For a vegetarian version, use plant-based cheeses that melt well (like Miyoko's or Violife brands) and substitute butter with vegan butter. For a fully vegan option, replace the cheese with a cashew-based cheese sauce and use vegan breadcrumbs. The squid ink remains vegetarian-friendly, but check your charcoal source if using that instead. The baking process and techniques remain the same—just adjust the seasoning slightly to complement plant-based ingredients.