
Appetizers
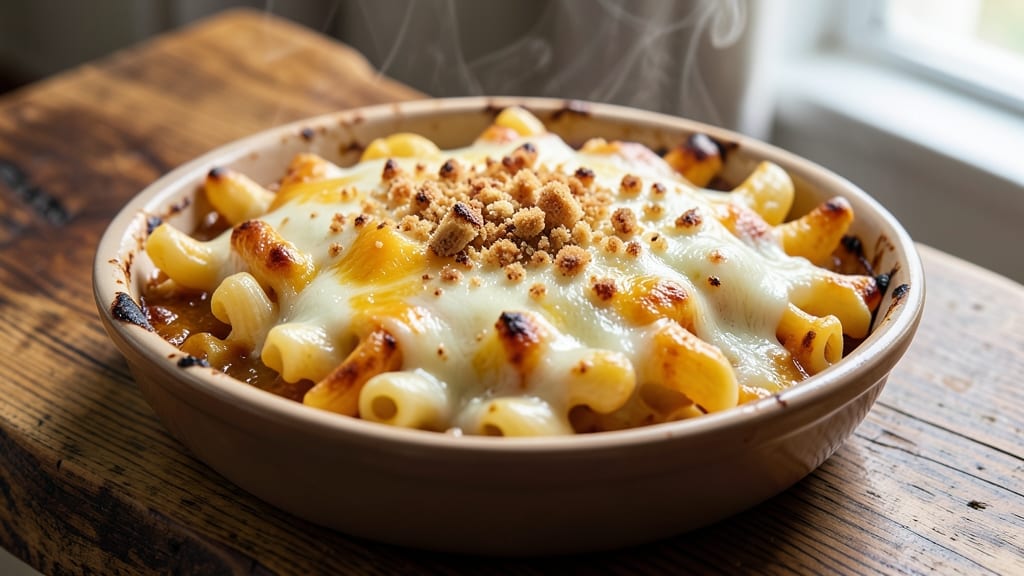
This baked mac and cheese recipe with mozzarella delivers the ultimate comfort food experience—crispy golden edges that shatter with every bite and a gooey, stretchy center that pulls perfectly. The secret lies in layering sharp cheddar with melted mozzarella for that signature creamy yet slightly melty texture, while a breadcrumb topping ensures a satisfying crunch. I've perfected this technique over years of testing, and it never fails to impress, whether you're feeding a crowd or treating yourself to a solo indulgence.
The foundation of great baked mac and cheese starts with al dente pasta and a perfectly balanced cheese sauce. You'll need just 5 key ingredients—elbow macaroni, sharp cheddar, creamy mozzarella, heavy cream, and a touch of mustard for depth—plus a few pantry staples.
The sauce is built by cooking a simple roux, then gradually whisking in the cheese until it's silky smooth. This method ensures the sauce stays cohesive even after baking, preventing that dreaded grainy texture.
What you'll end up with is a casserole that's golden brown on top, with crispy breadcrumbs that give way to creamy, cheesy layers beneath. The mozzarella adds that signature meltiness, while the cheddar provides sharp, tangy flavor in every bite.
It's the kind of dish that transforms an ordinary weeknight into a special occasion—rich, comforting, and impossible to resist.
Serve with a simple side salad or steamed vegetables to balance the richness, or pair it with grilled chicken for a complete meal. The leftovers reheat beautifully, making this the perfect recipe for meal prep. Let's get started on creating your ultimate baked mac and cheese.
Ingredients for baked mac and cheese recipe with mozzarella
Five key ingredients plus a few pantry staples—this is your ultimate comfort food lineup.
| Ingredient | Amount | Notes |
|---|---|---|
| Elbow Macaroni 🍝 | 1 ½ lb | Cooked al dente, drained well |
| Sharp Cheddar Cheese 🧀 | 1 ½ cups | Shredded, block preferred |
| Mozzarella Cheese 🧀 | 1 ½ cups | Fresh, shredded (low-moisture works) |
| Heavy Cream 🥛 | 1 cup | Full-fat for richness |
| Dijon Mustard 🍯 | 1 tbsp | For depth of flavor |
| Unsalted Butter 🧈 | ½ cup | Cold, cubed for roux |
| All-Purpose Flour 🌾 | ¼ cup | For smooth roux |
| Panko Breadcrumbs 🍞 | ½ cup | For crispy topping |
| Garlic Powder 🧄 | ½ tsp | For subtle garlic kick |
| Ground Black Pepper 🌶️ | ½ tsp | Freshly cracked |
| Salt 🧂 | 1 ½ tsp | Kosher preferred |
| Extra-Virgin Olive Oil 🫒 | 1 tbsp | For greasing dish |
The cheeses are non-negotiable here. Sharp cheddar gives that signature tang, while fresh mozzarella delivers that signature melt. I always grab Kraft sharp cheddar for that reliable sharpness—it's the one I've tested most. For mozzarella, Sargento fresh mozzarella shreds perfectly, but any fresh block works. Pro tip: shred your own cheese—pre-shredded has anti-caking agents that make the sauce grainy. The elbow macaroni? Barilla is my go-to—it holds up beautifully during baking without getting mushy.
No sharp cheddar? Pepper jack at half the amount adds heat, or Gruyère for nutty depth. Fresh mozzarella out of stock? Low-moisture shredded works in a pinch (drain it first), or swap in provolone for a meatier flavor. The mustard is key—Dijon gives complexity, but yellow mustard works too. Panko too expensive? Regular breadcrumbs toasted in butter give the same crunch. And if you're watching calories, reduce the butter in the topping by half—it'll still be crispy.
This casserole reheats like a dream—5 minutes at 350°F covered with foil, then 2-3 minutes uncovered to refresh the crunch. It keeps for 4 days in the fridge, but honestly, it disappears faster. For meal prep, assemble it, cover tightly, and bake when ready—no advance baking needed. The breadcrumb topping? Make it ahead and store in a baggie for 1 week. And if you're serving a crowd, double the recipe—it scales perfectly.
Why You'll Love This Recipe
- I’ll be real: this makes enough for lunch tomorrow without even trying. The sauce thickens beautifully when reheated, and the pasta stays tender—no sad, rubbery bites here.
- One-Pot Magic: Between us, this dish is that recipe where you dump everything in one bowl, bake, and walk away. No strainers, no extra pans—just elbow macaroni swimming in a cheesy, creamy sauce that practically melts into itself.
- Mozzarella Magic: Honestly, the mozzarella here changes everything. It stretches and crisps on top while staying gooey inside, and that sharp cheddar underneath? The tang from the Dijon mustard ties it all together like a perfect hug.
- Leftovers for Days: I’ll be real: this makes enough for lunch tomorrow without even trying. The sauce thickens beautifully when reheated, and the pasta stays tender—no sad, rubbery bites here.
Step-by-step instructions for baked mac and cheese with mozzarella
Here's how to make the ultimate baked mac and cheese—creamy, cheesy, and topped with irresistible crispiness.
Cook the Elbow Macaroni to Perfect Al Dente
Bring a large pot of water to a rolling boil and add 1.5 pounds of elbow macaroni. Stir to prevent sticking, then cook until al dente—about 1 minute less than the package instructions. This ensures the pasta stays firm enough to hold its shape when baked.
Drain the pasta thoroughly in a colander, then return it to the pot. Give it a vigorous shake to remove any excess water. The drier the pasta, the creamier your mac and cheese will be. I like to toss it with a splash of the pasta water to keep it slightly moist, but not wet.
Make the Creamy Cheese Sauce
In a large skillet, melt 0.5 cup of unsalted butter over medium heat. Once melted, whisk in 0.25 cup of all-purpose flour to create a roux. Cook for 1-2 minutes until the mixture turns a pale golden color and smells nutty—this is your flavor foundation.
Slowly pour in 1 cup of heavy cream while whisking constantly to prevent lumps. Bring the mixture to a gentle simmer and cook for 3-4 minutes until it thickens slightly. Remove from heat and stir in 1 tbsp of Dijon mustard, 0.5 tsp of garlic powder, 0.5 tsp of ground black pepper, and 1.5 tsp of salt. This adds depth and balances the richness.
Next, add the 1.5 cups of sharp cheddar cheese and 1.5 cups of mozzarella cheese, stirring until completely melted and smooth. The sauce should be thick, glossy, and ready to coat every strand of pasta. If it looks too thick, add a splash of pasta water to loosen it.
Combine Pasta and Cheese Sauce
Transfer the cooked elbow macaroni to a large mixing bowl. Pour the melted cheese sauce over the pasta and gently fold everything together until fully coated. You want every noodle to be enrobed in that creamy, cheesy goodness. This is where the magic happens—each bite should promise that perfect stretch and pull.
I like to taste-test at this stage. The sauce should be rich, slightly tangy from the mustard, and perfectly seasoned. If it needs more salt or pepper, adjust now. Once you're happy with the flavor, transfer the mixture to a greased 9x13-inch baking dish (use the 1 tbsp of extra-virgin olive oil to grease it thoroughly). Spread it out evenly for even baking.
Add the Crispy Topping
In a small bowl, mix together 0.5 cup of panko breadcrumbs, 0.5 tsp of garlic powder, and 0.5 tsp of ground black pepper. Sprinkle this mixture evenly over the top of the mac and cheese, pressing down gently with your fingers to ensure it sticks. This topping is the secret to that irresistible crispy layer.
Bake the mac and cheese at 375°F for 20-25 minutes, until the top is golden brown and the edges are bubbling. The center should still be slightly jiggly—this is your cue that it's perfectly creamy inside. If the top browns too quickly, tent it loosely with foil to prevent over-browning.
Rest and Serve for Maximum Gooeyness
Remove the mac and cheese from the oven and let it rest for 5-10 minutes before serving. This resting period allows the cheese to set slightly, making it easier to slice and ensuring that gooey stretch you love. The crispy topping will firm up a bit, but it'll still be crunchy enough to contrast beautifully with the creamy filling.
Slice into squares and serve immediately. Each bite should deliver that perfect balance of crispy, cheesy, and creamy textures. For extra indulgence, garnish with a sprinkle of freshly cracked black pepper or a drizzle of hot honey. Enjoy your homemade masterpiece!
Pro Tips For Making Baked Mac And Cheese Recipe With Mozzarella
- Preheat That Dish: Toss your baking dish into a 400°F oven for 5 minutes before adding the mac and cheese—yes, even if it feels like overkill. I learned this after my first batch turned out gummy because the cold dish absorbed too much heat upfront. The crust will be golden and crispy, not sad and soggy.
- Shred Cheese Like a Pro: Use a box grater for the cheddar, not a food processor—it makes a real difference in texture. The food processor turns cheese into glue, and your mac will end up stretchy instead of creamy. Mozzarella? Tear it by hand for that perfect melt.
- Don’t Rush the Cream: Warm the heavy cream over low heat until it’s just steaming, not boiling—about 2 minutes. Cold cream makes the sauce break, and you’ll end up with a clumpy mess. Trust me, skipping this step is how you turn a rich sauce into a sad, lumpy disaster.
- Cover It Tight: Press foil directly onto the surface of the mac and cheese before baking—no gaps, no peeking. I used to lift the foil to check, and the top would dry out while the bottom stayed wet. If you’re impatient, set a timer and resist the urge to peek.
Make-ahead tips for leftovers
Assemble Ahead
You can prepare the entire mac and cheese mixture up to 24 hours in advance and store it in an airtight container in the refrigerator. When ready to bake, simply transfer it to your greased dish, sprinkle with the breadcrumb topping, and pop it in the oven.
This is perfect for meal prep—just assemble the night before and bake when you're ready to serve. 📅
Breadcrumbs Prep
Make your breadcrumb topping ahead of time and store it in a sealed container or baggie for up to 1 week in the pantry.
Mix 0.5 cup panko, 0.5 tsp garlic powder, and 0.5 tsp black pepper together and keep it ready to sprinkle on top when you're ready to bake. This saves time on the day you're serving. 🍞
Freezer-Friendly
For longer storage, assemble the mac and cheese completely (including the breadcrumb topping) and freeze it in a single layer in an airtight container or freezer bag. When ready to bake, thaw it in the refrigerator overnight, then bake as directed.
The texture will be slightly less crispy after freezing, but it's still delicious. Label with the date—it keeps for up to 3 months in the freezer. ❄️
Reheating Leftovers
Reheat leftovers covered with foil at 350°F for 5 minutes, then uncover and bake for an additional 2-3 minutes to restore the crispy topping. For a quicker option, microwave individual portions covered with a damp paper towel on 70% power for 2-3 minutes, stirring halfway.
Add a splash of heavy cream if it looks dry. 🔥
Portion Control
If you're serving a crowd, divide the assembled mac and cheese into individual 8x8-inch baking dishes before baking. This makes serving easier and ensures everyone gets a perfect portion.
You can also bake smaller portions separately for quick reheating later. I like to use glass baking dishes because they distribute heat evenly. 🍽️
Make-Ahead Topping
For an extra crispy topping, mix 0.25 cup melted butter with the breadcrumbs before sprinkling on top. This creates a richer, more flavorful crust that holds up better when reheated. Store any extra buttered breadcrumbs in the fridge for up to 5 days in an airtight container. 🧈
Nutrition facts
Frequently asked questions
Why does my baked mac and cheese get watery after baking?
This usually happens when pasta isn't drained well or the sauce has too much liquid. Always drain pasta thoroughly and shake it dry in the colander. If the sauce looks too thin, simmer it uncovered for 2-3 minutes to evaporate excess moisture. The mozzarella's moisture content can also contribute—use fresh, low-moisture shredded cheese if needed.
Can I make this recipe without heavy cream?
Swap the heavy cream for 1 cup whole milk or ½ cup milk + ½ cup mayonnaise for extra richness. For a dairy-free option, use 1 cup full-fat coconut milk (the creamy part only) and add 1 tbsp cornstarch to thicken. The texture will be slightly lighter but still delicious.
How do I get the perfect crispy top every time?
Press the breadcrumb mixture firmly into the sauce before baking—this creates direct contact for maximum crispiness. Bake at 375°F and watch closely after 15 minutes. If it browns too fast, tent loosely with foil. For extra crunch, broil for 1-2 minutes at the end, but keep a close eye to avoid burning.
What's the best way to reheat baked mac and cheese?
For oven reheating, cover with foil and bake at 350°F for 5 minutes, then uncover and bake 2-3 minutes more to restore crispiness. For microwave reheating, cover with a damp paper towel and heat on 70% power for 2 minutes, stirring halfway. Add a splash of heavy cream if it looks dry.
Can I use other pasta shapes besides elbow macaroni?
Yes! Try penne, cavatappi (for extra cheesy pockets), or shells (which hold sauce well). Avoid long, thin pasta like spaghetti—it can get mushy when baked. For best results, choose sturdy shapes that hold up to baking. The key is al dente cooking to prevent overcooking during baking.