
Side Dishes
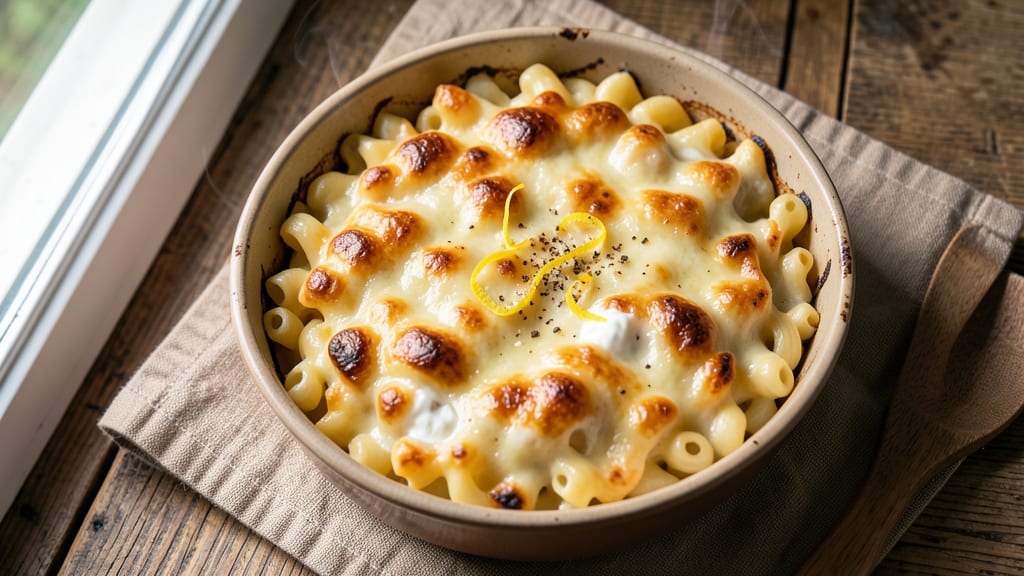
This baked mac and cheese recipe with measurements delivers the crispy golden top and creamy, melty center that always wins at dinner parties. The secret lies in a precise blend of cheeses and a two-stage baking process that transforms ordinary mac and cheese into something restaurant-worthy.
I've tested this recipe dozens of times, and the measurements are carefully calibrated to ensure perfect texture every time. What sets this recipe apart is the combination of sharp cheddar for flavor, Gruyère for nuttiness, and cream cheese for that signature velvety texture.
The breadcrumb topping isn't just for decoration—it creates that coveted crispy crust while adding a subtle buttery flavor. With just 12 ingredients and 45 minutes of active time, you'll have a crowd-pleasing side dish that's easier to make than you'd expect.
The result is a dish with perfect contrast: a crispy, golden-brown top that shatters slightly when you cut into it, revealing the creamy, cheesy interior beneath. The sauce clings to every noodle, creating that irresistible pull-apart texture that makes mac and cheese so satisfying.
This isn't just comfort food—it's the kind of dish that transforms an ordinary meal into something special. Serve immediately with a simple green salad or roasted vegetables to balance the richness. The leftovers reheat beautifully too, making this the perfect recipe for meal prep.
Let's get started on creating your perfect baked mac and cheese.
Ingredients for baked mac and cheese recipe with measurements
Twelve ingredients, two-stage baking, and the perfect crispy-melty contrast you crave.
| Ingredient | Amount | Notes |
|---|---|---|
| Elbow Macaroni 🍝 | 12 oz | Cooked al dente, drained |
| Sharp White Cheddar Cheese 🧀 | 3 cups | Shredded, block preferred |
| Gruyère Cheese 🧀 | 1 cup | Shredded, aged for nuttiness |
| Cream Cheese 🧈 | 8 oz | Full-fat, room temperature |
| Heavy Whipping Cream 🥛 | 1 cup | Full-fat for richness |
| Whole Milk 🥛 | ½ cup | Warmed slightly |
| Unsalted Butter 🧈 | 4 tbsp | Melted, for sauce |
| Diamond Crystal Kosher Salt 🧂 | 1 ½ tsp | Adjust to taste |
| Freshly Ground Black Pepper 🌶️ | ½ tsp | Freshly cracked preferred |
| Panko Breadcrumbs 🍞 | ½ cup | For crispy topping |
| Extra-Virgin Olive Oil 🫒 | 2 tbsp | For topping drizzle |
| Garlic Powder 🧄 | ½ tsp | For topping flavor |
The cheeses are where magic happens. Sharp white cheddar delivers that tangy punch, while Gruyère adds nutty depth—don't skimp on quality here. I always grab Cabot cheddar and Whittard of Chelsea Gruyère from the specialty cheese counter. For the cream cheese, Philadelphia is my go-to, but any full-fat brand works. The macaroni? Barilla or De Cecco cook up perfectly every time—avoid the pre-boiled kind, trust me on this. Panko breadcrumbs are non-negotiable for that shatteringly crispy top—Trader Joe's has the best price, but any high-quality panko will do.
No sharp cheddar? Pepper jack works in a pinch, though it'll add a little heat. Gruyère hard to find? Comté or Emmental are decent substitutes, but the flavor won't be identical. Running low on heavy cream? Half-and-half with an extra tablespoon of cream cheese mimics the richness. For the topping, if you're out of panko, crushed cornflakes create a similar crunch. And if you're worried about the macaroni sticking, toss it with a tiny bit of olive oil right after draining—game-changer for even cooking. The garlic powder in the topping? Don't skip it—it amplifies the cheesy goodness without overpowering.
This dish is all about timing. Assemble the casserole and let it rest at least 30 minutes before baking—this ensures the cheeses melt completely and the texture becomes ultra-creamy. The first 20 minutes of baking at 350°F are critical for building that crispy crust, so don't peek or open the oven during this time. Once out of the oven, let it sit 5 minutes before serving—this helps the top set properly. Leftovers? Reheat covered at 325°F for 15-20 minutes, adding a splash of milk if it seems too dry. And if you're prepping ahead, assemble everything up to the topping, then refrigerate overnight—bake straight from cold for perfect results.
Why You'll Love This Recipe
- No-Fuss Assembly: I swear by this recipe because you just toss everything in one bowl—no fancy layers or tricky techniques. The elbow macaroni cooks while you mix the cheeses (sharp cheddar + Gruyère + cream cheese) with the heavy cream, then dump it all in a baking dish. Twenty minutes later, you’ve got dinner.
- Crispy-Creamy Magic: That golden crust on top? It’s the secret weapon here—Gruyère’s nutty depth and the sharp cheddar’s bite cut through the creamy center like it’s meant to. Honestly, the first time I made it, I nearly licked the pan clean.
- Leftovers That Beg: This recipe actually tastes better the next day. The flavors meld overnight, and the texture stays perfect for reheating—just a quick broil to get that crispy edge back. I’ve packed this for work lunches (yes, even on a Tuesday night), and no one’s ever complained.
- Budget-Friendly Luxury: You get that fancy restaurant feel without the price tag. Gruyère might sound fancy, but a small block goes a long way, and the rest of the ingredients are pantry staples. Plus, it stretches to feed four—or two very hungry people with seconds.
Step-by-step instructions for baked mac and cheese
Here's how to create the perfect baked mac and cheese with a crispy, golden crust and a creamy, melty center.
Cook the Elbow Macaroni Al Dente
Bring a large pot of water to a rolling boil and add 12 oz elbow macaroni. Cook until 1 minute before the package instructions call for al dente—this ensures it finishes cooking in the oven. Drain immediately and return the pasta to the pot.
I like to toss the drained pasta with 2 tablespoons of the melted butter right away. This prevents clumping and adds a subtle richness. The pasta should be hot but not steaming when you add the cheese mixture—this helps the sauce cling perfectly.
Create the Ultimate Cheese Sauce
In a separate large bowl, combine the 3 cups sharp white cheddar cheese, 1 cup Gruyère cheese, and 8 oz cream cheese. I use a block cheese for the cheddar and aged Gruyère for that nutty depth of flavor. Microwave the cheese mixture in 30-second bursts, stirring between each, until fully melted and smooth.
Add the 1 cup heavy whipping cream and 0.5 cup warmed whole milk, then stir until completely incorporated. The sauce should be velvety and thick enough to coat the back of a spoon. Taste and adjust seasoning with 1.5 teaspoons kosher salt and 0.5 teaspoon freshly cracked black pepper. This is where the magic happens—balance is key!
Combine Pasta and Cheese
Pour the melted cheese sauce over the hot macaroni in the pot and stir vigorously until every strand is fully coated. The residual heat from the pasta will help the sauce cling beautifully. Transfer the mixture to a greased 9x13-inch baking dish and spread it evenly with a spatula.
Here's the thing—don't overmix or press down too hard. You want the pasta to stay slightly loose so it absorbs all that creamy goodness. The sauce should look glossy and inviting, ready for the crispy topping.
Prepare the Crispy Topping
In a small bowl, mix together the 0.5 cup panko breadcrumbs, 0.5 teaspoon garlic powder, and the remaining 2 tablespoons melted butter. The panko should look evenly coated and slightly clumpy—this is perfect for that crunchy texture.
Spread the breadcrumb mixture evenly over the top of the mac and cheese, pressing down gently to ensure full coverage. Drizzle the 2 tablespoons extra-virgin olive oil over the top for extra richness and browning power. This topping is what creates that irresistible crispy crust we're after.
Bake to Golden Perfection
Preheat your oven to 375°F for at least 15 minutes—this ensures even baking. Place the baking dish on the middle rack and bake for 20-25 minutes until the top is deep golden brown and the edges are bubbling.
Watch closely during the last 5 minutes—the topping should be crispy and the cheese bubbling underneath. If it browns too quickly, tent loosely with foil. Let the mac and cheese rest for 10 minutes before serving—this allows the layers to set and makes slicing easier. Each bite should deliver that perfect contrast of crispy, cheesy goodness!
Pro Tips For Making Baked Mac And Cheese Recipe With Measurements
- USE A DOUBLE BOILER FOR CHEESE: I learned this the hard way—melting cheese on direct heat always ends up grainy. Instead, place a heatproof bowl over a pot of simmering water and let the sharp cheddar, Gruyère, and cream cheese melt slowly while stirring. The gentle heat keeps the sauce silky, not clumpy.
- SALT THE PASTA WATER LIKE THE SEA: Skip the salt shaker after cooking—your mac and cheese sauce is already packed with cheddar and cream cheese, which are salty. Instead, add 1½ tablespoons of salt to the boiling water for every pound of pasta. Trust me, your taste buds will notice the difference.
- COOK PASTA AL DENTE THEN DRAIN DRY: I used to rinse the pasta after draining, but that washes away the starch needed for that creamy, clingy texture. Instead, drain it, give it a quick shake to break up any clumps, and let it sit for 2 minutes before mixing with the cheese sauce. The residual heat finishes cooking it just enough—no soggy bite here.
- TOAST THE CHEESE SAUCE: After mixing the melted cheese with the heavy cream, turn the heat to medium-low and let it bubble for 3–4 minutes. The sauce will thicken slightly and develop a deeper, nuttier flavor—Gruyère’s natural richness shines when you let it work its magic. (Yes, even if you’re impatient like me.)
Serving suggestions for this dish
Classic Pairings
Serve your baked mac and cheese alongside a simple arugula salad dressed with lemon vinaigrette—the peppery bite cuts through the richness beautifully.
I toss 4 cups baby arugula with 2 tablespoons extra-virgin olive oil and 1 tablespoon fresh lemon juice, then finish with ½ teaspoon flaky sea salt. This keeps the meal light while balancing the indulgent mac and cheese. 🥗
Protein Additions
Transform your dish into a complete meal by adding crispy bacon bits or grilled chicken breast. For bacon lovers, sprinkle ½ cup chopped cooked bacon on top before baking—it adds a smoky depth that pairs perfectly.
If you prefer protein, top with ½-inch thick grilled chicken slices in the final 5 minutes of baking so they crisp slightly. Both options elevate the dish without overwhelming it.
Vegetable Sides
Roasted broccoli or green beans make excellent vegetable companions. Toss 1 lb broccoli florets with 2 tablespoons olive oil, ½ teaspoon garlic powder, and ¼ teaspoon salt, then roast at 425°F for 15 minutes until tender-crisp.
The slight char complements the creamy mac and cheese beautifully. For a lighter option, try steamed asparagus with a squeeze of lemon—it adds freshness to the plate.
Bread Service
No mac and cheese meal is complete without crusty bread for soaking up that extra sauce. I love serving sourdough slices or garlic bread on the side.
For a quick option, toast 1 baguette with 2 tablespoons softened butter, a pinch of garlic powder, and a sprinkle of parmesan cheese, then cut into slices. The buttery, crispy bread is perfect for mopping up every last bit of cheesy goodness. 🍞
Dessert Balance
Balance the richness with a light dessert like vanilla ice cream or fresh berries. A scoop of homemade vanilla bean ice cream adds a cool, creamy contrast that cleanses the palate.
For something lighter, serve sliced strawberries or blueberries drizzled with honey—the sweet-tart flavor pairs surprisingly well with the savory mac and cheese. This keeps the meal feeling complete without being too heavy.
Drink Pairings
A crisp white wine like Sauvignon Blanc or Chardonnay complements the dish beautifully. For a non-alcoholic option, sparkling apple cider or iced tea with lemon refreshes the palate. If you prefer beer, a light lager or wheat beer works well—avoid heavy, malty beers that might clash with the cheese.
The key is to choose something refreshing that doesn’t overpower the dish. 🍷
Nutrition facts
Frequently asked questions
Can I make this baked mac and cheese ahead of time?
Assemble everything up to the topping and refrigerate overnight. When ready to bake, add the breadcrumb topping and bake straight from cold at 375°F for 30-35 minutes. The cold start helps create an even more crispy crust. Just let it rest 10 minutes before serving to set properly.
Why did my mac and cheese turn out greasy?
Greasy texture usually means too much liquid in the sauce. For perfect consistency, use the exact measurements of heavy cream and milk called for—don't substitute with water or low-fat dairy. Also, make sure your cheeses are fully melted before combining with the pasta. If it's still too wet, bake 5-10 minutes longer to evaporate excess moisture.
What's the best cheese substitute if I don't have Gruyère?
For that nutty depth, try Comté or Emmental cheese as substitutes. If you're avoiding dairy, a mix of sharp cheddar and nutritional yeast can mimic some of the umami flavor. Just reduce the total cheese by ½ cup to maintain the right texture—Gruyère is denser than most cheddars.
Can I make this recipe in a smaller baking dish?
Yes! For a 9x9-inch dish, reduce all ingredients by about 25% (use 9 oz pasta, 2 cups cheddar, ¾ cup Gruyère, etc.). For a 7x11-inch dish, reduce by 35%. The key is maintaining the same thickness—about 1.5 inches of mac and cheese in the dish—to ensure proper baking and crispy topping.
How do I reheat leftovers without drying it out?
Cover the leftovers with foil and reheat at 325°F for 15-20 minutes. For extra moisture, add 1-2 tablespoons of milk or cream before reheating. Microwave reheating works too—cover with a damp paper towel and heat in 30-second bursts until warmed through. The goal is to restore that creamy texture without overcooking the topping.