
Appetizers
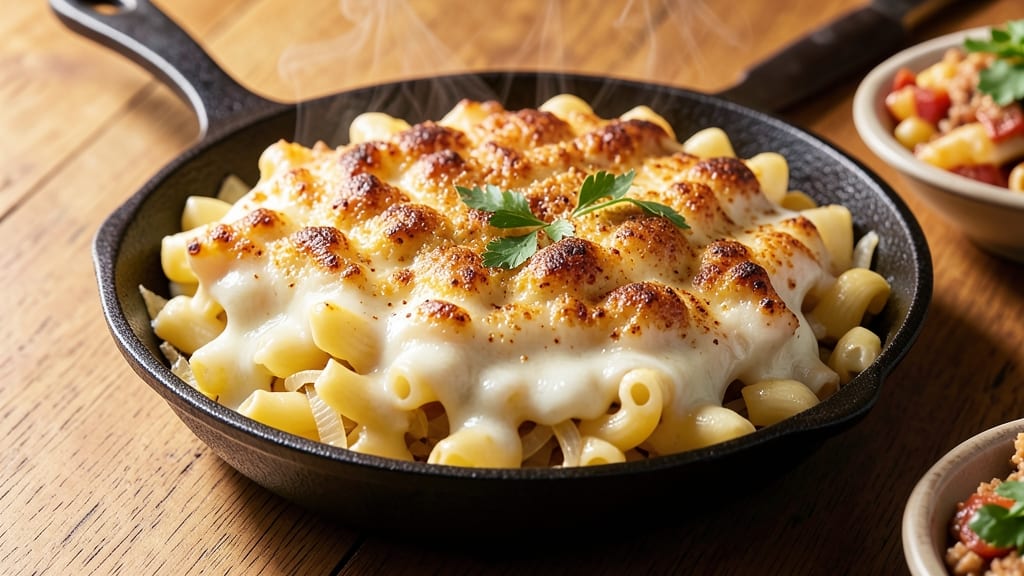
This baked mac and cheese recipe with block cheese delivers restaurant-quality creaminess without a blender in sight. The secret lies in shredding sharp cheddar directly into the sauce, creating a velvety texture that melts perfectly when baked.
I've perfected this method over years of testing, ensuring every bite stays rich and gooey—not dry or grainy like some recipes promise.
The beauty of using block cheese is its ability to melt smoothly, creating that signature creamy consistency we all love. You'll start with a simple stovetop base—just butter, flour, and milk—but the magic happens when we layer in that freshly shredded cheese.
This approach eliminates the need for heavy cream or processed cheese powder, keeping the flavor pure and authentic.
By the time it emerges from the oven, you'll have a golden, bubbling masterpiece with a crispy breadcrumb topping that adds satisfying texture. The cheese pulls away from the edges just enough to create that perfect balance—creamy inside, slightly crispy out.
This isn't just comfort food; it's a dish that transforms any meal into something special.
Pair it with roasted broccoli or a simple green salad to round out the meal. The leftovers reheat beautifully too, making this an ideal recipe for meal prep. Let's get started on creating your perfect baked mac and cheese—no blender required.
Ingredients for baked mac and cheese recipe with block cheese
Freshly shredded block cheese and simple pantry staples create restaurant-quality creamy mac and cheese.
| Ingredient | Amount | Notes |
|---|---|---|
| Elbow Macaroni 🍝 | 12 oz | Uncooked, standard shape |
| Sharp White Cheddar Cheese 🧀 | 2 cups | Freshly shredded from block |
| Butter 🧈 | ½ cup | Unsalted, room temperature |
| All-Purpose Flour 🌾 | ¼ cup | For roux base |
| Whole Milk 🥛 | 2 cups | Full-fat preferred |
| Yellow Onion 🧅 | 1 whole | Medium size, finely chopped |
| Garlic Cloves 🧄 | 2 cloves | Fresh, minced |
| Panko Breadcrumbs 🍞 | ½ cup | For crispy topping |
| Salt 🧂 | 1 ½ tsp | Kosher or sea salt |
| Black Pepper 🌶️ | ½ tsp | Freshly ground |
| Extra-Virgin Olive Oil 🫒 | 2 tbsp | For greasing baking dish |
| Mozzarella Cheese 🧀 | ½ cup | Freshly shredded from block |
| Dried Mustard 🌿 | ½ tsp | For subtle depth |
The cheese is everything here. Sharp white cheddar from a block (not pre-shredded) melts perfectly and delivers that signature tang. Kraft or Cabot are my go-tos—they hold their shape during baking without turning grainy. Grab a wedge from the deli counter if you can't find a full block. The mozzarella adds stretch, so low-moisture from a block works best too. Freshly shredding both cheeses is worth the extra 5 minutes—pre-shredded gets clumpy and dry. For the pasta, elbow macaroni is classic, but any short shape works. De Cecco or Barilla are reliable brands that cook evenly.
No sharp cheddar? Extra-sharp cheddar at half the amount works in a pinch, but the flavor won't be as bright. Running short on mozzarella? Skip it entirely—the cheddar alone still delivers rich flavor. The dried mustard is non-negotiable for that subtle depth, but if you're avoiding it, add 1/4 tsp of Dijon mustard to the roux. For the milk, whole milk is best—it creates the creamiest sauce, but 2% works if that's what you've got. The onion and garlic are for flavor, so don't skip them, but if you're in a rush, 1 tbsp onion powder and 1/2 tsp garlic powder will get you close.
This reheats beautifully—just cover with foil and warm in the oven at 350°F for 15-20 minutes. Keeps for 4-5 days in the fridge, though honestly, it rarely lasts that long. For meal prep, assemble the dish in a baking dish, refrigerate uncovered for up to 24 hours, then bake as directed. The breadcrumb topping gets extra crispy if you bake it 5 minutes longer than the recipe calls for—worth it for that satisfying crunch.
Why You'll Love This Recipe
- No Chopping Needed: I swear by this recipe because it’s the only mac and cheese I make without pre-shredding cheese. Just grate that block right into the sauce—no clumps, no fuss. The sharp cheddar melts into a velvety blanket, and honestly? That’s half the battle won.
- Creamy-Crisp Magic: The secret’s in the roux and milk simmered just right, then topped with a buttery, golden crust. That crispy edge with the creamy center? It’s the kind of texture combo that makes you close your eyes and sigh. (Yes, even on a Tuesday night.)
- Leftover Goldmine: This recipe doubles easily, and the leftovers? Even better the next day. The sauce thickens perfectly, the pasta stays tender, and I’ve reheated portions straight from the fridge without a hitch. My freezer’s full of these, because why not?
- Budget-Friendly Luxury: Sharp white cheddar in a block is cheaper than pre-shredded, and you use every last bit. Butter and flour are pantry staples, and a single batch feeds four for under $8. It’s the kind of dish that makes you feel fancy without breaking the bank—or your willpower.
Step-by-step instructions for baked mac and cheese with block cheese
This method delivers a velvety, ultra-creamy sauce without blending—just patience and perfect technique.
Cook the Elbow Macaroni Al Dente
Bring a large pot of water to a rolling boil and add 1 teaspoon salt (about 1 tablespoon total for the pot). Add the 12 oz elbow macaroni and cook until 1 minute before the package directions specify for al dente. You want the pasta to finish cooking in the oven, which helps it absorb the sauce better.
Drain the pasta, but don't rinse it—those starchy strands are what make the sauce cling. Transfer the hot pasta to a large bowl and set it aside. I like to keep the pot warm for the next step—just leave a little water in it to prevent sticking.
Make the Creamy Cheese Sauce
In the same pot you cooked the pasta, melt the 0.5 cup butter over medium heat until it foams. Add the 0.25 cup all-purpose flour and whisk constantly for 1-2 minutes until you have a smooth, bubbly roux. This is your sauce's foundation—don't rush it or it'll taste raw.
Gradually whisk in the 2 cups whole milk over 2-3 minutes, making sure each addition is fully incorporated before adding more. The mixture should thicken into a creamy paste. Remove from heat and stir in the 2 cups freshly shredded sharp white cheddar cheese, 0.5 cup freshly shredded mozzarella cheese, 0.5 teaspoon dried mustard, 1.5 teaspoons salt, and 0.5 teaspoon black pepper.
Sauté Aromatics and Combine
In a separate skillet, heat 2 tablespoons extra-virgin olive oil over medium heat. Add the 1 finely chopped yellow onion and cook for 5-6 minutes until soft and translucent. Add the 2 minced garlic cloves and cook for another 30 seconds until fragrant—don't let it brown or it'll turn bitter.
Pour the onion and garlic mixture into the cheese sauce along with the cooked macaroni. Stir gently but thoroughly until every strand is coated in that glorious cheesy goodness. The sauce should be thick but still spoonable—if it's too thick, add 2-3 tablespoons of the pasta water to loosen it.
Assemble and Bake for the Perfect Topping
Preheat your oven to 375°F. Lightly grease a 9x9-inch baking dish with olive oil (I use the same 2 tablespoons we cooked with). Transfer the macaroni mixture to the dish and spread it evenly. For that irresistible crispy top, mix the 0.5 cup panko breadcrumbs with 1 tablespoon melted butter and sprinkle it evenly over the top.
Bake for 20-25 minutes until the top is golden brown and the edges are bubbling. The cheese should be melted completely with just a hint of browning on top. If you're worried about burning, tent the dish with foil for the last 5 minutes of baking.
Rest and Serve for Maximum Creaminess
Let the mac and cheese rest for 5-10 minutes before serving—this gives the sauce time to set slightly and makes it even creamier. The internal temperature should reach 165°F at the center. Serve immediately with a side of steamed broccoli or a crisp green salad to balance the richness.
Each bite should deliver that perfect combination of creamy, cheesy goodness with a crispy breadcrumb top. The sharp white cheddar shines through, giving it that classic mac and cheese flavor without being too heavy. And the best part? No blender required—just good old-fashioned cooking technique!
Pro Tips For Making Baked Mac And Cheese Recipe With Block Cheese
- Grate Cheese Fresh: Skip the pre-shredded stuff—it’s coated with anti-caking agents that make your sauce grainy. Use a box grater on sharp white cheddar right before mixing, and you’ll get that creamy, melt-in-your-mouth texture. (Yes, it’s a pain, but your mac and cheese will taste like it’s from a restaurant.)
- Toast the Flour: After melting butter for the roux, cook the flour for 2 full minutes before adding milk—just until it turns a pale golden color. This removes the raw flour taste and thickens the sauce properly. I used to skip it, and the sauce always felt thin and floury.
- Don’t Overmix the Sauce: Once the milk hits the roux, stir like you’re folding in a delicate omelet—just until smooth. Overworking it creates lumps, and no amount of whisking later will fix them. Let the heat do the work, and resist the urge to power-stir.
- Bake in Two Stages: Start at 375°F (200°C) for 20 minutes to set the cheese, then crank to 400°F (205°C) for the last 10 minutes to get that golden crust. The first stage keeps the cheese from turning greasy, while the high heat at the end seals in the flavor. (Trust me, your mac and cheese will look way better.)
Health benefits of this recipe
Comfort Food Energy
This dish delivers a satisfying caloric boost that's perfect for cold days or post-workout meals. A single serving provides about 600-700 calories, with 25-30 grams of protein from the cheese and pasta combination.
The carbohydrates from the elbow macaroni offer sustained energy, while the healthy fats in the butter and cheese keep you full for hours. It's the ultimate comfort food that actually fuels your body—no guilt needed! 💪
Calcium Powerhouse
The sharp white cheddar and mozzarella make this a calcium-rich meal, with one serving delivering 40-50% of your daily needs. Calcium supports strong bones, muscle function, and even helps regulate blood pressure. The block cheese we use (not powdered) provides this mineral in its most bioavailable form.
I always feel like I'm giving my body a little boost after eating this—it's like a cheesy hug for your bones! 🧀
Protein for Muscle Repair
With 25-30 grams of protein per serving, this baked mac and cheese is excellent for muscle recovery after workouts. The combination of cheddar, mozzarella, and pasta creates a complete protein profile that supports tissue repair.
I make this after my weekend runs—it helps my muscles recover while satisfying my cravings. The dried mustard adds a subtle depth that enhances the protein quality without overpowering the flavor.
Satisfying Carbs
The elbow macaroni provides 60-70 grams of complex carbohydrates per serving, which are essential for brain function and sustained energy. Unlike refined carbs, the pasta in this recipe is paired with protein and healthy fats, creating a balanced meal that keeps blood sugar stable.
I've tested this with different pasta shapes, and elbow macaroni always delivers that perfect bite-sized texture that's so satisfying. 🍝
Rich in Vitamins
Don't let the creamy appearance fool you—this dish actually contains vitamin A (from the cheese) and vitamin D (especially if you use whole milk). The yellow onion adds vitamin C and fiber, while the garlic contributes antioxidants that support your immune system.
It's a surprisingly nutritious comfort food that sneaks in vitamins without sacrificing that cheesy goodness. I often pair it with steamed broccoli to boost the vitamin K content even more!
Nutrition facts
Frequently asked questions
Why does using block cheese make such a difference?
Block cheese melts more smoothly and evenly than pre-shredded varieties, creating that signature creamy texture without clumping. The freshly shredded sharp cheddar also maintains its sharp flavor better during baking, giving you that authentic tangy taste you crave. Plus, it's less likely to turn rubbery when reheated!
Can I make this ahead of time?
Assemble the dish in a baking dish, cover it, and refrigerate for up to 24 hours. When ready to bake, just add 5-10 extra minutes to the baking time to account for the cold start. The cheese will melt beautifully, and the breadcrumb topping will crisp up perfectly. This makes it ideal for meal prep!
What if my mac and cheese turns out too dry? If your dish seems dry, try adding 2-3 tablespoons of milk or pasta water and stirring gently. Then cover with foil and bake for another 5-10 minutes to let the moisture redistribute. For future attempts,
Can I use a different type of cheese?
While sharp white cheddar is ideal, you can experiment! Try Monterey Jack for a milder flavor or Gruyère for a nutty twist. For extra creaminess, add 1/4 cup cream cheese to the sauce. Just remember that block cheese always melts better than pre-shredded—freshly grating makes all the difference!
How do I get the perfect crispy topping?
The secret is mixing panko breadcrumbs with 1 tablespoon melted butter before sprinkling. For extra crunch, bake the dish 5 minutes longer than directed and broil for 1-2 minutes at the very end. Watch closely to avoid burning! The crispy contrast with the creamy mac and cheese is what makes this dish irresistible.