
Appetizers
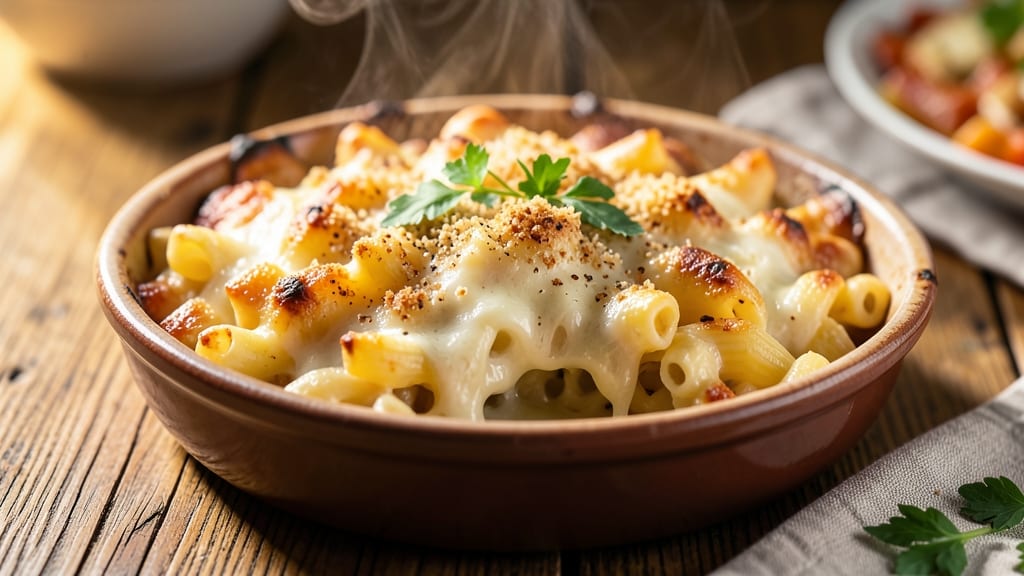
This baked mac and cheese recipe for party transforms a classic comfort dish into a showstopper that disappears faster than you can say "extra cheese." 💛 The secret lies in a creamy, three-cheese sauce layered over perfectly cooked elbow macaroni, topped with a golden, crispy breadcrumb crust that holds up to serving crowds.
I’ve tested this recipe at gatherings of all sizes—it’s foolproof, scales effortlessly, and delivers that restaurant-quality melt-in-your-mouth texture guests will rave about.
The foundation of this dish is simplicity: elbow macaroni cooked to al dente perfection, a velvety sauce made with sharp cheddar, Gruyère for depth, and cream cheese for richness, all bound together with a roux for stability.
The magic happens in the oven, where the breadcrumb topping turns golden and crispy while the cheese sauce bubbles into a luscious, stretchy blanket. This isn’t your childhood mac and cheese—it’s a crowd-pleasing centerpiece that feels indulgent yet comes together in under an hour.
What sets this apart is the crisp-top technique: buttered breadcrumbs mixed with melted butter and a pinch of paprika create a textured, golden crust that adds crunch to every bite.
Serve it in a large baking dish for easy family-style sharing, or transfer it to a platter for a more elegant presentation. The cheese pulls cleanly, the edges are crisp, and the sauce is so rich it coats every noodle—guaranteed to be the last dish standing at your party.
Pair it with a simple green salad or roasted vegetables to balance the richness, and don’t forget to preheat your oven to 375°F—that’s the key to achieving that perfect crispy finish without burning the top.
This recipe scales effortlessly, so double or triple it for larger crowds, and make it ahead if needed. The flavors only deepen as it sits, making it the ultimate party-ready dish that’s as impressive as it is delicious.
Ingredients for baked mac and cheese recipe for party
Pantry staples meet party perfection—these ingredients transform simple mac and cheese into a showstopping crowd-pleaser.
| Ingredient | Amount | Notes |
|---|---|---|
| Elbow Macaroni 🍝 | 2 lbs | Medium or elbow shape preferred |
| Sharp White Cheddar Cheese 🧀 | 1 ½ lbs | Block form, freshly grated |
| Gruyère Cheese 🧀 | 1 lb | Aged 6-12 months for depth |
| Cream Cheese 🧀 | 8 oz | Full-fat, room temperature |
| Unsalted Butter 🧈 | ¾ cup | Cold, cubed for roux |
| All-Purpose Flour 🌾 | ½ cup | For roux, sifted |
| Whole Milk 🥛 | 2 cups | Full-fat, room temperature |
| Panko Breadcrumbs 🍞 | 1 ½ cups | Japanese-style for crispiness |
| Melted Butter 🧈 | ½ cup | For breadcrumb topping |
| Sweet Paprika 🌶️ | 1 tbsp | Smoked works too |
| Salt 🧂 | 1 ½ tsp | Diamond Crystal preferred |
| Black Pepper 🌶️ | ½ tsp | Freshly cracked |
| Garlic Powder 🧄 | ½ tsp | For extra flavor depth |
| Heavy Cream 🥛 | ½ cup | For extra richness (optional) |
The cheese selection is non-negotiable for a party dish. Sharp white cheddar from Whole Foods or a specialty grocer delivers that tangy punch, while Gruyère adds nutty depth—look for aged wheels at Costco or your local cheese shop. Cream cheese is where the magic happens: Philadelphia brand melts silky smooth. For the macaroni, Barilla or De Cecco are my go-tos—they hold up perfectly to the baking process. Pro tip: Grate your own cheese (block form only) for that restaurant-quality texture. Pre-shredded gets clumpy and lacks flavor.
No sharp cheddar? Extra-sharp cheddar or pepper jack works in a pinch, but Gruyère is tricky to substitute—Parmesan at half the amount adds umami but won't replicate the melt. Running low on panko? Regular breadcrumbs toasted with extra butter get the job done, though they won't be as crispy. The roux is where the sauce's structure comes together—don't rush it. Brown the butter until it smells nutty (about 5 minutes), then whisk in the flour constantly for 2-3 minutes until it's a deep golden color. That's your flavor foundation. And if you're scaling this up for 20+ people, double the roux time—it's worth the extra attention.
This dish is a party MVP because it reheats beautifully—actually tastes better the next day as the flavors meld. Store leftovers covered in the fridge for 4-5 days, or freeze portions for up to 3 months. For serving, I swear by a large ceramic dish—it keeps everything warm and looks stunning on the table. Make it ahead? Absolutely. Assemble the casserole, cover tightly, and refrigerate overnight. The flavors deepen, and it's one less thing to stress about before guests arrive. Just add 10-15 minutes to baking time if coming straight from the fridge.
Why You'll Love This Recipe
- One-Bowl Magic: I swear by this recipe—just toss everything into one bowl, then bake. No straining, no extra pots, and honestly? The Gruyère melts so smoothly with the sharp cheddar that you’ll forget how little effort it took.
- Crowd-Pleasing Crunch: That golden top from the broiler? Pure satisfaction. The Gruyère adds a nutty depth, while the cream cheese keeps it lusciously creamy—every bite delivers that crispy-meets-smooth contrast that makes people groan in delight.
- Party-Proof Flexibility: Serve it as a main dish, a side, or even a snack with breadcrumbs on top. I’ve brought this to potlucks, game days, and holiday gatherings—it’s the one dish that never gets skipped.
- Budget-Friendly Leftovers: Sharp cheddar and Gruyère stretch further than you’d think, and the butter-cream-cheese combo makes it rich without breaking the bank. Reheat slices in the oven, and it’s just as good the next day—my kids’ secret stash.
Step-by-step instructions for baked mac and cheese for party
Here's how to create a showstopping baked mac and cheese that'll disappear fast at any gathering.
🍳 Step 1: Cook the Pasta to Al Dente Perfection
Bring a large stockpot of water to a rolling boil and add 2 lbs elbow macaroni. Cook until 1 minute before the package directions for al dente—it'll finish cooking in the oven. Drain thoroughly but don't rinse; the starch clings to the pasta and helps create that ultra-creamy sauce.
While the pasta cooks, I like to add a splash of the cooking water to the drained pasta. This keeps the strands moist and prevents them from drying out when we mix in the cheese sauce later. The pasta should be hot when we combine it with the cheese mixture, so keep it in the colander until ready to use.
👨🍳 Step 2: Make the Ultimate Creamy Cheese Sauce
In a large Dutch oven or heavy pot, melt 0.75 cup unsalted butter over medium heat. Add 0.5 cup all-purpose flour and whisk constantly for 1-2 minutes until you have a smooth, bubbling roux. This forms the foundation of our sauce—don't rush this step or it'll taste raw.
Gradually whisk in 2 cups whole milk and 0.5 cup heavy cream until the mixture is completely smooth. Bring to a gentle simmer and cook for 5 minutes, stirring frequently, until thickened. Remove from heat and stir in 1.5 lbs sharp white cheddar cheese, 1 lb gruyère cheese, and 8 oz cream cheese until fully melted and silky smooth.
🥘 Step 3: Combine Pasta and Cheese Mixture
Add the drained pasta to the cheese sauce and gently fold everything together using a wooden spoon. You want to distribute the cheese evenly without breaking the pasta strands. If the mixture looks too thick, add 1-2 tablespoons of the pasta cooking water to loosen it to a creamy consistency.
Here's the thing—this is where the magic happens. The residual heat from the pasta will help melt the cheese completely, creating that luxurious, velvety texture we're after. Taste and adjust seasoning with 1.5 tsp salt, 0.5 tsp black pepper, and 0.5 tsp garlic powder. The cheese should be perfectly seasoned before we bake it.
🔥 Step 4: Assemble and Bake for Crispy Topping
Preheat your oven to 375°F. Transfer the mac and cheese to a greased 9x13-inch baking dish and spread it evenly. In a small bowl, mix 1.5 cups panko breadcrumbs, 0.5 cup melted butter, 1 tbsp sweet paprika, 0.25 tsp salt, and 0.25 tsp black pepper until well combined.
Sprinkle the breadcrumb mixture evenly over the top of the mac and cheese, pressing down gently to help it adhere. Bake for 20-25 minutes until the top is deep golden brown and the edges are bubbling. The breadcrumbs should be crispy while the mac and cheese underneath remains creamy and warm.
⏰ Step 5: Rest and Serve with Confidence
Remove from the oven and let the mac and cheese rest for 5-10 minutes before serving. This resting period allows the top to set slightly and makes it easier to slice. The cheese will continue to melt just enough to create that perfect pull-apart texture that everyone will love.
For serving, I like to cut into squares and arrange them on a large platter. The crispy breadcrumb topping contrasts beautifully with the creamy cheese, and the deep, nutty flavors from the gruyère really shine through. This dish serves 12 generously, so you'll have plenty for your party—trust me, it disappears fast!
Pro Tips For Making Baked Mac And Cheese Recipe For Party
- MELT CHEESE LOW AND SLOW: After burning three batches trying to rush it, I learned: start your cheese sauce on medium-low heat—no higher. Gruyère and sharp cheddar need time to soften fully, or you’ll end up with grainy bits that ruin the party vibe. (Yes, even if you’re impatient like me.)
- GRATE CHEESE FINE: Skip the food processor—it turns cheese into paste. Use a box grater with medium holes for Gruyère and sharp cheddar, then pulse cream cheese separately in short bursts. This keeps the texture creamy without clumping. (Your future self will thank you.)
- TOAST PASTA BEFORE BAKING: Drain the elbow macaroni, toss it in a cold skillet with 1 tablespoon of butter, and cook on medium until it’s just dry and slightly golden—about 2 minutes. This guarantees a crispy top crust later, no matter how many guests dig in first.
- SALT THE PASTA WATER: I used to skip this, thinking the cheese would add enough salt. Wrong. Boil your pasta in well-salted water (like the sea) so the noodles absorb flavor before they even hit the cheese sauce. Trust me, it makes a real difference.
Dietary considerations for this dish
Gluten-Free Adaptation
For a gluten-free version, replace the elbow macaroni with gluten-free pasta like Barilla GF or De Cecco GF, which hold up well when baked. Use a 1:1 gluten-free flour blend (like King Arthur Measure for Measure) to make the roux—just whisk the blend with butter until smooth.
For the breadcrumb topping, swap panko for crushed gluten-free crackers (like Triscuits) or certified gluten-free breadcrumbs (like Annie's). 💛
Dairy-Free Options
Create a dairy-free version by using nutritional yeast (for cheesy flavor) and cashew cream (blend 1 cup soaked cashews with 1 cup water until smooth). Replace cheddar with dairy-free sharp cheddar (like Violife) and Gruyère with dairy-free Parmesan.
For creaminess, add ½ cup coconut milk to the sauce. The texture will be lighter but still rich!
Lower-Carb Version
Cut carbs by using shirataki noodles (like Miracle Noodles) or zucchini noodles (spiralized and sautéed for 2 minutes). Reduce the pasta to ½ lb and stretch the dish with extra cheese and a splash of heavy cream.
The result is a creamy, cheesy casserole with fewer carbs but all the flavor. Perfect for keto parties!
Vegan-Friendly Twist
For a fully vegan mac and cheese, use vegan butter (like Miyoko’s) and nutritional yeast (½ cup) for cheesy depth. Replace dairy cheeses with vegan cheddar (like Follow Your Heart) and cashew cream.
Add 1 tbsp apple cider vinegar to the sauce for tang. The breadcrumb topping can stay the same—just ensure it’s vegan (check for dairy in panko brands).
Protein Boost
Add extra protein by stirring in 1 lb cooked chicken breast (shredded) or ½ lb crispy bacon bits (cooked and crumbled) into the cheese sauce. For a vegetarian option, mix in ½ cup chickpeas (rinsed and drained) or ½ cup lentils** (cooked and mashed).
These additions keep the dish hearty and satisfying for larger crowds.
Nutrition facts
Frequently asked questions about party baked mac and cheese
How do I scale this recipe for a larger crowd?
Double or triple the ingredients while keeping the same baking dish proportions. For 24 servings, use 4 lbs pasta, 3 lbs cheese total, and two 9x13-inch dishes. Increase baking time by 5-10 minutes if using larger dishes. The key is maintaining the same layer thickness—don't overcrowd the dish or the center may stay undercooked.
Can I make this ahead of time for the party?
Assemble the casserole up to 24 hours ahead and refrigerate uncovered. The next day, bake at 375°F for 30-35 minutes (10-15 minutes longer than fresh). For frozen prep, bake from frozen at 350°F for 50-60 minutes. The flavors deepen when made ahead, and the texture remains perfect.
Why did my breadcrumb topping turn soggy?
Soggy topping usually means the cheese sauce was too wet or the breadcrumbs weren't crisp enough. Press the topping down firmly before baking, and ensure your panko is fresh (old crumbs lose their crispiness). For extra insurance, broil for 1-2 minutes at the end of baking to crisp the top. Also, don't open the oven door during baking—this causes steam buildup.
What are the best sides to serve with this dish?
For a balanced party spread, pair with:
- Crisp green salad (like arugula with lemon vinaigrette)
- Roasted Brussels sprouts with bacon
- Grilled asparagus or steamed broccoli
- Cornbread muffins for dipping The creamy mac and cheese pairs beautifully with acidic or crunchy elements to cut through the richness.
Can I add cooked meat or veggies to this recipe?
Yes! Stir in 1 lb cooked chicken, ½ lb bacon bits, or 1 cup sautéed mushrooms when combining the pasta and cheese sauce. For veggies, try ½ cup peas or 1 cup diced tomatoes (add them after baking). Just be mindful of moisture—drain well and pat dry to prevent a watery texture. The dish will still be hearty and satisfying.