
Snacks
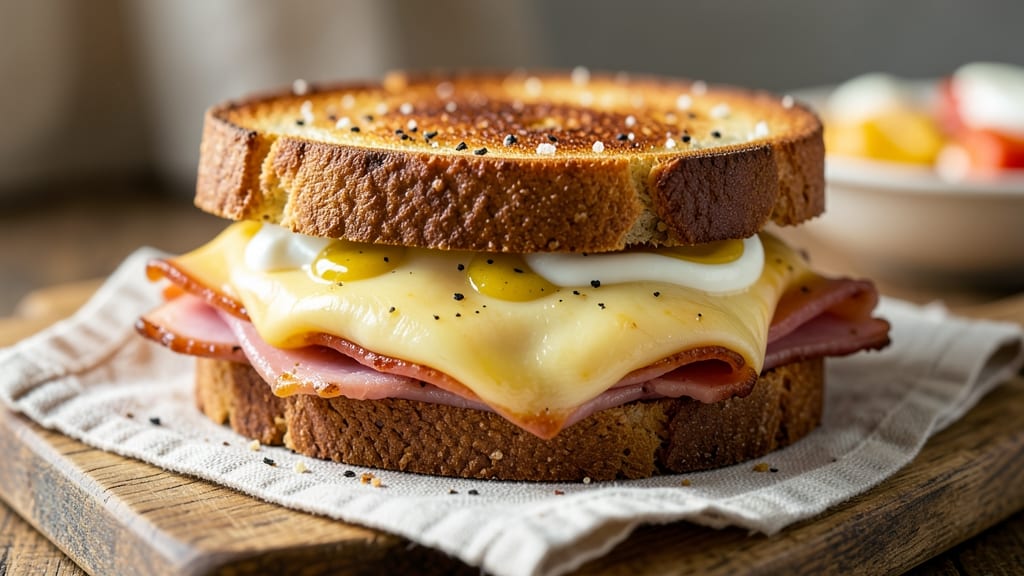
This baked ham and cheese sandwich recipe delivers crispy, golden layers in just 15 minutes—no grill required. The secret lies in layering thinly sliced ham, sharp cheddar, and buttery bread, then baking until the edges turn perfectly crisp.
I’ve perfected this technique after years of making lunch for busy days, and it never fails to satisfy.
The beauty of this method is its simplicity: no fancy equipment, no complicated steps. You’ll need just a few pantry staples—thick-cut bread, deli ham, and your favorite cheese—to create a sandwich that tastes like it came from a diner.
The bread gets toasted to a crispy golden brown while the cheese melts just enough to hold everything together without getting soggy.
What you’ll end up with is a sandwich that’s crispy on the outside, gooey on the inside, and packed with savory, salty, and cheesy flavors in every bite. It’s the kind of lunch that feels indulgent but comes together faster than takeout.
The best part? You can customize it with mustard, pickles, or even a smear of mayo for extra flavor.
Serve it warm with a side of potato chips or a simple green salad for a complete meal. This recipe is perfect for quick lunches, game day snacks, or whenever you crave comfort food without the fuss. Let’s get started!
Ingredients for baked ham and cheese sandwich
Just six key ingredients transform simple lunch into crispy, golden perfection.
| Ingredient | Amount | Notes |
|---|---|---|
| Thick-Cut Bread 🍞 | 4 slices | Sourdough or Texas toast preferred |
| Deli Ham 🥓 | 4 oz | Thinly sliced, honey-glazed or plain |
| Sharp Cheddar Cheese 🧀 | 1 cup | Shredded or sliced, aged for flavor |
| Butter 🧈 | 2 tbsp | Unsalted, softened for spreading |
| Yellow Mustard 🟡 | 1 tbsp | Optional, for extra tang |
| Mayonnaise 🥛 | 1 tbsp | Optional, for creaminess |
| Dijon Mustard 🟡 | 1 tsp | Optional, for depth |
| Salt 🧂 | ¼ tsp | Kosher or sea salt |
| Black Pepper 🌶️ | ¼ tsp | Freshly ground preferred |
| Pickle Slices 🥒 | 2 pieces | Optional, for tangy crunch |
| Potato Chips 🍟 | 1 cup | For serving, optional |
The bread is everything here—thick-cut sourdough or Texas toast gets perfectly crispy edges while staying soft inside. Whole Foods or Kroger usually carry the best thick-cut loaves, but any sturdy bread works. Look for slices that are at least 1/2-inch thick. For extra crispiness, I like toasting the bread first, but you can skip that if you're short on time. The ham? Honey-glazed adds sweetness that balances the sharp cheddar, but plain works too. Just make sure it's thinly sliced—thick ham won't melt properly.
No sharp cheddar? Swiss or provolone work in a pinch, but they won't have the same bold flavor. Running out of mustard? Skip it or use mayo instead. The butter matters—unsalted, softened spreads better than cold. For the cheese, pre-shredded is fine, but freshly grated melts smoother. Want extra crunch? Add crispy bacon bits on top before baking. The pickles are optional but add that classic diner touch—dill slices if you want to get fancy. And if you're feeling lazy, skip the mayo and just use butter for assembly.
Assembled sandwiches keep for 2 hours at room temp, but they're best eaten fresh out of the oven. Store leftovers in an airtight container for 3 days in the fridge—reheat in a toaster or oven to restore crispiness. For meal prep, assemble the sandwiches without cheese, wrap in parchment, and store separately. Then just add cheese and bake when ready. Freeze for 1 month by wrapping tightly in foil—thaw overnight in the fridge before reheating. These reheat beautifully, though they won't be quite as crispy as fresh.
Why You'll Love This Recipe
- No-Fuss Assembly: I swear by this recipe because it’s three ingredients plus butter—no chopping, no measuring, no stress. Just layer ham, cheese, and bread, slap on some mustard, and bake. My kids even help "build" them before I pop them in.
- Melty Magic: That sharp cheddar gets gloriously gooey while the edges toast to golden perfection. Here’s what sold me—the buttery bread soaks up the cheese drippings like a dream, and the mustard adds just enough tang to cut through the richness.
- Lunchbox Hero: Between us, this is my go-to for school lunches or picnic spreads. Wrap the halves in foil for easy transport, and the sandwich stays warm and sturdy. Honestly, I’ve packed these for work meetings, tailgates, and even my mom’s birthday—no one ever turns it down.
- Budget Win: A single ham steak and block of cheddar stretch across multiple sandwiches, and thick-cut bread stays fresh for days. I’ll be real: it’s my secret weapon for feeding the family without breaking the bank, especially when I double the batch for leftovers.
Step-by-step instructions for baked ham and cheese sandwiches
Here's how to make perfectly crispy, golden-brown sandwiches with gooey cheese and savory ham.
Prepare Your Sandwich Layers
Start by spreading 1 tablespoon of softened butter evenly on the outer surfaces of 2 slices of thick-cut bread. I like to use a small offset spatula for this—it gives you better control than a knife. While the butter is still soft, sprinkle ¼ teaspoon of salt and ¼ teaspoon of black pepper over each buttered slice. This seasoning will infuse into the bread as it bakes, adding subtle flavor.
Next, spread 1 tablespoon of mayonnaise and 1 teaspoon of Dijon mustard on the inner surfaces of the remaining 2 slices of bread. The mayo adds creaminess, while the Dijon brings a touch of sophistication. If you prefer a tangier bite, you can add 1 tablespoon of yellow mustard to the mix. Arrange 4 ounces of deli ham and 1 cup of sharp cheddar cheese between the inner bread slices. The cheese should be spread evenly so every bite gets that melty goodness.
Assemble and Butter the Sandwiches
Carefully place the cheese and ham layers between the buttered bread slices, pressing gently to ensure everything sticks together. This is where the magic happens—you want the cheese to melt perfectly between the crispy bread. Now, take another 1 tablespoon of softened butter and spread it evenly on the outer surfaces of the assembled sandwiches. This extra butter is key to achieving that golden, crispy crust we're after.
I like to press down lightly on the sandwiches to help them hold together while they bake. This prevents them from falling apart when you go to flip them later. If you're using pickle slices, place one on each sandwich now—they'll add a nice tangy contrast to the rich ham and cheese.
Bake Until Golden and Crispy
Preheat your oven to 375°F and let it come to temperature. Place the assembled sandwiches on a baking sheet lined with parchment paper or lightly greased with oil. Bake for 8-10 minutes until the edges are golden brown and the cheese is fully melted. You'll know it's ready when the bread has a crispy texture and the cheese has turned gooey and slightly browned in spots.
Here's the thing—don't walk away during this step. The sandwiches can go from perfect to burnt in seconds, especially if your oven runs hot. Keep an eye on them and remove them as soon as they reach that ideal golden-brown stage. If the top isn't brown enough, you can broil them for 1-2 minutes at the end, but watch them like a hawk to avoid burning.
Serve with Crunchy Potato Chips
Once the sandwiches are out of the oven, let them rest for 2-3 minutes before cutting. This gives the cheese a chance to set slightly, making it easier to handle. Cut each sandwich diagonally into two triangles for easy serving. The crispy edges should contrast beautifully with the soft, melty cheese inside.
Serve immediately with 1 cup of potato chips on the side. The crunch of the chips balances the richness of the sandwich, and it's a fun way to turn this into a more interactive meal. If you're feeling fancy, you can even arrange the chips on a small plate with the sandwich halves for a more restaurant-style presentation.
Pro Tips For Making Baked Ham And Cheese Sandwich
- Butter the Bread Like a Pro: Slather that thick-cut bread with butter all the way to the edges—no lazy corners. I used to skip the crusts, but the toasted edges are where all the flavor happens, and they’ll hold the sandwich together better too.
- Toast the Bread First: Pop the bread under the broiler for 2-3 minutes before assembling—just until it’s golden and slightly crisp. This stops soggy sandwiches and gives you a sturdy base for all that melted cheese. (Yes, even if you’re impatient like me.)
- Layer Cheese Strategically: Pile the sharp cheddar on the bottom slice first, then add ham and mustard on top. When you flip it, the cheese won’t slide off, and the mustard won’t get lost in the melt. Trust me, I’ve seen sandwiches fall apart over this.
- Press Heavy, Not Hard: Use a cast-iron skillet or even a heavy baking sheet to press down—just enough to flatten, not crush. Too much force will squeeze out the cheese and make the bread turn to mush. Think "gentle pressure," not "personal trainer."
Perfect pairings for these flavors
Classic Side Pairings
Potato chips are my go-to for balancing the richness of this sandwich—their salty crunch cuts through the buttery, cheesy layers beautifully. I like Kettle Brand Sea Salt or Lays Classic for that nostalgic diner vibe.
For a lighter option, try baby carrots with ranch dip or a crisp apple slices with a sprinkle of cinnamon. 🍟
Drink Recommendations
A cold sweet tea or iced lemonade is perfect for cutting through the richness, especially if you're serving this as a Southern-style lunch. For something heartier, a light lager like Miller Lite or Coors Light keeps the meal balanced.
If you're going for a more indulgent pairing, try a sparkling grapefruit soda like Jarritos for a refreshing twist. 🍹
Sauce Enhancements
Add a drizzle of spicy brown mustard or honey mustard on the side for dipping—it adds a tangy kick that elevates every bite. I also love a small bowl of marinara sauce for those who want a tomato-based contrast.
For a smoky touch, serve with chipotle mayo (mix 1 tbsp mayo with ½ tsp chipotle powder). 🌶️
Garnish Upgrades
Fresh arugula or baby spinach adds a peppery crunch when tucked into the sandwich before baking. For a sweet-and-salty combo, top with crispy fried onions or thinly sliced pickles.
A sprinkle of smoked paprika or garlic powder right before serving adds an extra layer of flavor without overpowering the ham and cheese. 🥗
Sweet Contrasts
Balance the savory sandwich with a sweet pickle relish (mix ¼ cup diced pickles with 1 tbsp honey and 1 tsp apple cider vinegar). A small fruit salad with strawberries, grapes, and blueberries also works wonderfully.
For a dessert pairing, serve with mini vanilla wafers or chocolate-covered pretzels for a sweet-salty finish. 🍓
Meal Prep Add-Ons
If you're making these ahead, prep pickled red onions (slice ½ red onion, soak in ¼ cup vinegar, 1 tbsp sugar, and ½ tsp salt for 30 minutes) to add freshness.
For a protein boost, include hard-boiled eggs or turkey slices on the side. A simple tomato and cucumber salad with balsamic glaze keeps things fresh and light. ✨
Nutrition facts
Frequently asked questions
Can I use turkey instead of ham in this recipe?
Swap the ham for 4 ounces of thinly sliced turkey (like deli turkey breast) for a lighter option. The cooking time stays the same, but you might want to add 1 extra minute to ensure the turkey heats through completely. For extra flavor, try a slice of Swiss cheese instead of cheddar.
Why did my sandwich get soggy instead of crispy?
This usually happens when the bread absorbs too much moisture from the cheese or ham. To fix it, pat the ham dry with a paper towel before assembling, and use less cheese (try ½ cup instead of 1 cup). Also, make sure your oven is at 375°F—lower temps won't crisp the bread properly.
Can I make these sandwiches ahead of time?
Yes! Assemble the sandwiches (without cheese) and store them in an airtight container for 2 hours at room temp. When ready to bake, add the cheese and follow the baking instructions. For longer storage, wrap the assembled sandwiches (with cheese) in foil and refrigerate for up to 3 days. Reheat in a toaster or oven to restore crispiness.
What’s the best bread for this recipe?
Thick-cut sourdough or Texas toast works best because it holds up to the butter and cheese without getting soggy. Avoid soft bread like white sandwich bread—it won’t get crispy. If you can’t find thick-cut, use whole wheat or brioche for a heartier texture.
How do I make this recipe vegetarian?
Replace the ham with marinated tofu or tempeh (press and slice it thin), and use vegetarian cheese like cheddar or Swiss. For extra flavor, add sautéed mushrooms or caramelized onions between the bread. The baking time stays the same, but check for doneness at 8 minutes.