
Appetizers
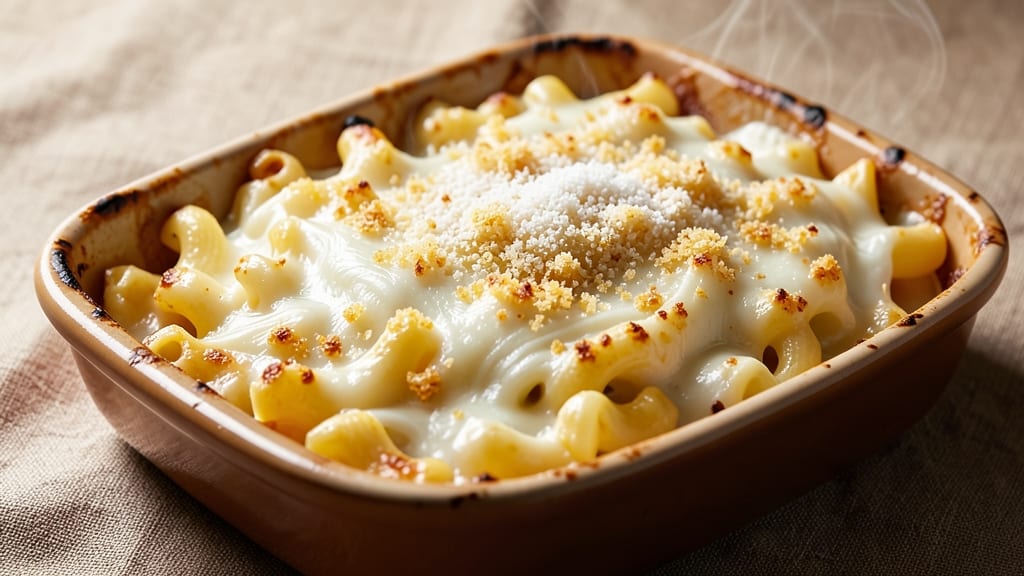
This baked four cheese mac and cheese recipe delivers the ultimate comfort food experience—crispy golden edges that give way to creamy, gooey layers of melted cheeses.
The secret lies in layering four distinct cheeses (sharp cheddar, Gruyère, Parmesan, and cream cheese) for a rich, complex flavor that’s impossible to resist. I’ve perfected this technique over years of testing, ensuring every bite delivers that perfect balance of texture and indulgence.
The process is surprisingly straightforward: cook the pasta al dente, mix the cheeses into a velvety sauce, layer everything in a baking dish, and bake until bubbly and golden. The key to achieving that crispy top without drying out the cheese is a precise baking time and temperature—no guesswork required.
This dish transforms a simple pasta meal into something restaurant-worthy, perfect for feeding a crowd or treating yourself to a cozy weeknight dinner.
What makes this recipe truly special is how the cheeses work together—Gruyère adds nutty depth, cheddar brings sharpness, Parmesan contributes umami, and cream cheese ensures that signature creaminess. The result? A dish so rich and satisfying that it disappears faster than you can say "second helping."
Whether you're serving it as a main course or a showstopping side dish, this baked mac and cheese will have everyone asking for the recipe.
Pair it with a simple green salad or roasted vegetables for a complete meal, or serve it as-is for a hearty, cheesy indulgence. The beauty of this recipe is its versatility—it’s perfect for holidays, game days, or just because you deserve a little comfort.
Let’s get started on creating the ultimate cheesy masterpiece.
Ingredients for baked four cheese mac and cheese
Four cheeses, one magical dish—crispy edges meet gooey perfection every time.
| Ingredient | Amount | Notes |
|---|---|---|
| Elbow Macaroni 🍝 | 1 ½ lbs | Cooked al dente, drained |
| Sharp White Cheddar Cheese 🧀 | 1 ½ cups | Shredded, block preferred |
| Gruyère Cheese 🧀 | 1 cup | Shredded, aged for nutty flavor |
| Parmesan Cheese 🧀 | ¾ cup | Freshly grated, block preferred |
| Cream Cheese 🧈 | 8 oz | Full-fat, room temperature |
| Heavy Whipping Cream 🥛 | ½ cup | Full-fat for richness |
| Unsalted Butter 🧈 | ½ cup | Melted, salted if preferred |
| Whole Milk 🥛 | ½ cup | Warmed for smooth sauce |
| Garlic Cloves 🧄 | 3 cloves | Minced, for depth of flavor |
| Yellow Onion 🧅 | ½ whole | Finely diced, sweet variety |
| All-Purpose Flour 🌾 | ¼ cup | For roux, if needed |
| Salt 🧂 | 1 ½ tsp | Diamond Crystal preferred |
| Ground Black Pepper 🌶️ | ½ tsp | Freshly cracked |
| Nutmeg 🌿 | ¼ tsp | Freshly grated, optional |
| Breadcrumbs 🍞 | ½ cup | Panko for extra crunch |
The cheeses are where the magic happens. Sharp white cheddar brings that tangy punch, while Gruyère adds nutty depth—don't skimp here. I always grab block cheddar and Gruyère from the deli counter (pre-shredded gets clumpy), and Parmigiano-Reggiano for the Parmesan. The cream cheese is non-negotiable for that signature creaminess—full-fat only (low-fat just won't cut it). For the Parmesan, grate it yourself—pre-grated tastes like sawdust. The Gruyère is the star though—look for a wedge with good marbling, not the pre-shredded stuff.
No sharp cheddar? Extra sharp works in a pinch, but the flavor won't be the same. Substituting Gruyère? Comté is the closest, but it's pricier. Want to make this dairy-free? Vegan cheddar and cashew cream can get you close, but texture will differ. The breadcrumbs are for that crispy top—Panko stays crispy longer than regular breadcrumbs. For the roux, if your sauce gets too thin, mix the flour with cold butter first to avoid lumps. And trust me on the nutmeg—freshly grated makes all the difference, even if it's just a pinch.
This keeps 3-4 days in the fridge, but honestly? It's even better the next day as the cheeses meld. For leftovers, reheat covered at 350°F until bubbly—no microwave! The crispy top will soften, but it's still delicious. Freezes beautifully for up to 2 months. I always make a double batch—one for dinner, one for lunches. Store in airtight containers with a sprinkle of breadcrumbs on top to keep it crispy.
Why You'll Love This Recipe
- No-Fuss Assembly: I swear by the 10-minute prep rule—just boil the pasta, mix the cheeses (sharp cheddar, Gruyère, Parmesan, and cream cheese) with a splash of milk, then dump it all in one baking dish. That’s it. Even my college-dorm version was this simple.
- Cheese Overload: Between the nutty Gruyère, sharp cheddar’s bite, and cream cheese’s silkiness, every forkful is a flavor party. The Parmesan on top? That’s the cherry—crunchy, salty, and always the first bite my kids go for.
- Weeknight Hero: This is my go-to for game days, lazy Sundays, or when I’m too tired to plan. It reheats beautifully for lunch the next day, and honestly? The leftovers taste even better cold—perfect for packed lunches or a quick snack.
- Budget-Friendly Luxury: Four kinds of cheese might sound fancy, but it’s actually cheaper than ordering takeout. A block of each stretches further than you’d think, and the elbow macaroni? The cheapest pasta in the store. Feels indulgent without breaking the bank.
Step-by-step instructions for baked four cheese mac and cheese
Here's how to create the ultimate baked mac and cheese with gooey layers and that irresistible crispy top.
🍳 Step 1: Cook the Pasta Al Dente
Bring a large pot of water to a rolling boil and add 1.5 lbs elbow macaroni along with 1.5 tsp salt. Cook until 1 minute before the package instructions for al dente—this ensures it finishes cooking perfectly in the oven. Drain the pasta and set it aside, reserving 1 cup of pasta water. This starchy water is your secret weapon for creating a silky sauce later.
Don't rinse the pasta—those surface starches help the cheese cling beautifully. I like to give it a quick toss with a tablespoon of the melted butter right after draining to prevent sticking. The pasta should be hot when you mix it with the cheese sauce, so work efficiently from this point forward.
🍳 Step 2: Build the Ultimate Cheese Sauce
In a large skillet over medium heat, melt the 0.5 cup unsalted butter until foamy. Add the 0.5 whole yellow onion and 3 cloves garlic cloves, cooking for 3-4 minutes until softened and fragrant. Here's where the magic happens—add the 8 oz cream cheese, 1.5 cups sharp white cheddar, 1 cup gruyère, and 0.75 cup parmesan, stirring constantly until fully melted.
Pour in the 0.5 cup heavy whipping cream and 0.5 cup whole milk, then sprinkle in the 0.25 cup all-purpose flour. Stir vigorously for 2-3 minutes until the sauce thickens to a velvety consistency. If it gets too thick, add pasta water 1 tablespoon at a time until smooth. The sauce should coat the back of a spoon and be hot enough to melt the pasta completely when combined.
🥘 Step 3: Combine and Layer for Maximum Gooeyness
Add the drained macaroni to the cheese sauce and stir gently until fully coated. The pasta should be completely enveloped in that luxurious cheese mixture—no dry spots allowed. Taste and adjust seasoning with 0.5 tsp ground black pepper and 0.25 tsp nutmeg if needed. Transfer the mixture to a 9x13-inch baking dish, spreading it evenly into a single layer.
This single-layer approach ensures even baking and that perfect gooey texture throughout. I like to use a rubber spatula to scrape up every last bit of cheese from the bottom of the pan—those flavorful bits make all the difference. The dish should look glossy and inviting, with cheese peeking through the pasta strands.
🔥 Step 4: Create the Crispy Top Magic
Preheat your oven to 375°F while you prepare the topping. In a small bowl, mix the 0.5 cup breadcrumbs with 1 tablespoon melted butter and 0.5 tsp salt until evenly distributed. Spread this mixture evenly over the top of the mac and cheese, pressing down gently with the back of a spoon to ensure good contact.
Bake uncovered for 20-25 minutes until the top is deep golden brown and the edges are bubbling. The center should still be slightly jiggly—this indicates perfect doneness. If the top browns too quickly, tent loosely with foil for the last 5-10 minutes to prevent burning while the center finishes cooking.
⏰ Step 5: Rest and Serve with Confidence
Remove from the oven and let the mac and cheese rest for 10-15 minutes before serving. This crucial resting period allows the layers to set slightly, making it easier to slice and serve without losing that perfect gooey texture. The crispy top will firm up just enough to hold its shape while maintaining that satisfying crunch.
Slice into squares and serve immediately with a simple green salad or crusty bread. Each bite should deliver that perfect combination of creamy, cheesy goodness with that irresistible crispy top. The sharp white cheddar provides a tangy bite, the gruyère adds nutty depth, and the crispy breadcrumb topping ties it all together in the most satisfying way possible.
Pro Tips For Making Baked Four Cheese Mac And Cheese
- USE PASTA WATER: The starchy water from elbow macaroni is your glue—don’t drain it completely. Reserve about ½ cup and stir it into your cheese sauce while it’s still hot. This makes the sauce silkier and helps it cling to every noodle. (Yes, even if you’re the type who skims the pot clean.)
- GRATE CHEESE FINE: Sharp white cheddar and Gruyère lose their magic if they clump. Use a box grater (not a food processor) and pulse them in short bursts—just until they’re in small, uneven pieces. Big chunks burn before melting, and you’ll end up with a lumpy mess. (I learned this after pulling out three stubborn cheddar lumps from my first attempt.)
- BAKE UNTIL GOLDEN: Don’t peek or you’ll steam it. Bake your mac and cheese at 375°F (190°C) until the top is deep golden brown—about 20-25 minutes. If it’s just bubbling, it’s not done. A crispy crust is non-negotiable for that restaurant-quality bite. (I know, I know—you’re impatient like me.)
- ADD PARMESAN LAST: Parmesan burns faster than the other cheeses. Mix it in only during the final 2 minutes of baking, then sprinkle extra on top. This keeps its nutty flavor bright and prevents a bitter aftertaste. (Your future self will notice the difference.)
Perfect pairings for this recipe
Crispy Top Upgrades
For an extra-crunchy finish, mix 1 tbsp melted butter with the breadcrumbs and add 1 tsp smoked paprika for a subtle smoky depth. I also love sprinkling ½ cup grated Parmesan on top before baking—it creates a golden, cheesy crust that's irresistible. 🌟
Vegetable Side Pairings
A vibrant roasted Brussels sprouts salad with crispy bacon and balsamic glaze cuts through the richness beautifully. Toss 1 lb Brussels sprouts with 2 tbsp olive oil, ¼ cup bacon bits, and 2 tbsp balsamic reduction.
Roast at 425°F for 20 minutes until caramelized. The peppery bite balances the creamy mac perfectly.
Protein Additions
For a heartier meal, fold 1 lb cooked pulled pork or diced grilled chicken into the cheese sauce before baking. I also love adding ½ cup cooked bacon crumbles for extra flavor. If you prefer vegetarian, mix in 1 cup sautéed mushrooms or roasted cherry tomatoes for freshness. 🥓
Beverage Pairings
A crisp Sauvignon Blanc from New Zealand complements the cheesy richness with its citrus notes. For beer lovers, a Belgian-style witbier like Hoegaarden adds refreshing contrast. If you prefer something lighter, an iced hibiscus tea with a splash of lime keeps the meal refreshing.
Garnish Ideas
Freshly cracked black pepper and a sprinkle of chopped chives add brightness right before serving. For a pop of color, add microgreens or cherry tomato halves—they look stunning and add freshness. A drizzle of truffle oil (just ½ tsp) elevates the dish to gourmet level.
Make-Ahead Serving
For parties, assemble the mac and cheese in the baking dish, refrigerate overnight, then bake straight from the fridge at 375°F for 30-35 minutes. The cold start prevents over-browning. Serve with warm dinner rolls or garlic bread—they're perfect for soaking up any extra cheesy goodness. 🍞
Nutrition facts
Frequently asked questions
Can I use pre-shredded cheese for this recipe?
Pre-shredded cheese works in a pinch, but block cheese is ideal for this baked mac and cheese. Block cheese melts more smoothly and creates a creamier texture. The anti-caking agents in pre-shredded cheese can make your sauce slightly grainy. If you must use pre-shredded, look for brands without additives or blend it with a little extra heavy cream to improve texture.
Why did my mac and cheese get watery after baking?
Watery mac and cheese usually means the sauce was too thin before baking or the pasta was overcooked. Always cook pasta 1 minute less than package instructions and use the reserved pasta water sparingly—just enough to loosen the sauce. For extra insurance, let the assembled dish rest 10 minutes before baking to help the cheese set properly.
What's the best way to reheat leftovers?
Reheat leftovers covered at 350°F for 15-20 minutes until bubbly—never microwave! The microwave makes the top rubbery. For extra crispiness, sprinkle fresh breadcrumbs on top before reheating. If your mac is too dry, add 1-2 tablespoons of milk or cream before reheating to restore creaminess.
Can I make this recipe ahead of time?
Assemble the dish in the baking dish, refrigerate uncovered for up to 24 hours, then bake straight from the fridge at 375°F for 30-35 minutes. The cold start prevents over-browning. For best results, let it sit at room temperature for 30 minutes before baking to ensure even cooking. This method actually enhances the flavor as the cheeses meld overnight.
What cheese can I substitute if I don't have Gruyère?
For Gruyère's nutty flavor, try Comté (closest substitute) or aged Gouda. If you're in a pinch, use extra sharp cheddar—just add ½ teaspoon of Dijon mustard to the sauce for depth. Avoid pre-shredded cheeses as they contain anti-caking agents that can make your sauce grainy. The key is to maintain that balance of sharp, nutty, and creamy flavors.