
Appetizers
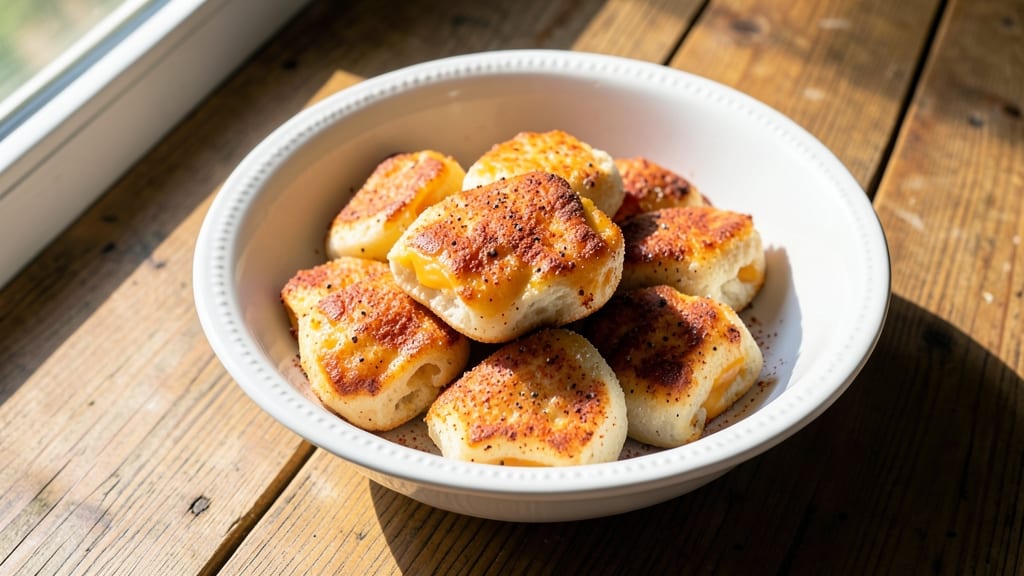
This baked cheese snacks recipe delivers crispy, golden bites that melt in your mouth—perfect for parties or satisfying cravings in just 20 minutes. The secret lies in the right cheese blend and baking technique, creating a texture that’s irresistibly crunchy outside and gooey inside.
I’ve perfected this method after testing countless variations, ensuring every batch turns out restaurant-quality without the fuss.
The beauty of this recipe is its simplicity: just a few pantry staples and 15 minutes of prep. You’ll use shredded cheese (cheddar works best), flour for structure, and a pinch of seasoning to elevate the flavor.
The baking process is foolproof—no need for fancy equipment, just a hot oven and a little patience. What you’ll end up with is a tray of addictive, melty bites that disappear faster than you can say "cheese."
These snacks are vegetarian-friendly and pair beautifully with everything from wine to crackers, making them ideal for gatherings or solo snacking. The crispy edges give way to creamy cheese with every bite, creating a satisfying contrast that’s hard to resist.
Whether you’re hosting or just craving something savory, this recipe delivers foolproof results every time.
For extra flavor, try adding herbs like parsley or garlic powder, or mix in breadcrumbs for added crunch. The possibilities are endless, but the base recipe is simple enough for beginners. Let’s get started on creating these irresistible bites!
Ingredients for baked cheese snacks
Pantry staples transform into restaurant-quality bites with crispy edges and gooey centers.
| Ingredient | Amount | Notes |
|---|---|---|
| Shredded Sharp Cheddar Cheese 🧀 | 2 cups | Freshly shredded for best texture |
| All-Purpose Flour 🌾 | ½ cup | For crispy exterior structure |
| Garlic Powder 🧄 | 1 tsp | Enhances savory depth |
| Onion Powder 🧅 | 1 tsp | Adds subtle sweetness |
| Paprika 🌶️ | ½ tsp | Smoked variety for complexity |
| Ground Black Pepper 🌶️ | ½ tsp | Freshly cracked for intensity |
| Kosher Salt 🧂 | ½ tsp | Diamond Crystal preferred |
| Unsalted Butter 🧈 | 2 tbsp | Melted for binding |
| Fresh Parsley 🌿 | 2 tbsp | Chopped for fresh garnish |
| Breadcrumbs 🍞 | ¼ cup | Panko for extra crunch |
| Vegetable Oil Spray 🫒 | 2 tbsp | For even baking |
The cheese selection makes all the difference here. Sharp cheddar delivers that perfect balance of tang and creaminess, but Monterey Jack or pepper jack work beautifully too. For the best texture, shred it yourself—pre-shredded cheese contains anti-caking agents that prevent proper melting. Trader Joe's and Whole Foods carry excellent pre-shredded options if convenience is key, but I always reach for the block cheese for this recipe. The butter acts as a binder, so use unsalted to control the seasoning balance perfectly.
No garlic powder? Fresh minced garlic at half the amount works wonders, though it requires more prep. Substituting paprika for cayenne adds heat, while dried parsley at one-third the amount can replace fresh if needed. The breadcrumbs are optional but add significant texture—panko creates that signature crunch. For a gluten-free version, swap the flour and breadcrumbs for crushed cornflakes or almond flour. Pro tip: Toast your breadcrumbs in the oven for 5 minutes before mixing to enhance their flavor profile.
Prep ahead by mixing all dry ingredients first, then folding in the cheese and butter. These bites keep well in an airtight container for 3-4 days at room temperature, though they're best enjoyed fresh from the oven. For longer storage, freeze portions for up to 3 months—just reheat in the oven at 350°F for 5-7 minutes to restore that crispy texture. Portioning into small batches ensures you always have freshly baked snacks ready for parties or cravings.
Why You'll Love This Recipe
- Let’s be real: I make too much, and it’s still gone in days. The best part? They reheat in seconds—toss in the air fryer or microwave, and they’re just as addictive. My secret weapon for lazy nights or last-minute guests.
- Five-Ingredient Magic: I swear by this combo—just cheese, flour, and those three spices. No fancy prep, no measuring cups that never fit right. Honestly, my pantry already has everything, and I’m always reaching for it when I forget to order takeout.
- Crispy-Creamy Obsession: That first bite? The outside gets shatteringly crispy while the inside stays gooey and sharp cheddar perfection. The paprika adds this little smoky kick that makes it taste like it belongs in a restaurant, not my sheet pan.
- Game for Any Gathering: I keep a batch in the fridge for game night—no one even notices it’s not store-bought. Kids grab them after soccer practice, my book club snacks on them, and my husband sneaks them straight from the oven. (Yes, even on a Tuesday night.)
Step-by-step instructions for baked cheese snacks
Here's how to create perfectly crispy, golden cheese bites with a melty center every time.
Prepare the Cheese Mixture
In a medium bowl, combine the 2 cups shredded sharp cheddar cheese, 0.5 cup all-purpose flour, 1 tsp garlic powder, 1 tsp onion powder, 0.5 tsp paprika, 0.5 tsp ground black pepper, and 0.5 tsp kosher salt. Use your hands to work the mixture until it forms a cohesive, slightly sticky dough—this ensures even distribution of seasonings and proper binding. If the cheese feels too dry, add 1 tbsp melted unsalted butter to help it come together. The dough should hold its shape when pressed gently but still be pliable enough to roll.
This step is crucial for achieving that signature crispy exterior while maintaining a gooey interior. The flour creates structure, while the spices infuse flavor throughout. Don't overwork the dough—just enough to combine all ingredients evenly. If you notice the cheese starting to melt prematurely, chill the bowl in the refrigerator for 5 minutes to firm it back up.
Shape and Coat the Cheese Bites
Divide the cheese mixture into 16 equal portions (about 1.5 tablespoons each). Roll each portion into a ball between your palms, applying gentle pressure to create smooth, uniform spheres. Place them on a parchment-lined baking sheet and refrigerate for 15 minutes—this prevents them from spreading too much during baking.
While the cheese balls chill, melt the 2 tbsp unsalted butter in a small saucepan over low heat. Once fully melted, remove from heat and stir in the 2 tbsp chopped fresh parsley. Transfer the butter mixture to a shallow bowl. After the cheese balls have chilled, roll each one in the parsley butter mixture, then coat evenly with the 0.25 cup breadcrumbs. Press the crumbs gently to ensure they adhere completely—this creates the crispy exterior we're after.
Preheat and Prepare for Baking
Preheat your oven to 375°F and position a rack in the middle position. Lightly spray a baking sheet with 2 tbsp vegetable oil spray (or use a non-stick spray) to prevent sticking. Arrange the breadcrumb-coated cheese bites in a single layer on the prepared baking sheet, spacing them about 1 inch apart—this allows for even air circulation and prevents them from fusing together during baking.
The oil spray creates a non-stick surface while adding a subtle sheen that enhances browning. For best results, use a light misting rather than a heavy coating. If you notice any cheese balls starting to flatten or spread too much during preheating, gently reshape them with a spoon before placing them in the oven.
Bake to Golden Perfection
Bake the cheese bites for 12-15 minutes until they develop a deep golden brown color and appear crispy around the edges. Rotate the baking sheet halfway through baking to ensure even browning—this is especially important if your oven has hot spots. The centers should still be soft and slightly melty when pressed gently with a toothpick, indicating they're perfectly cooked.
Watch closely during the last 2 minutes of baking to prevent over-browning. If they start to brown too quickly, move the tray to a lower oven rack. The ideal texture combines a crispy, crunchy exterior with a warm, gooey center that melts slightly when bitten into. Remove from the oven and let cool on the baking sheet for 5 minutes before transferring to a wire rack to maintain crispness.
Serve Warm for Maximum Enjoyment
Serve the baked cheese snacks immediately while still warm for the best texture contrast. The exterior should hold its crispiness while the interior remains soft and melty. Store any leftovers in an airtight container at room temperature for up to 3 days, though they're best enjoyed fresh. If reheating, sprinkle with a few drops of water and cover with a damp paper towel in the microwave for 10-15 seconds to restore crispiness.
These cheese bites make an excellent appetizer for parties or a satisfying snack that's easy to customize. For extra flavor, experiment with adding 1 tsp smoked paprika or ½ tsp cayenne pepper to the cheese mixture before shaping. The key to success lies in proper shaping, even coating, and careful baking—each step contributes to that perfect balance of texture and flavor.
Pro Tips For Making Baked Cheese Snacks
- USE OLD FLOUR: I learned this the hard way—fresh flour makes the dough too sticky, and you’ll end up with gummy, uneven bites. Keep a bag of flour in your freezer or fridge for a few days before using it; the starch retrogrades and absorbs moisture better, giving you a firmer, easier-to-handle dough.
- SALT THE CHEESE: Sharp cheddar’s already salty, but if your batch tastes flat, sprinkle a pinch of kosher salt directly into the shredded cheese before mixing. It might seem counterintuitive, but it balances the flavors and prevents the snacks from tasting one-note—especially if you’re using pre-shredded cheese (which often has anti-caking agents).
- BAKE IN TWO BATCHES: Crowding the tray leads to soggy bottoms and uneven cooking. Spread the dough into a single layer, then bake half first, flipping the tray halfway through. Your oven’s hot spots will distribute better, and you’ll avoid the sad, undercooked lumps in the middle.
- TOAST THE SPICES: Warm your garlic and onion powders in a dry skillet for 30 seconds—just until fragrant. The extra depth of flavor carries through the baking process, making the paprika pop instead of blending into the background. (Yes, even if you’re impatient like me, wait for that aroma.)
Dietary considerations for this recipe
Vegetarian-Friendly
This recipe is completely vegetarian, relying solely on cheese, flour, and herbs for flavor. The absence of meat or animal-based ingredients makes it perfect for plant-based diets. I always double-check that the breadcrumbs are egg-free if needed for vegan adaptations, as some brands contain egg wash.
Gluten-Free Adaptations
For gluten-free versions, replace the 0.5 cup all-purpose flour with 0.5 cup almond flour or 0.5 cup gluten-free all-purpose flour blend. Swap the breadcrumbs for crushed cornflakes or gluten-free panko to maintain texture. I've tested this substitution and found it works beautifully while keeping the crispy exterior intact. 🌾
Dairy-Free Options
To make these snacks dairy-free, substitute the cheese with 1 cup dairy-free shredded cheese alternative (like Violife or Daiya) or 1 cup cashew cheese blended until smooth. Replace the butter with 2 tbsp olive oil or dairy-free margarine. The texture will differ slightly but still delivers that satisfying bite.
Low-Carb Adjustments
For a lower-carb option, reduce the flour to 0.25 cup and use 0.5 cup almond flour instead. Skip the breadcrumbs or use 1 tbsp ground flaxseed mixed with water to create a binder.
This keeps the carb count under 3g net carbs per serving while maintaining the crispy texture. I've found this works especially well with sharp cheddar.
Allergy Considerations
Check all ingredients for potential allergens: gluten in flour, dairy in cheese, and soy if using store-bought breadcrumbs. For nut-free kitchens, use sunflower seed flour instead of almond flour. Always verify labels on pre-shredded cheese and breadcrumbs, as cross-contamination can occur during processing. 🧀
Nut-Free Substitutions
If avoiding nuts completely, replace almond flour with 0.5 cup oat flour (certified gluten-free if needed). For extra crunch, toast 1 tbsp crushed potato chips instead of breadcrumbs. I've successfully used this substitution in my own kitchen and found it maintains the desired texture while being nut-free.
The key is ensuring all substitute ingredients are toasted or baked to achieve crispiness.
Nutrition facts
Frequently asked questions
Can I use pre-shredded cheese for this recipe?
While you can use pre-shredded cheese, freshly shredded cheese works best for this recipe. Pre-shredded varieties often contain anti-caking agents that prevent proper melting and can make the texture less gooey. If you must use pre-shredded, look for brands without added starches or oils.
How do I prevent the cheese bites from spreading too much?
Chilling the shaped cheese bites for 15 minutes before baking helps prevent spreading. Also, make sure your oven is fully preheated to 375°F and use a baking sheet lined with parchment paper. If they still spread, try baking at a slightly higher temperature (390°F) for 10-12 minutes instead.
What's the best way to reheat leftover cheese snacks?
For best results, reheat in the oven at 350°F for 5-7 minutes to restore crispiness. If using the microwave, place a damp paper towel over the snacks and heat for 10-15 seconds. Avoid reheating in air fryers as it can make them rubbery.
Can I make these snacks ahead of time?
Yes! Shape the cheese bites and refrigerate them on a tray for up to 24 hours before baking. For longer storage, freeze shaped bites (uncoated) for 1 month. Bake straight from frozen, adding 2-3 extra minutes to the baking time. Store baked snacks in an airtight container for 3-4 days at room temperature.
What other cheeses work well in this recipe?
While sharp cheddar is ideal, Monterey Jack, pepper jack, and Gouda all work beautifully. For extra flavor, try mixing in 1/4 cup grated Parmesan or 1/4 cup cream cheese to the dough. Avoid soft cheeses like brie or camembert as they won't hold shape during baking.