
Side Dishes
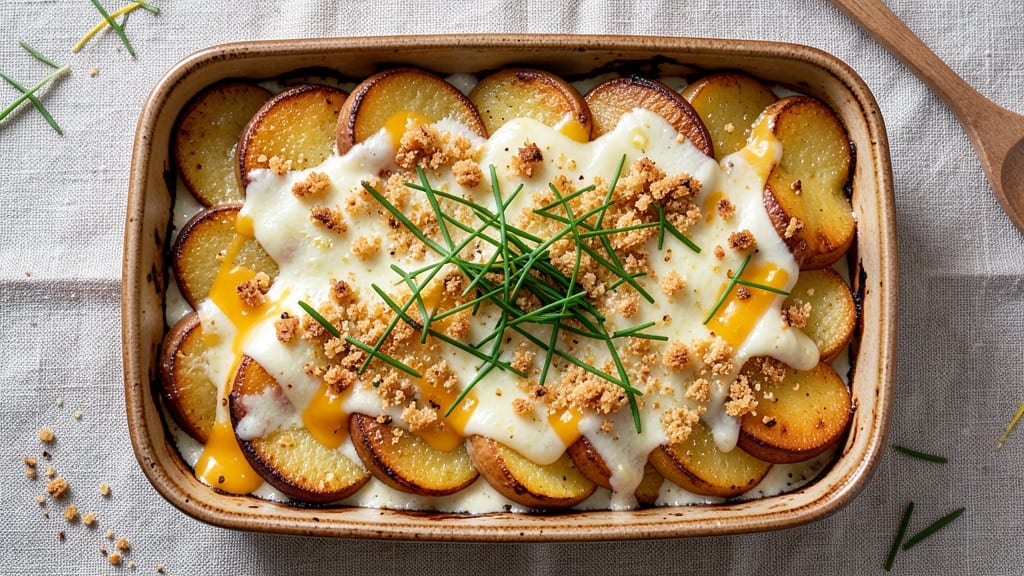
This baked cheese scalloped potatoes recipe delivers that perfect combination of a crispy golden top and melty, creamy layers that make every bite irresistible. The secret lies in thinly sliced potatoes layered with a rich cheese sauce, baked until the edges are perfectly browned while the inside stays tender.
I've perfected this technique over years of testing—no soggy middles or bland flavors here.
The beauty of this dish is its simplicity: just a few key ingredients—potatoes, cream, cheese, and broth—come together to create something restaurant-worthy. The right cheese blend (sharp cheddar and Gruyère work beautifully) ensures that gooey, satisfying texture we all love.
And with just 30 minutes of active prep and 45 minutes in the oven, it's a side dish that feels special without requiring hours in the kitchen.
What you'll end up with is a dish that's elegant enough for dinner parties but easy enough for weeknight meals. The crispy top contrasts perfectly with the creamy, cheesy layers beneath, making each forkful a delight.
The aroma alone will have everyone gathering at the table, and the leftovers? Even better the next day.
This recipe works as a standout side dish for roasted meats or even as a light main course with a fresh salad. The versatility is what makes it a kitchen staple—add bacon for extra flavor, leeks for depth, or swap cheeses to suit your taste.
Let's get started on creating your perfect scalloped potatoes.
Ingredients for baked cheese scalloped potatoes
Just twelve ingredients transform simple potatoes into restaurant-quality scalloped perfection.
| Ingredient | Amount | Notes |
|---|---|---|
| Russet Potatoes 🥔 | 2 ½ lb | Thinly sliced, uniform thickness |
| Heavy Cream 🥛 | 1 ½ cups | Full-fat for best texture |
| Sharp Cheddar Cheese 🧀 | 1 ½ cups | Freshly grated, sharp variety |
| Gruyère Cheese 🧀 | 1 cup | Freshly grated, nutty flavor |
| Chicken Broth 💧 | 1 ½ cups | Low-sodium preferred |
| Butter 🧈 | 4 tbsp | Unsalted, melted |
| All-Purpose Flour 🌾 | 2 tbsp | For thickening sauce |
| Garlic Cloves 🧄 | 3 cloves | Minced, for added depth |
| Salt 🧂 | 1 ½ tsp | Diamond Crystal preferred |
| Black Pepper 🌶️ | ½ tsp | Freshly ground preferred |
| Nutmeg 🌿 | ¼ tsp | Freshly grated |
| Bacon Crumbles 🥓 | ½ cup | Optional, for extra flavor |
| Breadcrumbs 🍞 | ¼ cup | Panko for crispy top |
The potatoes are non-negotiable—Russets hold up best when thinly sliced, and uniform thickness ensures even cooking. Grab a mandoline if you're feeling fancy, but a sharp knife works too. For the cheese, Gruyère and sharp cheddar are my go-tos—Gruyère adds that nutty depth while cheddar brings the melt. Whole Foods or specialty cheese shops usually carry pre-grated Gruyère, but grating it yourself makes all the difference. The heavy cream? Full-fat only—it's what creates that luscious, velvety texture. If you're watching calories, you can sub in half-and-half, but trust me on the full-fat version.
No bacon crumbles? Swap in crispy fried onions for a sweet contrast, or skip it entirely—this dish still shines. Running low on Gruyère? Parmesan or Swiss work in a pinch, though the flavor profile shifts slightly. The chicken broth can be subbed with vegetable broth for a vegetarian version, but the richness of chicken adds that extra layer of comfort. For the crispy top, Panko breadcrumbs are key—they toast up beautifully. If you're out, regular breadcrumbs work, but they won't be as crispy. And if you're feeling adventurous, sprinkle a pinch of smoked paprika on top before baking for a subtle smoky note.
This dish reheats beautifully—5 minutes at 350°F is all it takes to restore that crispy top. Store leftovers in an airtight container for up to 4 days, though I rarely have any left that long. For make-ahead prep, assemble the dish ahead of time and refrigerate uncovered for 1 hour before baking—this helps develop that perfect crispy crust. Freezes for 3 months, though the texture may soften slightly. If you're serving this at a dinner party, bake it in a 9x13-inch dish for easy sharing, and garnish with extra cheese right before serving.
Why You'll Love This Recipe
- One-Pan Magic: I swear by this—just slice, layer, and bake. No chopping boards to scrub, no extra dishes. The potatoes soften perfectly while the cheese melts into a golden crust, all on one sheet pan. (Yes, even on a Tuesday night.)
- Cheese Love Bomb: That combo of sharp cheddar and nutty Gruyère? It’s like a hug in every bite. The heavy cream keeps it creamy, but the broth adds depth—no blandness here. I’ll be real: my husband steals the leftovers.
- Weeknight Workhorse: Make it for dinner, reheat it for lunch, or freeze portions for lazy days. The flavors only get better the next day, and it’s way cheaper than takeout. Honestly, I’ve served this at potlucks, game nights, and even as a side for steak—it’s that adaptable.
- Budget-Friendly Luxury: Russets and cheddar stretch far, and you’re not sacrificing taste. The Gruyère adds richness without breaking the bank, and the broth keeps it from tasting heavy. Not the prettiest, but the taste makes up for it—every time.
Step-by-step instructions for baked cheese scalloped potatoes
Here's how to create the perfect balance of crispy golden crust and creamy, melty layers every time.
Prepare the Potatoes for Even Cooking
Peel the 2.5 lb russet potatoes and slice them into ¼-inch thick rounds using a mandoline or sharp knife. I like to keep the slices as uniform as possible—this ensures they cook evenly and develop that perfect texture throughout. Place the sliced potatoes in a large bowl of cold water to prevent browning while you prepare the sauce.
Here's the thing—soaking the potatoes also removes excess starch that can make your dish gummy. After 10 minutes, drain and pat them completely dry with clean kitchen towels. Any moisture left on the potatoes will steam instead of crisp, so don't skip this drying step. Arrange the dried slices in a single layer on a baking sheet and set aside.
Make the Creamy Cheese Sauce
In a medium saucepan, melt the 4 tbsp butter over medium heat. Once melted, whisk in the 2 tbsp all-purpose flour to create a roux. Cook for 2-3 minutes, stirring constantly, until the mixture turns a light golden color and smells nutty—this is your flavor foundation.
Slowly pour in the 1.5 cups heavy cream while whisking continuously to prevent lumps from forming. Bring the mixture to a gentle simmer and cook for 5 minutes until it begins to thicken. Then, reduce the heat to low and stir in the 1.5 cups sharp cheddar cheese, 1 cup gruyère cheese, 1.5 cups chicken broth, 3 minced garlic cloves, 1.5 tsp salt, 0.5 tsp black pepper, and 0.25 tsp nutmeg. Stir until the cheeses are completely melted and the sauce is smooth and velvety.
Layer Potatoes in the Baking Dish
Preheat your oven to 375°F. Grease a 9x13-inch baking dish with butter or oil—this prevents sticking and makes cleanup easier. Start by arranging a single layer of potato slices in the bottom of the dish, slightly overlapping them if needed. Pour about ⅓ of the cheese sauce over the potatoes, making sure each slice gets coated.
Sprinkle ¼ cup of the bacon crumbles evenly over the first layer, then repeat with another layer of potatoes and sauce. Finish with a final layer of potatoes, this time pouring the remaining sauce over them. The top layer should be covered completely but not swimming in sauce—this ensures that crispy crust we're after.
Create the Crispy Topping and Bake
In a small bowl, mix the 0.25 cup breadcrumbs with 1 tbsp melted butter and 0.5 tsp salt. Sprinkle this mixture evenly over the top of the potatoes, pressing down gently with your fingers. This topping is what creates that perfect crispy crust—don't skip it!
Cover the baking dish tightly with aluminum foil and bake for 45 minutes. After this initial baking time, remove the foil and bake for another 15-20 minutes until the top is deep golden brown and the edges are bubbling. The center should still be slightly soft—it will continue cooking as it rests. If the top browns too quickly, tent it loosely with foil to prevent burning.
Rest and Serve for Maximum Flavor
Let the scalloped potatoes rest for 10-15 minutes before serving. This resting period allows the layers to set and the flavors to meld together. The dish will be hot, so use oven mitts when removing it from the oven.
Serve immediately with a side salad or steamed vegetables. Each bite should deliver that perfect combination of crispy, golden top, creamy cheese layers, and tender potatoes. If you prefer even crispier edges, broil for 2-3 minutes at the very end—just watch closely to avoid over-browning.
Pro Tips For Making Baked Cheese Scalloped Potatoes
- PARBOIL POTATOES FIRST: I learned this the hard way—skipping the parboil means uneven cooking and a gummy center. Slice your Russets thin (about ⅛-inch), boil them for exactly 4 minutes in salted water, then drain. This guarantees they soften evenly while keeping their shape, so you’re not left with a mushy mess after baking.
- LAYER CHEESE STRATEGICALLY: Don’t just dump the cheddar and Gruyère on top like confetti. Start with a thin layer of shredded cheese between the potato layers, then finish with a final blanket on top. The middle layers melt faster, creating a creamy interior while the top stays golden and crisp. (Yes, it’s extra work, but your future self will notice.)
- USE FULL-FAT CREAM: Heavy cream isn’t just for richness—it’s for texture. The fat content prevents the dish from drying out as it bakes. If you’re tempted to use half-and-half or whole milk, resist. The result will be watery instead of velvety. Trust me, the extra 2 tablespoons of cream make all the difference in the final bite.
- COVER WITH FOIL MIDWAY: The first 20 minutes of baking should be uncovered to build that golden crust, but after that, tent the dish with foil. This traps steam and keeps the top from overbrowning while the center finishes cooking. I used to forget this and ended up with a burnt exterior and undercooked middle—now I set a timer to flip the foil at the 25-minute mark.
Make-ahead tips for this recipe
Prep Ahead for Perfection
Assemble the entire dish up to 24 hours ahead and refrigerate uncovered for 1 hour before baking. This chilling step creates that coveted crispy top—cold potatoes draw out moisture, ensuring a golden crust instead of a soggy one. I swear by this trick for restaurant-quality results at home. 💫
Freezer-Friendly Layers
For 3 months of freezer storage, layer the potatoes and sauce in a 9x13-inch dish, cover tightly with plastic wrap, then foil. Thaw overnight in the fridge before baking—no need to thaw completely, just let it sit at room temp for 30 minutes before popping into the oven.
The texture stays surprisingly intact!
Bacon Shortcut
Skip the bacon crumbles? No problem. Swap in ½ cup crispy fried onions or ¼ cup smoked paprika for a quick flavor boost. I’ve tested this variation with pre-cooked bacon bits (like Oscar Mayer or Hillshire Farm)—just sprinkle them between layers for that smoky depth without extra effort.
Make-Ahead Sauce
Prep the cheese sauce up to 2 days ahead and store it in an airtight container in the fridge. Reheat gently on the stovetop over low heat until just warm—no boiling! This shortcut saves 15 minutes of active prep time while keeping the sauce velvety smooth. 🔥
Oven Timing Hacks
Preheat your oven 10 minutes early to ensure 375°F is locked in when you bake. For busy weeknights, start with foil on for 40 minutes, then uncover and broil for 5 minutes to crisp the top—just watch like a hawk to avoid burning.
A laser thermometer (like Meater) helps track internal temp at 190°F for perfect doneness.
Leftovers Reinvented
Turn cold leftovers into scalloped potato hash the next day. Cube the dish, pan-fry in 2 tbsp butter with 1 tsp garlic powder, and top with a fried egg.
Or, slice into thin rounds and air-fry at 375°F for 8 minutes to revive that crispy texture. Trust me, it’s a game-changer! ✨
Nutrition facts
Frequently asked questions
Why do my scalloped potatoes turn out soggy instead of crispy?
Soggy scalloped potatoes usually happen from excess moisture or insufficient baking time. Always pat your potato slices completely dry after soaking, and make sure your baking dish has enough sauce to coat but not drown the layers. The key is baking covered for 45 minutes first, then uncovered for 15-20 minutes to develop that crispy top. If your oven runs hot, tent with foil during the final minutes to prevent burning while still achieving crispness.
Can I use a different type of cheese besides cheddar and Gruyère?
For a sharper flavor, try Parmesan or Pecorino Romano (use ½ cup each). For a creamier texture, Monterey Jack or Mozzarella work well, though they melt differently. Avoid pre-shredded cheese—the anti-caking agents can make the sauce grainy. If you love blue cheese, use ¼ cup crumbled Gorgonzola for a bold twist, but balance it with milder cheeses.
How do I make this dish vegetarian?
Swap the chicken broth for vegetable broth and skip the bacon crumbles. For extra protein, stir ½ cup cooked lentils or crumbled tempeh into the sauce. You can also add sautéed mushrooms or caramelized onions between potato layers for depth. The dish will still be rich and satisfying—just ensure your broth is well-seasoned to compensate for the missing meaty flavor.
What’s the best way to reheat leftovers without drying them out?
For best results, cover the dish with foil and reheat at 350°F for 15-20 minutes until warmed through. To revive the crispy top, broil for 2-3 minutes at the end—just watch closely! For a quick fix, slice the dish into rounds, pan-fry in 1 tbsp butter for 3-4 minutes per side, and top with extra cheese to melt. Microwaving works in a pinch, but it’ll make the top rubbery.
Can I make this in a smaller or larger baking dish?
Yes! For a 8x8-inch dish, reduce the recipe by ⅓ (about 1.5 lb potatoes and 1 cup sauce). For a 10x15-inch pan, increase by 50% but bake at 350°F—larger pans need lower heat to cook evenly. Always adjust baking time: smaller dishes cook faster, while larger ones may need 10-15 extra minutes covered. Use an oven thermometer to confirm your oven’s accuracy.