
Main Courses
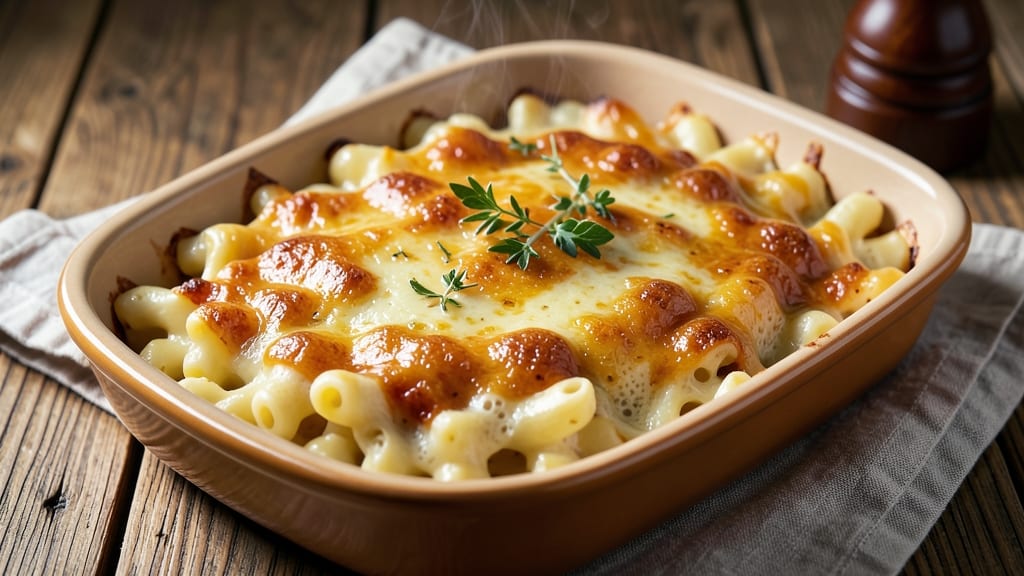
This baked cheddar mac and cheese recipe delivers the ultimate comfort food experience with triple-layered crunch and gooey cheese streaks that make every bite irresistible. ✨ The secret lies in a perfectly balanced cheese sauce that clings to al dente pasta, topped with a crispy breadcrumb crust that adds texture without overpowering the rich, creamy filling.
What sets this recipe apart is the foolproof technique that ensures tender pasta, a velvety cheese sauce, and a golden-brown topping—no lumps, no soggy layers.
We start with a classic roux base, then layer in sharp cheddar for that signature tangy flavor, finishing with a crispy breadcrumb topping that adds a satisfying crunch. The result? A dish so rich and comforting, it feels like a hug on a plate.
This recipe is designed for restaurant-quality results at home, with a method that’s simple yet precise. You’ll achieve that perfect crispy exterior and creamy interior every time, thanks to careful layering and baking at the right temperature.
Whether you’re serving it as a main course or a crowd-pleasing side, this mac and cheese will be the star of the meal.
For an extra touch, consider adding crispy bacon, jalapeños, or a sprinkle of paprika for a modern twist. The possibilities are endless, but the foundation—rich, cheesy, and utterly satisfying—remains the same. Let’s get started on creating your ultimate baked mac and cheese.
Ingredients for baked cheddar mac and cheese
Six ingredients make the magic happen—creamy, crispy, and utterly addictive.
| Ingredient | Amount | Notes |
|---|---|---|
| Elbow Macaroni 🍝 | 1 ½ lbs | Al dente when cooked |
| Sharp Cheddar Cheese 🧀 | 2 cups | Shredded, aged 6+ months |
| Monterey Jack Cheese 🧀 | 1 cup | Shredded, mild for balance |
| Heavy Whipping Cream 🥛 | 1 cup | Full-fat for creaminess |
| Unsalted Butter 🧈 | ½ cup | Cold for roux, cut into pieces |
| All-Purpose Flour 🌾 | ½ cup | For smooth roux base |
| Whole Milk 🥛 | 1 ½ cups | Warmed for sauce |
| Panko Breadcrumbs 🍞 | 1 cup | For crispy topping |
| Gruyère Cheese 🧀 | ½ cup | Shredded, nutty depth |
| Garlic Cloves 🧄 | 4 cloves | Minced for flavor boost |
| Dijon Mustard 🥫 | 1 tbsp | For tangy brightness |
| Salt 🧂 | 1 ½ tsp | Kosher salt, adjust to taste |
| Black Pepper 🌶️ | ½ tsp | Freshly cracked |
| Extra-Virgin Olive Oil 🫒 | 2 tbsp | For greasing baking dish |
The cheese is non-negotiable here. Sharp cheddar gives that signature tang, while Gruyère adds nutty depth—don't skimp on either. I grab Kraft sharp cheddar for convenience (it melts perfectly) and Whittard of Chelsea Gruyère when I want to splurge. The Monterey Jack balances the sharpness, so don't leave it out. For the breadcrumbs, Panko is a must—it stays crispy where regular breadcrumbs turn soggy. Pro tip: toast your breadcrumbs in the oven for 5 minutes before adding to the top layer for extra crunch.
No sharp cheddar? Extra-sharp white cheddar works in a pinch, but add a pinch of citric acid to mimic the tang. Out of Gruyère? Parmesan adds saltiness, but it won't have the same depth. For the pasta, cavatappi or penne work too—just cook them al dente. The mustard is key for that subtle tang, but if you're avoiding it, lemon juice at half the amount does the trick. And if you're feeling fancy, swap the milk for half-and-half for an extra-creamy sauce. Just don't skip the garlic—it's the secret to restaurant-quality flavor!
This reheats like a dream—honestly, it's even better the next day once everything melds together. Store leftovers in an airtight container for up to 5 days, though I rarely have any. For the cheese sauce, make it ahead and refrigerate—just reheat gently on the stove to avoid lumps. The breadcrumb topping? Assemble the dish, then refrigerate for 30 minutes before baking for a crispier crust. And if you're making this for a crowd, double the recipe—it disappears faster than you can say 'gooey streaks.'
Why You'll Love This Recipe
- One-Pot Magic: I swear by this recipe because it’s literally just boil, mix, bake. No straining pasta into a colander while it sticks to you—just toss the drained elbows right into the creamy cheddar-monterey jack mix. The butter and cream melt into that perfect, stretchy sauce with zero fuss.
- Cheese Overload (In the best way): Sharp cheddar and monterey jack? That’s a flavor power couple. The sharp cheese brings the tangy punch, while the monterey jack smooths it out—creamy, gooey, and just salty enough to make you crave another bite. (I’ve been known to eat it straight from the pan.)
- Weeknight & Potluck Hero: Between us, this is my go-to for lazy Tuesdays and Sunday dinners. Serve it as-is for a cozy family meal, or slice it cold for lunch the next day—no one judges. Honestly, it’s the dish that works for everyone, from picky eaters to your foodie friend who “doesn’t like mac and cheese.”
- Budget-Friendly Leftovers: A full pan costs me about $8 and feeds four. The leftovers? Even better the second day—if you can resist eating the whole thing fresh. The cream keeps it rich, the cheese stays melty, and it reheats like a dream. My wallet and my taste buds thank me.
Step-by-step instructions for triple-layered baked mac and cheese
Here's how to build the ultimate cheesy masterpiece with crispy layers and gooey perfection.
🍳 Step 1: Cook the Elbow Macaroni to Al Dente
Bring a large pot of water to a rolling boil and add 1.5 lbs elbow macaroni. Stir immediately to prevent sticking. Cook for 8-10 minutes until the pasta is al dente—you'll know it's perfect when you taste a piece and it has a slight bite in the center. Drain thoroughly in a colander, then return to the pot and toss with 2 tablespoons extra-virgin olive oil to prevent clumping.
Here's the thing—overcooked pasta makes soggy mac and cheese. I always pull mine out 1 minute early because it continues cooking in the oven. While the pasta cooks, start preparing your cheese sauce so everything comes together smoothly.
👨🍳 Step 2: Make the Creamy Cheese Sauce
In a large saucepan, melt 0.5 cup unsalted butter over medium heat until foaming. Whisk in 0.5 cup all-purpose flour to form a smooth roux, cooking for 1-2 minutes until it turns a pale golden color. This is your flavor foundation—don't let it brown or it'll taste bitter.
Gradually whisk in 1.5 cups warmed whole milk and 1 cup heavy whipping cream, letting each addition cook for 30 seconds before adding more. Stir constantly to prevent lumps. Once fully incorporated, reduce heat to low and whisk in 2 cups sharp cheddar cheese and 1 cup monterey jack cheese until completely melted and smooth.
🥘 Step 3: Combine Pasta with Sauce and Season
Add the cooked macaroni to the cheese sauce and stir gently to coat every strand. The sauce should cling beautifully to the pasta—if it's too thick, add 2-3 tablespoons hot water to loosen it. Fold in 0.5 cup gruyère cheese, 4 minced garlic cloves, 1 tablespoon dijon mustard, 1.5 teaspoons salt, and 0.5 teaspoon black pepper.
This is where the magic happens—the gruyère adds nutty depth, the garlic brings brightness, and the mustard cuts through the richness. Taste and adjust seasoning—you want it to be rich but not overwhelming. Let the mixture cool slightly while you prepare the crispy topping.
🔥 Step 4: Assemble the Triple-Layered Bake
Preheat your oven to 375°F. Grease a 9x13-inch baking dish with remaining olive oil. Spread half of the macaroni mixture evenly in the bottom of the dish. In a small bowl, mix 1 cup panko breadcrumbs with 2 tablespoons melted butter and spread this evenly over the pasta.
Add the remaining macaroni mixture on top, pressing down gently to create an even layer. The panko topping will create that perfect crispy contrast we're after. Bake uncovered for 25-30 minutes until the top is golden brown and bubbly, and the edges are crispy.
⏰ Step 5: Rest and Serve with Perfect Texture
Remove from the oven and let it rest for 5 minutes before serving. This resting period is crucial—it allows the layers to set slightly so they don't slide apart when you cut into it. The center should still be warm and gooey, with crispy edges and a golden-brown panko topping.
Slice into squares and serve immediately. Each bite should deliver that perfect combination of creamy cheese, crispy breadcrumbs, and al dente pasta. The sharp cheddar and gruyère create gooey streaks throughout, while the panko adds satisfying texture contrast. Trust me, this is the mac and cheese you'll want to make again and again!
Pro Tips For Making Baked Cheddar Mac And Cheese
- Cook Pasta Al Dente: Don’t overcook the elbows—pull them out when they’re still slightly firm (about 1 minute less than package instructions). They’ll finish cooking in the oven, and mushy pasta ruins everything. I learned this the hard way when my mac turned into glue.
- Grate Cheese Fresh: Skip the pre-shredded cheese—it’s coated with anti-caking agents that make the sauce grainy. Use a box grater for sharp cheddar and Monterey Jack, and pulse Monterey Jack in a food processor for a smoother texture. Your sauce will thank you.
- Temper the Cream: Warm the heavy cream and butter together over low heat until just steaming—don’t boil it. Cold cream curdles when mixed with hot pasta, and you’ll end up with a lumpy mess. A few minutes of patience saves a whole dish.
- Bake Uncovered Last 5 Minutes: Cover with foil for the first 20 minutes to melt the cheese evenly, then uncover for the final stretch. This gives you that perfect golden crust without burning the top. Sounds weird, but it works—your mac will be restaurant-quality.
Storing and reheating your baked cheddar mac and cheese
Refrigerator Storage
Let your baked mac and cheese cool completely before transferring to an airtight container—I use glass Pyrex with snap-on lids—and store it in the fridge for up to 4 days.
The flavors actually deepen overnight as the cheeses meld, making leftovers even more delicious. Just be sure to press plastic wrap directly on the surface first to prevent a dry top layer. 🧀
Freezer-Friendly Tips
For longer storage, freeze portions in single-serving airtight containers for up to 3 months. The triple-layered structure holds up beautifully when frozen, though the panko topping may lose some crunch.
To reheat, bake from frozen at 350°F for 30-35 minutes until bubbly and heated through. I recommend reheating in the oven rather than the microwave for best texture. ❄️
Stovetop Reheating
For a quick fix, transfer a portion to a skillet over low heat and cover with a lid. Add 1-2 tablespoons of milk or water to prevent drying, stirring gently until warmed through (165°F internal temperature).
The sauce will become slightly thinner, but the creamy texture remains intact. This method works best for smaller portions—1-2 cups at a time. 🔥
Oven Refresh Method
My favorite way to revive leftovers is to cover the baked mac and cheese with foil and reheat at 325°F for 15-20 minutes. The residual moisture keeps the panko topping crispy while warming the creamy layers evenly.
For extra crispiness, remove the foil for the last 5 minutes of reheating. This method is perfect for feeding a crowd or when you want restaurant-quality texture. 💫
Microwave Shortcut
When time is tight, use the microwave on 50% power for 2-3 minutes, stirring halfway. Add a damp paper towel to the top to retain moisture. While not as crispy as oven methods, this keeps the sauce creamy and melty.
For best results, cover the dish tightly with plastic wrap and poke a few holes to allow steam to escape. 💡
Reviving Crispy Topping
If your leftover mac and cheese loses its crispy top, sprinkle fresh panko breadcrumbs on top and broil for 2-3 minutes at 400°F until golden. This quick fix restores that satisfying crunch without drying out the creamy layers.
I also like adding a sprinkle of grated Parmesan for extra flavor. 🍞
Nutrition facts
Frequently asked questions
Why does my baked mac and cheese get watery after baking?
Watery mac and cheese usually means the sauce was too thin or the pasta wasn't fully drained. Always cook pasta al dente and drain it thoroughly, then toss with olive oil to prevent clumping. If your sauce seems too thin, simmer it uncovered for 3-5 minutes to thicken naturally. For extra insurance, add 1 tablespoon cornstarch mixed with water as a slurry.
Can I make this recipe without a roux?
Yes! For a quicker version, melt 0.5 cup butter in a saucepan, then whisk in 1.5 cups milk and 1 cup heavy cream until hot. Gradually whisk in the shredded cheeses until fully melted. The roux adds richness, but this method still delivers creamy results. Just expect slightly less depth of flavor.
How do I get the perfect crispy topping?
The secret is using Panko breadcrumbs and toasting them first. Mix 1 cup Panko with 2 tablespoons melted butter and spread it evenly over the top layer. For extra crispiness, bake the dish for 5 extra minutes uncovered at the end. Chilling the assembled dish for 30 minutes before baking also helps create a firmer crust.
What's the best way to add protein to this recipe? Try crispy bacon, pulled chicken, or diced ham for added protein. Cook bacon until crispy, then crumble it into the cheese sauce. For chicken, shred cooked rotisserie chicken and fold it into the pasta mixture. You can also add 1 cup cooked ground turkey or 1/2 cup cooked sausage for extra heartiness. Just
Can I make this mac and cheese ahead of time?
Assemble the dish completely (including the panko topping) and refrigerate it uncovered for 24 hours before baking. This helps the flavors meld and creates an even crispier crust. Bake from cold at 375°F for 35-40 minutes, covering with foil for the first 25 minutes to prevent over-browning. The results are even more flavorful!