
Appetizers
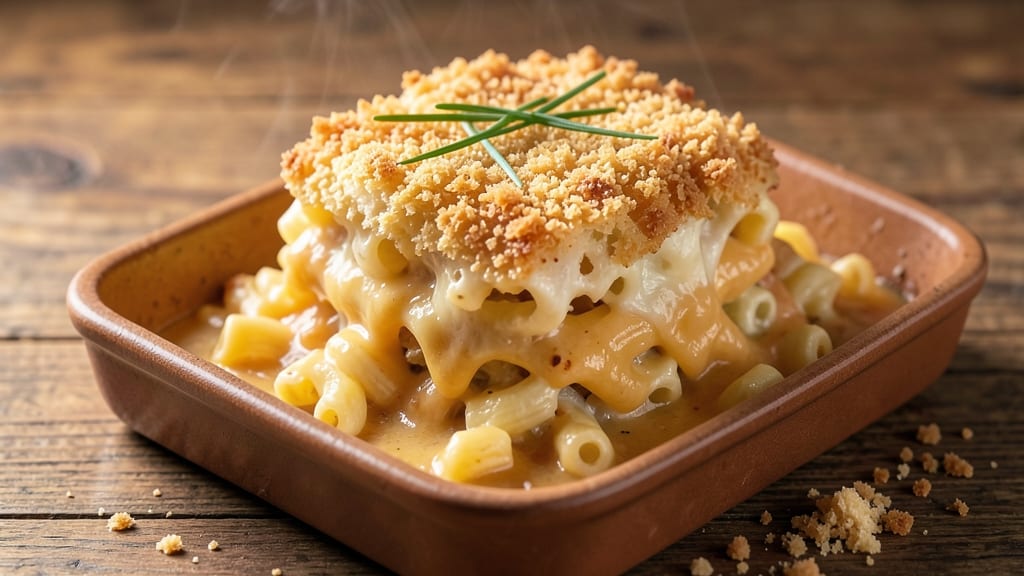
This baked breaded mac and cheese recipe delivers the ultimate comfort food experience with a crispy golden crust and gooey melted cheese that pulls apart perfectly. The secret lies in the breading technique—using panko for maximum crunch while keeping the center rich and creamy.
I’ve perfected this version after countless test batches, ensuring every bite balances texture and flavor without sogginess.
The process starts with al dente pasta and a velvety cheese sauce thickened just right, then topped with a buttery panko crust that transforms into a shatteringly crispy shield during baking.
At 375°F for 20 minutes, the oven works its magic, creating that coveted contrast between the crunchy exterior and molten interior. This isn’t just mac and cheese—it’s a showstopper dish that elevates simple ingredients into something restaurant-worthy.
What makes this recipe stand out is the foolproof method for achieving that crispy breading without burning the cheese underneath. The egg wash binds the panko perfectly, while a sprinkle of parmesan adds an extra layer of savory depth.
Serve immediately with a sprinkle of green onions or extra cheese for that final touch of elegance, and watch it disappear faster than you can say "comfort food."
Perfect for feeding a crowd or meal prepping, this baked mac and cheese reheats beautifully while maintaining that crispy texture—though I’d recommend serving it fresh when possible.
The combination of techniques and ingredients ensures every forkful is a balance of indulgence and satisfaction, making it a go-to recipe for any occasion.
Ingredients for baked breaded mac and cheese
Sixteen ingredients transform into restaurant-quality baked mac and cheese with crispy perfection.
| Ingredient | Amount | Notes |
|---|---|---|
| Elbow Macaroni 🍝 | 1 ½ lb | Al dente when cooked |
| Sharp Cheddar Cheese 🧀 | 2 cups | Shredded, 2-year aged preferred |
| Heavy Cream 🥛 | ½ cup | Full-fat for richness |
| Whole Milk 🥛 | 1 cup | Warmed for smooth sauce |
| Butter 🧈 | ½ cup | Unsalted, melted |
| Japanese Panko Breadcrumbs 🍞 | 1 ½ cups | For maximum crispiness |
| Large Eggs 🥚 | 2 whole | Room temperature for binding |
| Parmesan Cheese 🧀 | ½ cup | Freshly grated from block |
| All-Purpose Flour 🌾 | ¼ cup | For thickening sauce |
| Diamond Crystal Kosher Salt 🧂 | 1 ½ tsp | Adjust to taste |
| Freshly Ground Black Pepper 🌶️ | ½ tsp | For finishing |
| Green Onions 🧅 | ¼ cup | Sliced, for garnish |
| Garlic Cloves 🧄 | 2 cloves | Minced for flavor base |
| Extra-Virgin Olive Oil 🫒 | 2 tbsp | For sautéing garlic |
The cheese selection is non-negotiable for this recipe. Sharp cheddar with at least two years of aging delivers the best melt and depth of flavor—Cabot or White Cheddar are my go-tos. For the panko, Japanese brands like Kikkoman are superior to generic versions, offering that signature crunch. The Parmesan should be freshly grated from a block; pre-shredded contains anti-caking agents that prevent proper melting. Store your cheeses in airtight containers with parchment paper between slices to maintain freshness for up to 6 months.
No aged cheddar? Monterey Jack or Gruyère work as substitutes, though the flavor profile shifts slightly. Running low on panko? Crushed cornflakes provide a similar texture, though with less crispiness. The egg wash is critical—use room temperature eggs for better binding with the panko. For a dairy-free option, replace the heavy cream with full-fat coconut milk and use a dairy-free cheese alternative. The garlic should be freshly minced; jarred garlic lacks the aromatic punch needed for this dish.
Prep the pasta al dente and drain immediately to prevent overcooking. The cheese sauce should coat the back of a spoon but remain thick enough to cling to the pasta. Assemble the dish in a 9x13-inch baking dish for even browning. Refrigerate uncooked portions for up to 24 hours before baking, though it's best served fresh. Leftovers reheat beautifully in the oven at 350°F for 15 minutes, covered with foil to prevent drying. For meal prep, portion into individual containers and freeze for up to 3 months—reheat covered with a damp paper towel.
Why You'll Love This Recipe
- No-Fuss Assembly: I swear, this takes less effort than deciding what to watch on Netflix. Just toss the cooked pasta into a buttered dish, dump the cheesy sauce on top, sprinkle with breadcrumbs, and bake. That’s it—no fancy layering, no stressing over textures.
- Sharp Cheese Magic: Between us, sharp cheddar changes everything. The tang cuts through the creaminess, and when it melts just right? That golden crust on top? It’s the kind of flavor that makes you pause mid-bite and go, "Damn, that’s good."
- Lunchbox Hero: Honestly, this is my go-to for meal prep. The leftovers reheat like a dream—still crispy on top, still creamy inside—and it’s a hit with kids, coworkers, or anyone who needs a no-brainer lunch. Pack it in a container, and you’re golden.
- Budget Baked Bliss: Heavy cream and milk stretch the cheese further than you’d think, and elbow mac is cheap. For a dish that feels indulgent, it’s shockingly affordable—especially when you’re feeding a crowd or just treating yourself after a long week.
Step-by-step instructions for baked breaded mac and cheese
Here's the method for achieving that perfect balance of crispy golden breading and creamy, melty cheese.
Cook the Elbow Macaroni to Al Dente Perfection
Bring a large pot of water to a rolling boil and add the 1.5 lb elbow macaroni. Stir immediately to prevent sticking. Cook until 1 minute shy of the package directions for al dente—this ensures it finishes cooking in the oven without becoming mushy. The pasta should have a slight bite to it when you taste test.
Drain the pasta in a colander, but don't rinse it—this removes the surface starch needed for the creamy sauce to cling. Transfer the drained pasta to a large bowl and set it aside. The residual heat will keep it warm while you prepare the cheese sauce.
Build the Creamy Cheese Sauce
In a separate saucepan, melt the 0.5 cup butter over medium heat. Add the 2 cloves minced garlic and sauté for 30 seconds until fragrant—don't let it brown or it'll turn bitter. Stir in the 0.25 cup all-purpose flour and cook for 1 minute, whisking constantly to create a smooth roux.
Gradually whisk in the 1 cup warm whole milk and 0.5 cup heavy cream. Bring the mixture to a gentle simmer, then reduce heat to low and stir continuously for 3-4 minutes until it thickens enough to coat the back of a spoon. Remove from heat and add the 2 cups shredded sharp cheddar cheese and 0.5 cup grated parmesan cheese, stirring until completely melted and smooth.
Combine Pasta and Sauce
Pour the cheese sauce over the cooked elbow macaroni and gently fold until every strand is coated. Season with 1.5 tsp diamond crystal kosher salt and 0.5 tsp freshly ground black pepper. Taste and adjust seasoning—this is where the flavor really comes together, so don't be shy with the salt if needed.
Transfer the macaroni mixture to a 9x13-inch baking dish and spread it evenly. The dish should be about ¾ full—this allows room for the breading to expand. Smooth the top with a spatula for an even surface.
Create the Crispy Breading
In a medium bowl, whisk together the 2 whole large eggs until frothy. Add the 1.5 cups japanese panko breadcrumbs and mix until fully combined. The mixture should resemble wet sand—if it's too dry, add 1 tablespoon of milk to help bind it.
Pour the 2 tbsp extra-virgin olive oil over the baking dish and tilt to coat the macaroni evenly with oil. Then, sprinkle the breadcrumb mixture evenly over the top, pressing down gently to ensure full coverage. The breading should be ¼-inch thick—this ensures maximum crispiness without burning.
Bake to Golden Perfection
Preheat your oven to 375°F. Place the baking dish on the middle rack and bake for 25-30 minutes until the top is deep golden brown and the edges are bubbling. The center should still be slightly jiggly—it'll continue cooking as it rests.
For the final touch, broil for 1-2 minutes on high to intensify the browning. Watch closely to prevent burning. Remove from the oven and let it rest for 5 minutes before serving. Garnish with 0.25 cup sliced green onions and additional black pepper for freshness.
Pro Tips For Making Baked Breaded Mac And Cheese
- TOAST THE PASTA: Drain your elbow macaroni, then spread it on a rimmed baking sheet and toast in a 375°F oven for 3-4 minutes before mixing with the cheese sauce. I learned this the hard way—raw pasta in the oven makes the sauce watery and the final texture gummy. The extra starch from toasting also helps bind the breading later.
- GRATE CHEESE FRESH: Skip the pre-shredded cheese—its anti-caking agents make the sauce grainy and the breading clump. Use a box grater for sharp cheddar and mix in 1/4 cup of the grated cheese directly into the dry breadcrumbs. This ensures even coating and a crispier crust without extra effort.
- BREAD IN TWO LAYERS: Toss the toasted pasta in half the breadcrumbs first, then mix in the cheese sauce, and finish with another layer of breadcrumbs. The first layer sticks to the pasta, the second locks in flavor and creates a golden crust. Sounds weird, but it works—no more dry, crumbly tops or soggy bottoms.
- BAKE COVERED THEN UNCOVERED: Start baking your mac and cheese at 350°F covered with foil for 20 minutes to melt the cheese evenly, then uncover and crank to 400°F for the last 10 minutes. This two-step method guarantees a creamy interior and a deep golden crust without burning the top. I know, I know—it’s one more oven trip, but trust the process.
Common mistakes when making perfect results
Overcooking the Pasta
One of the most common mistakes is cooking the pasta until it's fully tender before baking. This leads to a mushy, sad mac and cheese that loses its structure.
Always cook your elbow macaroni 1 minute shy of package directions—it'll finish cooking in the oven while maintaining that perfect al dente bite. I've ruined countless batches by overcooking, so trust the timer! 🍝
Skipping the Egg Wash
The egg wash is what binds the panko breadcrumbs to the cheese sauce, creating that coveted crispy crust. If you skip it or use cold eggs, the breading will clump and fall off during baking.
Whisk your 2 large eggs until frothy and room temperature for the best adhesion. I learned this the hard way when my first attempt crumbled like sand.
Uneven Breading Thickness
Inconsistent breading thickness leads to some areas burning while others stay soft. Aim for a ¼-inch thick layer of panko mixture across the entire surface. Press gently to eliminate air pockets and ensure full coverage.
I use a ruler to check thickness—this precision makes all the difference in achieving that perfect golden crust.
Baking at Wrong Temperature
Baking too hot (above 375°F) will burn the breading before the cheese melts properly, while too low (below 350°F) results in a soggy top. 375°F is the sweet spot for that ideal balance of crispy exterior and creamy interior.
Use an oven thermometer to verify your oven's accuracy—many run hotter than set.
Not Resting Before Serving
Cutting into your mac and cheese immediately after baking causes the cheese to slide out of the breading and become messy. Let it rest for 5 minutes—this allows the cheese to set slightly and the breading to firm up.
I've seen entire portions collapse when served too soon, so patience pays off here. ✨
Overmixing the Cheese Sauce
While stirring the cheese sauce, it's easy to create lumps or make it too thick. The sauce should coat the back of a spoon but remain smooth. If it's too thick, add 1 tablespoon of warm milk at a time.
I've had batches where the sauce separated completely—this happens when you overheat it or don't melt the cheese gradually. Keep heat on low once the cheese is added.
Nutrition facts
Frequently asked questions
Can I make this baked mac and cheese ahead of time?
Assemble the dish in your baking dish, cover tightly with plastic wrap, and refrigerate for up to 24 hours before baking. For best results, bake it straight from the fridge at 375°F for 30-35 minutes—the extra time compensates for the cold start. This is perfect for meal prep!
What if I don't have panko breadcrumbs?
No problem! Use crushed cornflakes or crushed potato chips for a similar texture, though panko gives the best crispiness. For extra crunch, mix in 1 tablespoon of grated parmesan with your substitute. The egg wash still works perfectly with these alternatives.
How do I reheat leftovers without losing the crispy top?
Cover the baked mac and cheese with foil and reheat at 350°F for 15 minutes. For extra crispiness, broil for 1-2 minutes at the end. Avoid microwaving—it turns the breading soggy. If reheating from frozen, add 5-10 extra minutes to the baking time.
Can I add other ingredients like bacon or veggies?
Yes! Cook ½ lb bacon until crispy and crumble it into the cheese sauce, or sauté 1 cup chopped broccoli until tender before mixing with the pasta. Just reduce the cheese by ¼ cup to maintain the proper balance. The breading will still crisp up beautifully.
Why did my breading turn out greasy instead of crispy?
Greasy breading usually means too much oil was used or the panko wasn't pressed down firmly. Stick to 2 tablespoons of olive oil total, and press the breadcrumb mixture gently to eliminate air pockets. Also, ensure your panko is fresh—old breadcrumbs lose their crispiness.