
Appetizers
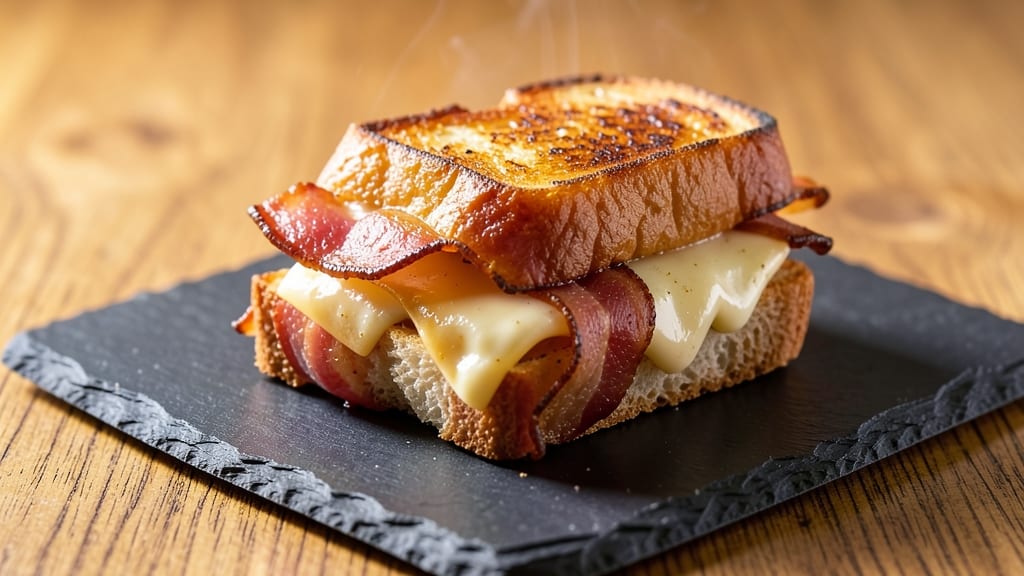
This bacon-wrapped grilled cheese delivers crispy edges and smoky-melty magic that turns a simple lunch into something extraordinary. 🔥 After years of perfecting the balance between tender cheese and perfectly rendered bacon, I've cracked the code for restaurant-quality results at home.
The secret lies in layering flavors—crispy bacon, gooey cheese, and buttery bread—all wrapped in a way that ensures every bite is a harmonious blend of textures and tastes.
What makes this recipe special is the technique: crisping the bacon first for maximum flavor, then wrapping it around the cheese and bread to create a crispy, caramelized exterior while keeping the center perfectly melty.
This method transforms a classic comfort food into a gourmet experience that's surprisingly simple to execute. With just a few high-quality ingredients and a stovetop or oven, you'll have a dish that's impossible to resist.
By the time you take that first bite, you'll experience the perfect combination of crispy bacon, creamy melted cheese, and buttery toasted bread. The bacon adds a smoky depth that elevates the cheese, while the bread provides the ideal structure for holding everything together.
This is the kind of recipe that feels indulgent yet comes together quickly—ideal for a cozy lunch or a satisfying snack.
The beauty of this dish is its versatility. Swap cheddar for gouda, add jalapeños for a kick, or use sourdough for extra tang. Serve it with tomato soup for the ultimate comfort food pairing, or enjoy it as-is for a meal that feels like a hug in every bite.
Let's get started on creating your perfect bacon-wrapped grilled cheese.
Ingredients for bacon wrapped grilled cheese
Crispy bacon, gooey cheese, buttery bread—just eight ingredients for smoky-melty magic.
| Ingredient | Amount | Notes |
|---|---|---|
| Thick-Cut Bacon 🥓 | 8 slices | Thick-cut for best crispiness |
| Sourdough Bread 🍞 | 4 thick slices | Crust removed for even toasting |
| Sharp Cheddar Cheese 🧀 | 1 ½ cups | Shredded, aged for best flavor |
| Butter 🧈 | 2 tbsp | Unsalted, softened for spreading |
| Mayonnaise 🥫 | 1 tbsp | For extra creaminess in filling |
| Garlic Powder 🧄 | ½ tsp | For subtle garlic flavor |
| Salt 🧂 | ½ tsp | Kosher salt for seasoning |
| Black Pepper 🌶️ | ¼ tsp | Freshly ground for best flavor |
| Olive Oil 🫒 | 1 tbsp | For greasing the pan |
| Gouda Cheese 🧀 | ½ cup | Optional for extra richness |
| Jalapeño Slices 🌶️ | 2 slices | Optional for heat lovers |
The bacon is everything here. Thick-cut is non-negotiable—it crisps up perfectly without burning. Grab the thickest slices you can find at Costco or your local butcher. I always buy extra because crispy bacon is worth the splurge. For the bread, sourdough with a thick crust gives that perfect chewy bite, but any sturdy bread works. Remove the crusts unless you're feeling fancy—they burn before the cheese melts. Pro tip: pat the bread dry with a paper towel before assembling so it doesn't get soggy.
No sharp cheddar? Gouda or pepper jack work great—just adjust the heat level. Running short on mayo? Greek yogurt thinned with a splash of milk does the trick. Want extra flavor? Mix in a dash of hot sauce or smoked paprika with the cheese. The jalapeños? Pickled or fresh both work, but seeded if you hate spice. And if you're using a nonstick pan, skip the olive oil—but if you're getting that crispy caramelized crust, grease it lightly for insurance.
Assemble these bad boys fresh—don't let the cheese sit out too long. Store any leftover cheese in an airtight container for up to 5 days, and pre-cooked bacon keeps 1 week in the fridge. For next-level prep, make bacon ahead and freeze it on a tray before storing—crispy every time. The bread? Day-old works best—it toasts up even better. And if you're making these for a crowd, double the bacon. Trust me, you'll need it.
Why You'll Love This Recipe
- Five-Ingredient Magic: I swear by this combo—thick-cut bacon, sourdough’s chewy crunch, and sharp cheddar melting into gooey perfection. The mayo spread? That’s the secret sauce that keeps everything from drying out while you’re busy (because let’s be real, life happens).
- Crispy-Creamy Obsession: The moment that first bite hits—crispy bacon, buttery sourdough, and that molten cheddar pull? It’s like a flavor hug. Honestly, I’ve made grilled cheese before, but this? This is the kind of sandwich that makes you close your eyes and sigh.
- Lunchbox Hero: Pack these for work or school—wrapped in foil, they stay warm and sturdy. My kids actually eat them cold too (yes, even on a Tuesday), and the bacon holds up better than any sad, soggy sandwich I’ve ever tried to send with them.
Step-by-step instructions for bacon-wrapped grilled cheese
Here's how to make the ultimate crispy, smoky grilled cheese with perfect melty layers.
🔥 Step 1: Prepare the Cheese Filling
In a medium bowl, combine the 1.5 cups Sharp Cheddar Cheese and 0.5 cup Gouda Cheese (if using). Add the 1 tbsp Mayonnaise, 0.5 tsp Garlic Powder, 0.5 tsp Salt, and 0.25 tsp Black Pepper. Mix until fully combined—this creates the perfect creamy, flavorful center.
I like to use a fork for this step because it helps break up any large cheese chunks while keeping the texture smooth. If you're adding the 2 slices Jalapeño Slices, chop them into small pieces first and fold them into the cheese mixture for even heat distribution.
👨🍳 Step 2: Assemble the Bacon-Wrapped Sandwiches
Lay out the 4 thick slices Sourdough Bread on a clean work surface. Spread 1 tbsp softened Butter on one side of each slice—this creates a golden, crispy exterior when grilled. Divide the cheese mixture evenly between the bread slices, spreading it thinly but completely.
Here's the fun part: Wrap each sandwich with 2 slices Thick-Cut Bacon, pressing gently to seal the edges. The thick-cut bacon ensures maximum crispiness, and the wrap keeps the cheese contained while it melts. I like to make two sandwiches at a time for easier handling on the grill.
🔥 Step 3: Cook the Bacon-Wrapped Sandwiches
Heat a large skillet over medium heat and add 1 tbsp Olive Oil. Once the oil is shimmering (about 2-3 minutes), carefully place the bacon-wrapped sandwiches in the pan. Cook for 4-5 minutes per side until the bacon is deep golden brown and crispy, and the bread is toasted to perfection.
This is where the magic happens—the bacon renders its fat, which bastes the sandwich and creates that irresistible smoky flavor. Don't press down on the sandwiches with a spatula; just let them cook undisturbed so the bacon gets crispy all over. You'll know they're ready when the cheese is fully melted and the edges are beautifully browned.
⏰ Step 4: Rest and Serve
Transfer the bacon-wrapped sandwiches to a plate and let them rest for 2-3 minutes. This brief resting period allows the cheese to set slightly, making it easier to handle when you cut into them. The sandwiches will be hot, so use a knife and fork to cut through the bacon and bread.
Serve immediately while the cheese is still gooey and the bacon is at its crispest. The combination of smoky bacon, crispy bread, and melty cheese creates a flavor explosion in every bite. For extra decadence, serve with a side of marinara or pickles to balance the richness.
Pro Tips For Making Bacon Wrapped Grilled Cheese
- CRISP THE BACON FIRST: I learned this the hard way—cooking the bacon after assembling the sandwich leads to soggy wrappers. Get it perfectly crisp (4-5 minutes in a cold pan) before wrapping so it holds its shape and adds crunch every bite.
- SPREAD MAYO ON THE INSIDE: That buttery outside is non-negotiable, but don’t skip the mayo. Slather the inside of the bread with about ½ teaspoon each—it melts the cheddar faster and keeps the sandwich from falling apart when you cut into it.
- WRAP TIGHT, SEAL EDGES: Loose bacon = cheese spillage. Fold the bacon strips around the sandwich like a burrito, overlapping edges, then secure with a toothpick. Press the edges gently to seal—this guarantees the cheese stays put during grilling.
- GRILL LOW AND SLOW: High heat = burnt outside, cold inside. Start over medium-low (325°F) for 3-4 minutes per side, then finish with a quick sear if needed. The bacon’s fat needs time to render, or you’ll end up with a greasy mess instead of crispy perfection.
Flavor customization for this dish
Spice Level Boost
For heat lovers, add 2 slices jalapeño to the cheese mixture or wrap them inside the bacon before cooking.
If you want extra kick, sprinkle ½ tsp smoked paprika or ¼ tsp cayenne pepper into the cheese filling. 🌶️ I like to toast the jalapeños in the pan for 30 seconds before wrapping to deepen their flavor—just don’t burn them!
Cheese Variations
Swap the sharp cheddar for pepper jack (adds heat), gruyère (nutty depth), or blue cheese (bold tang). For extra richness, mix in ¼ cup cream cheese with the mayo. I once used aged Gouda and smoked Gouda together—trust me, the smoky-sweet combo is next-level.
Sweet & Savory Twist
Add a touch of sweetness with 2 tbsp apricot jam or honey to the cheese mixture. The caramelized sugar pairs perfectly with the smoky bacon. For a breakfast version, top with a fried egg and hot sauce. This combo is my go-to for brunch—crispy, creamy, and totally addictive. 🍯
Extra Crispy Tricks
For maximum crunch, broil the sandwiches for 1-2 minutes at the end (watch closely!). Or, press them in a skillet with a lid for 30 seconds to trap steam and create a crispy crust.
I also love using thin-sliced bacon (like Applewood smoked) for a different texture—it gets extra crispy but stays tender.
Gourmet Upgrades
Add 1 tbsp Dijon mustard to the cheese for tang, or fold in 2 tbsp caramelized onions for sweetness. For a fancy touch, sprinkle crushed black pepper and fresh thyme on top before serving.
Once, I even wrapped the sandwich in prosciutto instead of bacon—it added a luxurious salty note. 💫
Gluten-Free Adaptation
Use gluten-free sourdough bread or brioche-style GF bread for a sturdy base. For extra crispiness, brush the bread with melted butter before wrapping. I’ve tested this with Canyon Bakehouse GF bread—it holds up well and toasts beautifully. Just keep an eye on it to avoid burning!
Nutrition facts
Frequently asked questions
Can I make this recipe without mayo in the cheese filling?
Swap the mayo for 2 tbsp sour cream or Greek yogurt for tangy creaminess, or use extra butter (1 tbsp) mixed with the cheese for richness. The mayo helps bind flavors and adds moisture, but these alternatives work beautifully. Just mix them into the cheese until fully combined.
How do I keep the bread from getting soggy?
Pat your bread slices very dry with paper towels before assembling, and avoid overloading with cheese. The bacon wrap helps contain moisture, but for extra insurance, toast the bread lightly (30 seconds per side) in a dry pan before adding the cheese. Also, cook the sandwiches over medium heat—too high heat can steam the bread instead of toasting it.
Can I make these ahead of time?
Prep the components in advance: Cook the bacon and store it in the fridge for up to 5 days, and shred the cheese ahead (store in an airtight container). Assemble the sandwiches just before cooking—this keeps the bread crispy. For make-ahead convenience, freeze the assembled sandwiches (uncooked) on a tray, then transfer to a bag. Cook straight from frozen, adding 1-2 extra minutes per side.
What's the best way to reheat leftovers?
Reheat in a skillet over low-medium heat for 2-3 minutes per side until the bacon is crispy again. For oven reheating, wrap in foil and bake at 350°F for 5 minutes, then unwrap and broil for 1-2 minutes to restore crispiness. Microwaving works in a pinch (30 seconds), but the texture won't be as perfect—skillet reheating is always best.
Can I use turkey bacon instead of pork bacon?
Yes! Turkey bacon works well, though it has a milder flavor and may crisp up slightly differently. For best results, use thick-cut turkey bacon and cook it 1 minute longer per side> to ensure full crispiness. You might want to add a pinch of smoked paprika> to the cheese filling to compensate for the reduced smokiness. The texture will still be delicious—just expect a lighter flavor profile.