
Breakfast & Brunch
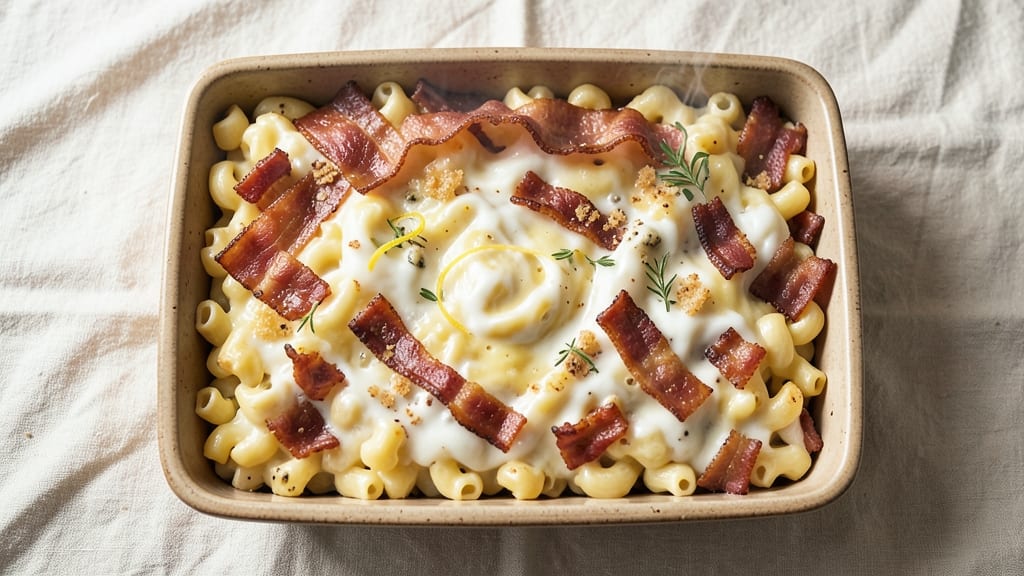
This bacon mac and cheese casserole recipe delivers the ultimate comfort food experience—crispy bacon crumbles, a golden cheese crust, and creamy, melty layers that make every bite irresistible. The secret lies in the perfect balance of stovetop roux and oven-baked richness, ensuring a texture that’s both tender and satisfying.
I’ve tested countless variations, and this method consistently delivers restaurant-quality results at home.
The foundation starts with a velvety cheese sauce made from sharp cheddar, Gruyère, and cream cheese, all blended into a smooth, velvety consistency. Crispy bacon adds a smoky depth that cuts through the richness, while a buttery breadcrumb topping creates that coveted golden crust.
The key is baking at the right temperature—375°F—to achieve a crispy exterior without drying out the cheese underneath.
What you’ll end up with is a casserole that’s crispy on top, perfectly tender in the middle, and packed with layers of cheesy goodness. The aroma alone will have everyone gathering around the table, and the first bite delivers that perfect combination of textures—creamy, crispy, and savory all at once.
This recipe is ideal for feeding a crowd or meal prepping for the week.
Serve with a simple side salad or steamed vegetables to balance the richness, or enjoy it as a hearty main dish on its own. The leftovers reheat beautifully, making this the ultimate weeknight dinner solution. Let’s get started on creating your perfect cheesy masterpiece!
Ingredients for bacon mac and cheese casserole
Crispy bacon, velvety cheese, golden crust—this casserole delivers restaurant-quality comfort in one dish.
| Ingredient | Amount | Notes |
|---|---|---|
| Elbow Macaroni 🍝 | 2 cups | Uncooked, dry pasta |
| Thick-Cut Bacon 🥓 | 1 ½ lb | Crispy, chopped into small pieces |
| Sharp White Cheddar Cheese 🧀 | 4 oz | Shredded, block preferred |
| Gruyère Cheese 🧀 | 4 oz | Shredded, for depth of flavor |
| Cream Cheese 🧈 | 8 oz | Full-fat, room temperature |
| Heavy Whipping Cream 🥛 | 1 cup | Full-fat for richness |
| Unsalted Butter 🧈 | ½ cup | Cold, cubed for roux |
| All-Purpose Flour 🌾 | ¼ cup | For smooth roux base |
| Whole Milk 🥛 | 1 cup | Warmed for blending |
| Panko Breadcrumbs 🍞 | ½ cup | For crispy topping |
| Seasoned Salt 🧂 | 1 tsp | Garlic/herb blend preferred |
| Black Pepper 🌶️ | ½ tsp | Freshly cracked |
| Garlic Powder 🧄 | ½ tsp | For subtle depth |
| Paprika 🌶️ | ¼ tsp | Smoked for color |
| Mustard Powder 🌶️ | ¼ tsp | Brightens the cheese |
The bacon is non-negotiable—thick-cut delivers that perfect crunch. Costco or Trader Joe's sell it pre-chopped for convenience, but if you're feeling fancy, cut it yourself for even crispier pieces. Gruyère is the secret weapon here—it melts like a dream and adds that nutty complexity. Whole Foods carries it pre-shredded, but I always buy a wedge and grate it fresh for maximum flavor. The cheddar? Sharp white is key—avoid the pre-shredded stuff (it gets gummy when baked). For the breadcrumbs, Panko is your best friend—it stays crispy where regular breadcrumbs turn soggy.
No Gruyère? Parmesan or Swiss cheese works in a pinch, but the flavor won't be the same. Pre-shredded cheese? Toss it in flour first to absorb moisture—this prevents that dreaded gummy texture. Out of heavy cream? Half-and-half or whole milk will work, but the sauce won't be quite as luscious. For the roux, low and slow is critical—rushing it means a floury, grainy mess. The mustard powder might seem odd, but trust me, it cuts through the richness and brightens everything. Want extra crisp? Add a sprinkle of crushed potato chips to the breadcrumb mix—game changer.
This casserole tastes even better the next day—make a double batch if you can. Store leftovers covered in the fridge for up to 4 days, and freeze portions for 2 months. To reheat, cover with foil and bake at 350°F until bubbly. The breadcrumb topping gets extra crispy when reheated, so it's worth the effort. For meal prep, assemble the casserole in a disposable foil pan—just bake and serve straight from the pan for easy cleanup. The aroma alone will have everyone rushing to the table.
Why You'll Love This Recipe
- One-Pot Magic: I swear by this recipe when I’m too tired to wash a million dishes. The bacon cooks right in the pan, the pasta boils in the same liquid, and the cheeses melt into a dreamy sauce—all while I’m free to stir, taste, and pretend I’m not secretly watching a rerun of The Office.
- Crispy-Creamy Obsession: That first bite? The crunch of thick-cut bacon against the stretchy, Gruyère-rich cheese—it’s like a hug for your taste buds. The sharp cheddar cuts through the creaminess, and the cream cheese? It’s the secret weapon that makes it dangerously good.
- Weeknight Workhorse: I make this for lazy Mondays, potlucks where I don’t want to bring a salad, and even as a side for Thanksgiving when I’m too busy carving the turkey. It reheats like a champ and disappears faster than my willpower when I’m hungry.
- Budget-Friendly Luxury: Between us, this recipe feeds four for less than $10 and tastes like you slaved over it. The bacon adds that indulgent touch without breaking the bank, and leftovers? They’re my favorite—better the next day, if you can believe it.
Step-by-step instructions for bacon mac and cheese casserole
Here's how to create the ultimate comfort dish with a golden, crispy crust and gooey cheese center.
Cook and Crisp the Bacon
Line a baking sheet with parchment paper and arrange the 1.5 lb thick-cut bacon in a single layer. Place it in a cold oven and bake at 275°F for 20-25 minutes until fully crisp. This low-and-slow method renders fat beautifully without burning.
Remove the bacon and drain on paper towels, reserving 1 cup of the rendered fat. Chop the bacon into small pieces—they should be bite-sized but not crumbly. The crispy bacon adds incredible texture contrast to the creamy cheese filling.
Prepare the Cheese Sauce
In a large skillet over medium heat, melt the 0.5 cup unsalted butter until foaming. Whisk in the 0.25 cup all-purpose flour and cook for 1-2 minutes until the roux turns a pale golden color. This is your flavor foundation—don't rush it or it'll taste raw.
Gradually whisk in the 1 cup whole milk and 1 cup heavy whipping cream, letting each addition cook into the roux before adding more. Simmer for 3-4 minutes until the sauce thickens enough to coat the back of a spoon. Remove from heat and stir in the 8 oz cream cheese until completely melted and smooth.
Combine Cheese and Pasta
Bring a large pot of salted water to a boil and cook the 2 cups elbow macaroni until al dente (about 1 minute less than package instructions). Drain and rinse briefly with cold water to stop cooking, then transfer to a large bowl.
Add the cooked macaroni to the cheese sauce along with the 4 oz sharp white cheddar cheese, 4 oz gruyère cheese, and the chopped bacon. Stir until everything is evenly coated and the cheeses are fully melted. The mixture should be thick but still pourable—if it's too stiff, add 1-2 tablespoons of milk to loosen it.
Assemble and Bake the Casserole
Transfer the macaroni mixture to a 9x13-inch baking dish, spreading it evenly. In a small bowl, combine the 0.5 cup panko breadcrumbs, 1 tsp seasoned salt, 0.5 tsp black pepper, 0.5 tsp garlic powder, 0.25 tsp paprika, and 0.25 tsp mustard powder. Sprinkle this mixture evenly over the top of the casserole.
Bake at 375°F for 25-30 minutes until the top is deep golden brown and the edges are bubbling. The cheese should be melted throughout, with a crispy, crackly crust on top. If the top browns too quickly, tent loosely with foil for the last 5 minutes of baking.
Rest and Serve
Remove from the oven and let the casserole rest for 10 minutes before serving. This allows the cheese to set slightly and makes slicing easier. The crispy topping will soften a bit, but it'll still provide that satisfying texture contrast with each bite.
Cut into 6 generous servings and enjoy immediately while the cheese is at its peak meltiness. The combination of smoky bacon, rich cheeses, and crispy panko topping makes this the ultimate comfort food experience.
Pro Tips For Making Bacon Mac And Cheese Casserole
- CRISP THE BACON FIRST: I learned this the hard way—cooking bacon in the same pan as the mac and cheese leads to a greasy, uneven mess. Render the thick-cut bacon until it’s deep brown, not just pink, then drain it well on paper towels. That crispy fat is flavor gold, but you don’t want it swimming in your casserole.
- GRATE THE CHEESE FINE: Sharp white cheddar and Gruyère won’t melt smoothly if they’re in big chunks. Use the large holes of a box grater—not the shredder attachment—and mix them with the cream cheese before adding to the pasta. This guarantees a creamy, cohesive sauce instead of a lumpy one. (Yes, even if you’re impatient like me.)
- STIR IN THE CREAM CHEESE LAST: Adding cream cheese too early turns your sauce into a sad, grainy paste. Once the pasta is cooked and the cheeses are melting, take the pan off heat for 30 seconds, then whisk in the cream cheese until fully incorporated. This keeps the texture rich but smooth—not gluey.
- BAKE UNTIL THE TOP CRUSTS: Skip the foil halfway through and let the top brown for 5–7 minutes under the broiler. The Gruyère will turn golden and nutty, while the sharp cheddar adds that perfect crispy contrast. If you’re worried about burning, watch it like a hawk—this isn’t the prettiest method, but it’s the tastiest.
Essential equipment for this recipe
Baking Dish Essentials
A 9x13-inch baking dish is non-negotiable for this recipe—it provides the perfect surface area for even baking and that coveted crispy crust.
I recommend using a heavy-duty stainless steel pan from All-Clad or Calphalon for even heat distribution, but a well-seasoned cast iron skillet works too if you prefer rustic edges. Avoid dark-colored pans—they can make the casserole look underdone even when fully cooked. 🔥
Mixing Bowls
You’ll need a large mixing bowl (at least 8-quart capacity) for combining the macaroni and cheese sauce. I use a stainless steel bowl from OXO because it’s durable and easy to clean, but any non-reactive bowl will work.
For the breadcrumb topping, a small ramikkin or ramekin (about 1-cup size) keeps everything contained while mixing. A silicone spatula helps scrape every last bit of cheese from the bowl.
Cheese Tools
Invest in a fine grater (like the Microplane) for freshly shredding the Gruyère and cheddar—pre-shredded cheese has anti-caking agents that make the sauce gummy. A small offset spatula (about 3-inch wide) is perfect for spreading the cheese sauce evenly in the baking dish.
For the cream cheese, cut it into small cubes before adding to the sauce so it melts smoothly without lumps.
Bacon Cooking Setup
For crispy bacon, use a wire cooling rack placed over a rimmed baking sheet to catch fat. A kitchen torch (like the Weber Q1000) can crisp bacon faster if you’re short on time, but oven-baking at 275°F gives the best flavor.
Line the sheet with parchment paper for easy cleanup—no scrubbing required! Reserve the rendered fat for future cooking or discard if you’re watching calories. 🥓
Measuring and Prep
Precision matters here! Use a digital kitchen scale for the cheeses (they’re measured by weight, not volume) and a measuring cup set (like Pyrex) for liquids. A fine-mesh strainer helps drain excess water from cooked pasta without losing nutrients.
For the breadcrumb topping, a measuring spoon set ensures you get the right balance of seasonings—too much salt can overpower the dish.
Optional Upgrades
Want extra crisp? Add a handheld immersion blender (like Magic Bullet) to emulsify the cheese sauce for a silkier texture. For serving, a sharp chef’s knife (like Wüsthof) makes clean cuts through the crispy top.
If you’re meal prepping, aluminum foil pans (like Reynolds) are disposable and easy to reheat—just pop them back in the oven when ready to serve.
Nutrition facts
Frequently asked questions
Can I make this casserole ahead of time?
Assemble the casserole in a baking dish, cover tightly with foil, and refrigerate for up to 24 hours before baking. For best results, bake it straight from the fridge at 375°F for 30-35 minutes—the extra time ensures the cheese melts perfectly. You can also freeze the assembled (unbaked) casserole for 2 months.
Why did my cheese sauce get grainy?
Grainy sauce usually means the cheese didn't melt smoothly. Always shred cheese fresh (no pre-shredded) and cut cream cheese into small cubes before adding. If your sauce thickens too much, whisk in 1-2 tablespoons of warm milk. For extra silkiness, blend the sauce briefly with an immersion blender after removing from heat.
Can I use a different type of pasta?
Elbow macaroni is ideal for this recipe, but you can substitute with penne or fusilli for better texture contrast. Avoid long noodles—they break easily when mixed with cheese. For a gluten-free option, use gluten-free elbow macaroni and ensure your breadcrumbs are certified GF too.
How do I prevent the top from getting soggy?
The crispy topping secret is baking time and temperature. Don't over-bake—25-30 minutes at 375°F is perfect. If your oven runs hot, tent with foil for the last 5 minutes. Also, make sure your breadcrumbs are dry and toasted before adding them to the top.
What's the best way to reheat leftovers?
Cover the casserole with foil and reheat at 350°F for 15-20 minutes until bubbly. For extra crisp, broil for 2-3 minutes at the end. Microwaving works in a pinch (30-second intervals), but the texture won't be as perfect. The crispy topping reheats beautifully this way!