
Snacks
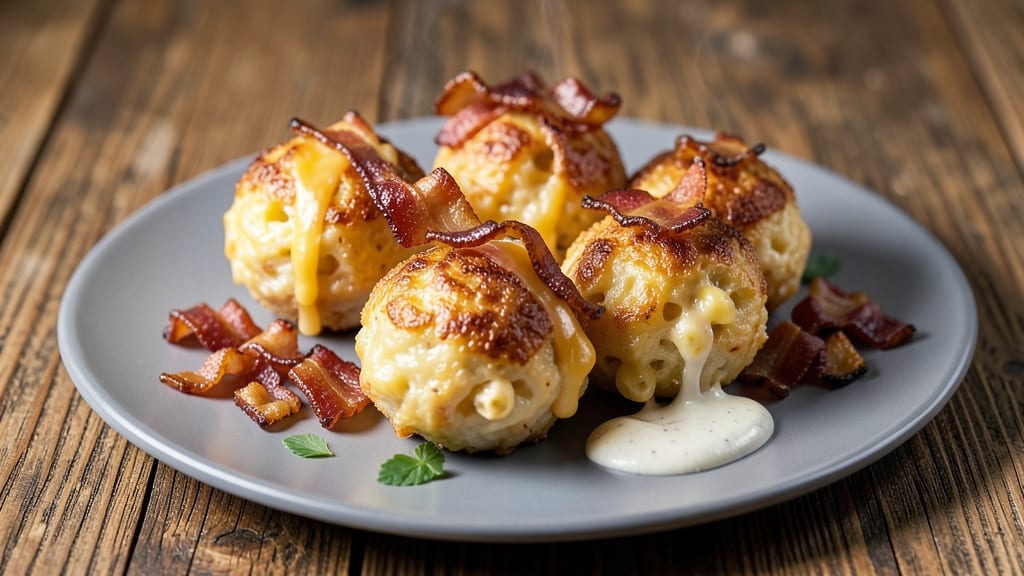
This bacon mac and cheese balls recipe delivers the ultimate comfort food experience in bite-sized form—crispy golden edges, gooey cheesy centers, and smoky bacon flavor in every mouthful.
The secret lies in perfectly balanced ingredients and a foolproof baking technique that ensures each bite stays crispy while maintaining that signature pull-apart texture. I've tested countless variations to perfect this recipe, and it never fails to disappear from the plate.
What sets these mac and cheese balls apart is the combination of elbow macaroni, sharp cheddar, and crispy bacon, all bound together with a creamy cheese sauce that holds its shape during baking.
The recipe uses simple pantry staples and requires just 30 minutes of active prep time, making it ideal for game day, parties, or a satisfying snack when cravings strike. The result is a dish that's both impressive and effortless to prepare.
By the time they emerge from the oven, you'll have golden-brown bites with crispy exteriors and melty, cheesy interiors that pull apart with every bite. The bacon adds a smoky depth that complements the rich, cheesy flavor perfectly.
These mac and cheese balls are versatile enough to serve as an appetizer, snack, or even a main dish when paired with a fresh salad.
The beauty of this recipe is its adaptability—you can adjust the spice level, cheese blend, or even add mix-ins like jalapeños for those who love a little kick. Once you try these, they'll become a regular feature at your gatherings. Let's get started on creating these delicious bites!
Ingredients for bacon mac and cheese balls
Crispy edges, melty centers, and smoky bacon—here's what makes these bites irresistible.
| Ingredient | Amount | Notes |
|---|---|---|
| Elbow Macaroni 🍝 | 1 lb | Uncooked, dried pasta |
| Sharp Cheddar Cheese 🧀 | 2 cups | Shredded, sharp flavor preferred |
| Bacon 🥓 | 8 oz | Cooked until crispy, chopped |
| Heavy Cream 🥛 | ½ cup | Full-fat for creaminess |
| Milk 🥛 | ½ cup | Whole milk preferred |
| Large Eggs 🥚 | 2 whole | Room temperature for binding |
| All-Purpose Flour 🌾 | ¼ cup | For breading consistency |
| Panko Breadcrumbs 🍞 | 1 cup | Light and crispy |
| Butter 🧈 | 2 tbsp | Melted for sauce |
| Garlic Powder 🧄 | ½ tsp | For subtle flavor boost |
| Onion Powder 🧅 | ½ tsp | Enhances cheesy flavor |
| Salt 🧂 | 1 tsp | Kosher or sea salt |
| Black Pepper 🌶️ | ¼ tsp | Freshly ground preferred |
The bacon is non-negotiable for that smoky depth. Thick-cut bacon from Costco or Trader Joe's stays crispier longer—look for good marbling, not the paper-thin stuff. Cook it until it's golden and crispy, then chop it finely so every bite packs flavor. The sharp cheddar makes all the difference too—Kraft 2% Milk Sharp Cheddar is my go-to, but any sharp cheddar works. If you're feeling fancy, grab some Cabot Clothbound from the dairy section—it's worth the splurge for the creamy texture. The elbow macaroni should be the small, uniform kind—Barilla or De Cecco are reliable brands.
No panko? Regular breadcrumbs plus a splash of milk work in a pinch, but they won't be as crispy. Running out of heavy cream? Half-and-half or whole milk stretches it, though the texture might get a little lighter. Want extra crispiness? Add a tablespoon of cornstarch to the breadcrumbs—it's a game-changer. The eggs are crucial for binding, but if you're prepping ahead, room temperature eggs mix better. No sharp cheddar? Pepper Jack or smoked cheddar gives a different but delicious twist. Just keep the cheese shredded—pre-shredded gets clumpy and gummy.
These stay crispy for about 2 hours at room temperature, so serve them fresh from the oven. For leftovers, store in an airtight container for 3 days—reheat in the oven at 350°F for 5-10 minutes to restore crispiness. Freeze for up to 2 months by arranging them on a tray first, then transferring to a bag. The bacon flavor gets even better the next day, so make extra if you can. Trust me, they disappear fast.
Why You'll Love This Recipe
- One-Pot Magic: I swear by this recipe—just cook the mac, crisp the bacon, and mix it all with melted cheese and cream. No extra bowls, no fuss. The only cleanup is licking the spoon.
- Addictive Crunch: That first bite of crispy bacon wrapped around gooey, cheddar-packed mac? It’s the kind of combo that makes you forget you’re eating comfort food. The sharp cheddar cuts through the richness, and the bacon keeps it from feeling heavy.
- Party in a Bite: Between us, these are my go-to for game day, potlucks, or when I need to feed a crowd without stress. Serve them warm or at room temp—they’re just as good cold the next day. Kids love picking them up, and adults won’t stop reaching for seconds.
- Budget Win: A bag of pasta, a block of cheese, and a pack of bacon stretch farther than you’d think. I make a double batch, freeze half, and pull it out for lazy nights. It’s cheap, filling, and always a hit—no takeout needed.
Step-by-step instructions for bacon mac and cheese balls
Here's how to make these addictive, cheesy bites with perfect crispy exteriors every time.
Cook and Prepare the Mac and Cheese Base
Start by cooking the 1 lb elbow macaroni in a large pot of boiling salted water until al dente, about 10-12 minutes. Drain well and return to the pot. Reduce heat to low and stir in the 2 cups sharp cheddar cheese, 0.5 cup heavy cream, and 0.5 cup milk until completely melted and smooth. This creates the rich, creamy foundation for your cheese balls.
Next, remove the pot from heat and let the mixture cool slightly. Once cool enough to handle, gently fold in the 8 oz cooked, crispy bacon using a spatula. The bacon adds that smoky, salty punch that makes these bites irresistible. Let the mixture cool completely before shaping—this prevents the cheese from melting prematurely.
Bind the Mixture and Shape the Balls
In a separate bowl, whisk together the 2 whole large eggs, 0.25 cup all-purpose flour, 1 tsp salt, 0.25 tsp black pepper, 0.5 tsp garlic powder, and 0.5 tsp onion powder until smooth. This egg mixture acts as the binder, holding everything together while keeping the balls cohesive.
Add the cooled mac and cheese mixture to the egg mixture and gently fold until fully combined. The texture should be thick enough to hold its shape when rolled. Using your hands, form the mixture into 1.5-inch balls—about 4 total—rolling them gently to create smooth, even surfaces. If the mixture feels too sticky, chill it for 10 minutes before shaping.
Bread the Cheese Balls for Extra Crispiness
Place the 1 cup panko breadcrumbs in a shallow bowl. Set up a second bowl with the 2 tbsp melted butter mixed with a pinch of salt. Dip each cheese ball into the melted butter, letting excess drip off, then roll it thoroughly in the panko breadcrumbs until fully coated. The breadcrumbs will create that satisfying crunch we're after.
Here's the thing—don't skip the butter step. It helps the breadcrumbs stick and adds an extra layer of flavor. Place the breaded cheese balls on a parchment-lined baking sheet and refrigerate for 15 minutes to firm up. This chilling step is crucial for maintaining shape during baking and ensuring maximum crispiness.
Bake Until Golden and Bubbly
Preheat your oven to 375°F for perfect browning. Bake the cheese balls for 20-25 minutes, flipping them halfway through, until they're golden brown and the internal temperature reaches 165°F. You'll know they're done when the edges are crispy and the cheese inside is just starting to pull slightly in the center.
Watch them closely in the last few minutes—they go from perfectly breaded to burnt surprisingly fast. If they brown too quickly, tent them loosely with foil. Once done, let them rest for 5 minutes before serving. This resting period helps the cheese set slightly, making each bite even more satisfying.
Serve Warm with Your Favorite Dipping Sauce
Serve the cheese balls immediately while still warm and crispy. The contrast of the creamy, cheesy interior with the crispy panko exterior is what makes these bites so addictive. Pair them with marinara sauce, ranch dressing, or even a simple honey mustard dip for the ultimate flavor combination.
Real talk: these are the kind of appetizers that disappear fast at parties. Make a double batch if you're feeding a crowd—trust me, you'll want seconds. Store any leftovers in the fridge for up to 3 days, reheating in the oven at 350°F for 10 minutes to restore that perfect crispiness.
Pro Tips For Making Bacon Mac And Cheese Balls
- CRANK THE BACON LOW: I learned this the hard way—cooking bacon fast at high heat makes it crispy but turns the cheese sauce greasy and uneven. Use medium-low heat and render it slowly; crisp it up later in the oven if you want crunch, but keep the fat controlled for a smooth sauce.
- GRATE THE CHEESE FINE: Sharp cheddar has texture, and big chunks mean uneven melting. Use a box grater or food processor for a powdery consistency—this ensures every bite is creamy, not chewy. (Yes, even if you’re impatient like me.)
- UNDERCOOK THE MACARONI: Al dente pasta holds its shape better when mixed into the cheese sauce. Pull it out of boiling water 30 seconds early—it’ll finish cooking in the oven while the balls bake. Overcooked pasta turns mushy when reheated.
- CHILL THE MIX BEFORE SHAPING: Cold cheese sticks together better, so refrigerate the mac and cheese mixture for 10 minutes before rolling into balls. Warm hands make sticky messes; cold hands keep the shape intact. (Your future self will thank you.)
Health benefits of this dish
Protein-Packed Bites
These mac and cheese balls pack a surprising amount of protein—about 12 grams per serving—thanks to the combination of crispy bacon and cheddar cheese.
The 8 oz bacon provides about 25% of your daily protein needs in just one serving, while the 2 cups sharp cheddar adds another 15 grams. This makes them a satisfying snack for muscle recovery or a quick meal when you need something filling. 💪
Balanced Macronutrients
Each serving delivers a perfect balance of macronutrients: roughly 15 grams of fat (mostly from the cheese and bacon), 20 grams of carbs (from the elbow macaroni), and 12 grams of protein.
The healthy fats in the cheese and bacon help keep you full longer, making these bites ideal for curbing cravings between meals. They’re also a great option for those watching their carbs but still want a cheesy indulgence.
Calcium and Vitamin Boost
The sharp cheddar cheese provides a solid dose of calcium—about 20% of your daily value per serving—which supports bone health and muscle function. Additionally, the whole milk and heavy cream contribute vitamin D and B12, both essential for energy and immune function.
The bacon also adds a small amount of iron and zinc, rounding out the nutritional profile.
Satisfying Without Guilt
While these bites are undeniably indulgent, they’re not as heavy as they might seem. The panko breading adds fiber and a satisfying crunch, while the elbow macaroni provides complex carbs for sustained energy.
The combination of protein, fat, and carbs makes them a well-rounded snack that won’t leave you feeling sluggish. Plus, the smoky flavor from the bacon keeps things exciting without adding empty calories. 🌟
Customizable for Dietary Needs
You can easily adapt this recipe to fit dietary preferences. For a lower-carb option, swap the macaroni for cauliflower rice or zucchini noodles. To reduce fat, use low-fat cheese or turkey bacon, though the flavor will shift slightly.
For a vegetarian version, omit the bacon and add extra cheese or veggies like diced bell peppers. The beauty of this recipe is its flexibility—you can tweak it to suit almost any dietary goal while keeping the cheesy satisfaction intact.
Nutrition facts
Frequently asked questions
Can I make these cheese balls ahead of time?
These hold up well for meal prep. Form the balls and refrigerate them on a tray for up to 24 hours before baking. For longer storage, freeze unbaked balls on a tray, then transfer to a bag for up to 2 months. Bake from frozen, adding 5-7 extra minutes at 375°F. The flavor actually improves overnight as the bacon flavors meld.
Why did my cheese balls turn out greasy instead of crispy?
Greasy results usually happen from one of two issues: either the cheese mixture wasn't fully cooled before shaping (melting the butter in breadcrumbs too early), or you skipped the 15-minute chilling step before baking. Always let the mixture cool completely and chill breaded balls before baking. For extra crispiness, bake at 400°F for 18-20 minutes instead.
What's the best way to reheat leftovers?
Oven reheating preserves crispiness best: place on a baking sheet at 350°F for 8-10 minutes. For air fryer lovers, try 375°F for 3-4 minutes to restore that golden crunch. Microwaving works in a pinch (30 seconds), but expect softer texture. The secret is speed—reheat just until warmed through to avoid sogginess.
Can I use different types of pasta?
Elbow macaroni is ideal for its shape and texture, but you can substitute with small shells or penne if needed. Avoid large shapes like rigatoni—they won't bind as well. For a lower-carb option, try cauliflower rice (use 2 cups riced cauliflower instead of pasta) or shredded zucchini, though texture will differ slightly.
How many people will this recipe serve?
This makes about 12-16 appetizer-sized balls, perfect for 4-6 people as a snack or appetizer. For a crowd, double the recipe—these disappear fast! Each serving contains about 3-4 balls, making them ideal for game day or parties. The recipe scales perfectly, so just multiply all ingredients by 2 for larger gatherings.