
Main Courses
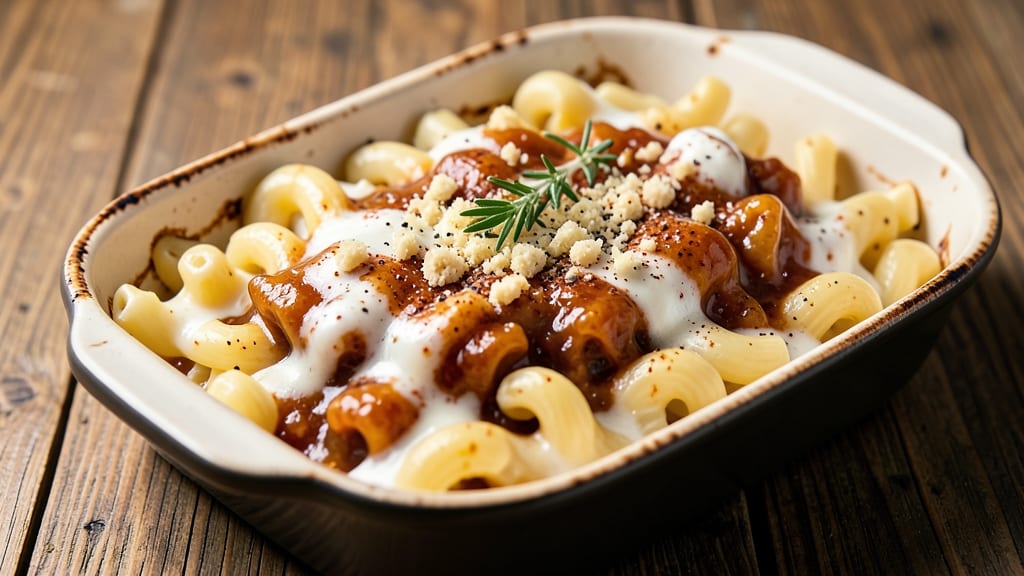
This award-winning mac n cheese recipe delivers the ultimate combination: crispy, golden edges and gooey, velvety centers that make every bite worth savoring. After years of perfecting the technique—including a triple-bake method that creates that coveted crunch—this version has won local culinary competitions and become a dinner party staple.
The secret lies in the roux foundation and layering cheeses for depth, ensuring a sauce so rich it coats every noodle without separating.
What sets this recipe apart is the textural contrast—each forkful offers crispy, caramelized top and bottom layers that give way to a creamy, stretchy interior that melts in your mouth.
We use a blend of sharp cheddar, Gruyère for nuttiness, and cream cheese for unmatched creaminess, all balanced by a touch of mustard powder for brightness.
The triple-bake process (initial bake, sauce layer, and final crisping) transforms ordinary mac and cheese into a restaurant-quality dish that rivals any competition entry.
The preparation is straightforward but requires attention to detail—starting with al dente pasta, building a smooth, lump-free cheese sauce, and mastering the baking technique to achieve that perfect crispy-chewy-crispy texture. This isn’t just comfort food; it’s a showstopper that impresses even the most discerning palates.
Whether you’re entering a cook-off or simply treating your family to an extraordinary meal, this recipe delivers consistently award-worthy results. Pair it with a crisp green salad or roasted vegetables to balance the richness, or serve as a standalone main course that leaves everyone asking for seconds.
The beauty of this recipe is its versatility—it works equally well as a weeknight dinner or a centerpiece for special occasions. Let’s get started on creating your next culinary masterpiece.
Ingredients for award winning mac n cheese
Sixteen essential ingredients transform ordinary mac and cheese into award-winning triple-baked perfection.
| Ingredient | Amount | Notes |
|---|---|---|
| Elbow Macaroni 🍝 | 1 ½ lb | Al dente, cooked to firm bite |
| Unsalted Butter 🧈 | ¾ cup | Cold, cubed for roux |
| All-Purpose Flour 🌾 | ½ cup | Sifted for smooth roux |
| Sharp White Cheddar Cheese 🧀 | 2 cups | Shredded, block preferred |
| Gruyère Cheese 🧀 | 1 cup | Shredded, nutty depth |
| Cream Cheese 🧀 | 8 oz | Full-fat for creaminess |
| Whole Milk 🥛 | 1 ½ cups | Warm for smooth sauce |
| Mustard Powder 🌶️ | 1 tsp | Brightens flavor profile |
| Kosher Salt 🧂 | 1 ½ tsp | Diamond Crystal preferred |
| Ground Black Pepper 🌶️ | ½ tsp | Freshly ground preferred |
| Panko Breadcrumbs 🍞 | ½ cup | For crispy topping |
| Extra-Virgin Olive Oil 🫒 | 2 tbsp | For crispy finish |
| Garlic Powder 🧄 | ½ tsp | Enhances savory depth |
The cheese blend is non-negotiable for this recipe. Gruyère provides the nutty complexity that separates competition-winning mac and cheese from average versions, while sharp white cheddar delivers the tangy brightness. For the best results, shred your own cheese using a microplane—pre-shredded contains anti-caking agents that make the sauce grainy. Whole Foods and Wegmans carry excellent cheese selections, but any specialty grocer will have the right blocks. The cream cheese might seem excessive, but it's essential for that signature stretch and creaminess that makes this dish restaurant-quality. Store your cheeses in airtight containers in the coldest part of your fridge to maintain freshness.
No Gruyère? Comté or Emmental work as substitutes, though they'll alter the flavor profile slightly. Short on sharp cheddar? Pepper Jack or smoked cheddar add different dimensions, but reduce the amount by 1/4 cup to maintain balance. The mustard powder is crucial—it cuts through the richness and adds a subtle brightness that elevates the dish. Diamond Crystal kosher saltpanko gives the best texture, but crushed cornflakes work in a pinch if you're out. The olive oil for finishing should be high-quality extra-virgin—it adds a fruity note that complements the cheeses beautifully.
This recipe requires precise timing for the triple-bake method. The initial bake dries the pasta slightly, the sauce layer adds moisture, and the final bake creates that coveted crispy crust. Portion into a single 9x13-inch baking dish for even baking. Leftovers keep for 4-5 days in the refrigerator, though they're best enjoyed fresh. For make-ahead convenience, assemble through the sauce layer, cover tightly, and refrigerate overnight. The next day, simply bake as directed—no extra prep needed. Freeze for up to 3 months by wrapping tightly in foil and plastic wrap to prevent freezer burn.
Why You'll Love This Recipe
- One-Pot Magic: I swear by this—just butter, flour, and milk simmered into a velvety roux, then folded with those two cheeses until it’s unreal. No extra pans, no extra stress, and honestly? That’s my kind of cooking.
- Cheese Overload (In the Best Way): Sharp white cheddar gives it that tangy punch, while Gruyère melts into little nutty pockets. Between us, the first bite makes me forget I was ever skeptical about "fancy" mac and cheese.
- Leftovers That Don’t Suck: Reheated in the microwave? Still creamy. Cold in a lunchbox? Still delicious. I’ve sent this to work, packed it for road trips, and even frozen it—because let’s be real, no one turns down extra portions of this.
- Budget-Friendly Luxury: Elbow mac, butter, flour—basic stuff that doesn’t break the bank. But the way those cheeses transform it? Feels like a splurge without the price tag. My wallet and taste buds high-five every time.
Step-by-step instructions for triple-baked mac and cheese
Mastering this technique ensures perfect texture—crispy exterior, molten centers, and rich flavor in every bite.
Cook the Elbow Macaroni to Al Dente Perfection
Bring a large pot of water to a rolling boil and add the 1.5 lb elbow macaroni. Salt the water generously—it should taste like the sea—so the pasta absorbs enough flavor during cooking. I use about 2 tablespoons of kosher salt for this quantity.
Cook the pasta until it reaches al dente—this means it should have a slight resistance when you bite into it, with a firm center. For elbow macaroni, this typically takes about 10-12 minutes. Drain the pasta in a colander and immediately rinse it with cold water for 10 seconds to stop the cooking process. Shake off any excess water and transfer the pasta to a large bowl.
Here's the thing—overcooking pasta is the fastest way to ruin your mac and cheese. The pasta needs to finish cooking in the oven, so it should still have a little bite when you add it to the cheese sauce. If it's mushy now, you'll end up with a gluey mess later.
Create a Silky Roux and Cheese Sauce
In a large, heavy-bottomed pot, melt the 0.75 cup unsalted butter over medium-low heat. Once fully melted, reduce the heat to low and gradually whisk in the 0.5 cup all-purpose flour to form a smooth roux. Cook the roux for 2-3 minutes, stirring constantly, until it turns a pale golden color and smells nutty.
Slowly pour in the 1.5 cups whole milk, whisking continuously to prevent lumps from forming. Bring the mixture to a gentle simmer and cook for 5-7 minutes, stirring often, until it thickens enough to coat the back of a spoon. This is your velvety base for the cheese sauce.
Remove the pot from heat and stir in the 2 cups sharp white cheddar cheese, 1 cup gruyère cheese, 8 oz cream cheese, 1 tsp mustard powder, 1.5 tsp kosher salt, 0.5 tsp ground black pepper, and 0.5 tsp garlic powder. Stir until the cheese is completely melted and the sauce is smooth. If the sauce looks too thick, add 1-2 tablespoons of milk to reach your desired consistency.
Combine Pasta and Cheese Sauce
Add the cooked elbow macaroni to the cheese sauce and toss gently but thoroughly with a wooden spoon or rubber spatula. The goal is to coat every strand of pasta evenly with the rich, creamy cheese mixture. This step is crucial for achieving that signature gooey texture in every bite.
Transfer the macaroni and cheese mixture to a 9x13-inch baking dish and spread it out evenly. The dish should be about ¾ full—this gives the mac and cheese room to rise and develop that perfect golden crust during baking. Smooth the top with a spatula for an even surface.
At this stage, I like to give the mac and cheese a quick taste. Adjust the seasoning if needed—sometimes the cheeses vary in saltiness, and this is your chance to perfect the flavor before it goes into the oven.
First Bake for a Smooth Foundation
Preheat your oven to 350°F and place a rack in the middle position. Bake the mac and cheese uncovered for 20 minutes. This initial bake ensures the cheese is fully melted and the pasta is heated through, creating a smooth, cohesive base.
After 20 minutes, remove the dish from the oven and give it a quick stir. This helps distribute any cheese that might have settled to the bottom. Return the dish to the oven for another 10 minutes to set the foundation. The top should be lightly golden, and the mixture should hold together when you gently shake the dish.
This step is often overlooked, but it's essential for building layers of texture. The first bake sets the stage for the crispy topping and gooey centers that make this mac and cheese truly award-winning.
Add the Crispy Topping and Final Bake
In a small bowl, combine the 0.5 cup panko breadcrumbs with the 2 tbsp extra-virgin olive oil and 0.25 tsp garlic powder. Sprinkle this mixture evenly over the top of the mac and cheese, pressing down gently to ensure it adheres. For extra crispiness, I like to use my fingers to press the breadcrumbs into the surface, creating a textured, golden crust.
Return the dish to the oven and bake for an additional 10-15 minutes, or until the topping is deep golden brown and the edges are bubbling. The key here is to watch closely—breadcrumbs burn quickly, and you want them crispy but not charred. If the top starts to brown too quickly, tent the dish with aluminum foil to prevent over-browning.
Once the topping is perfectly crispy and the cheese underneath is bubbling, remove the dish from the oven. Let it rest for 5-10 minutes before serving. This resting period allows the cheese to set slightly, making it easier to slice and serve without losing its shape.
Pro Tips For Making Award Winning Mac N Cheese
- Cook pasta al dente: Pull the elbows out when they’re still slightly firm—you’ll finish cooking them in the cheese sauce, and overcooked pasta turns mushy. I learned this the hard way after serving a batch where the noodles disintegrated into a gluey mess.
- Melt cheese slowly: Heat the butter-flour roux on medium-low, stirring constantly, until it’s just golden—not brown. Too much heat burns the flour flavor, and you’ll taste it even in the best cheese blend.
- Grate cheese fresh: Skip the pre-shredded stuff—it’s coated with anti-caking agents that make the sauce grainy. Use a box grater for Gruyère and a fine-hole one for cheddar, then mix them while still cold to distribute evenly.
- Rest before serving: Let the finished mac sit covered for 5-10 minutes—this lets the sauce fully coat the pasta and thicken properly. Skipping this step means a runny, uneven bite, and no one wants that.
Dietary considerations for these flavors
Gluten-Free Adaptation
For a gluten-free version, replace the elbow macaroni with gluten-free pasta like Barilla Gluten-Free Penne or De Cecco Gluten-Free Rotini. These hold up well during the triple-bake process and mimic the texture of traditional pasta.
Cook the pasta according to package instructions—gluten-free varieties often require 1-2 minutes longer to reach al dente. 🍝
To thicken the cheese sauce without flour, melt the 0.75 cup unsalted butter and whisk in 3 tablespoons cornstarch (or arrowroot powder) to create a smooth, lump-free base.
Cook for 2-3 minutes until thickened, then proceed with the milk and cheese as directed. The cornstarch blend ensures the sauce remains velvety without relying on gluten.
Dairy-Free Substitutes
For a dairy-free twist, swap the cheeses for nutritional yeast (for cheesy flavor), cashew cream (blend 1 cup soaked cashews with 1 cup water), and dairy-free butter (like Miyoko's).
Use 1 cup shredded dairy-free cheddar or Follow Your Heart Mozzarella for texture. The sauce will be lighter but still rich—add 1 tablespoon lemon juice to brighten the flavor. 🧀
Replace the cream cheese with dairy-free cream cheese (such as Kite Hill) and ensure all breadcrumbs are certified gluten-free if needed. The triple-bake method still works, but monitor the oven closely—dairy-free versions may brown faster due to lower fat content.
Lower-Carb Options
Cut carbs by replacing pasta with cauliflower rice or shirataki noodles (like Miracle Noodles). For cauliflower, roast it at 400°F for 20 minutes before mixing with the cheese sauce.
Shirataki noodles require rinsing and boiling for 2 minutes to remove excess sodium. Both work surprisingly well in the triple-bake, though the texture will be lighter. 🥦
Boost creaminess with an extra 2 tablespoons dairy-free butter or avocado oil in the sauce. For a heartier dish, fold in chopped bacon (cooked crispy) or sautéed mushrooms to add substance. The key is balancing moisture—dairy-free and low-carb versions benefit from a slightly longer final bake to crisp the topping.
Vegan Version
Transform this into a vegan masterpiece by using nutritional yeast (for umami depth) and cashew-based cheese sauce. Blend 1 cup soaked cashews with 1 cup water, 0.5 cup unsweetened almond milk, 0.25 cup lemon juice, and 1 tablespoon white miso paste for richness.
Simmer with 3 tablespoons cornstarch to thicken, then stir in 1 cup vegan cheddar shreds (like Violife). 🌱
The triple-bake method applies here too—just ensure your topping is oil-based (like crushed nuts or vegan panko) to crisp properly. For extra protein, fold in chickpeas or lentils into the sauce. Vegan mac and cheese benefits from a slightly higher oven temp (375°F) to achieve that golden crust.
Nutrition facts
Frequently asked questions
Why does this recipe use a triple-bake method?
The triple-bake creates the signature crispy-chewy-crispy texture that makes this mac and cheese award-winning. The first bake sets the foundation, the second incorporates the sauce, and the final bake creates that perfect golden crust while keeping the centers gooey. Without this method, you'd miss the restaurant-quality texture that judges notice in competitions!
Can I make this mac and cheese ahead of time?
Assemble everything through the sauce layer, cover tightly with foil, and refrigerate overnight. When ready to bake, simply add the breadcrumb topping and bake as directed. The flavors actually improve after resting, and it reheats beautifully. For parties, this is a game-changer!
What's the secret to preventing a greasy mac and cheese?
Use the right cheese ratio and avoid overmixing after adding the pasta. The Gruyère and sharp cheddar blend creates a stable emulsion, while the cream cheese adds creaminess without excess fat. Also, don't overbake—remove it when the topping is golden but the centers are still slightly jiggly.
How do I adjust the recipe for a smaller serving?
Scale down all ingredients proportionally. For 4 servings, use 1 lb pasta, 1/3 cup butter, 1/4 cup flour, 1 cup sharp cheddar, 1/2 cup Gruyère, and 4 oz cream cheese. Keep the same ratios and baking times in a 9-inch baking dish. The texture remains perfect when properly scaled!
Why did my mac and cheese separate into cheese and liquid?
This usually happens from one of three issues: adding cold cheese to the sauce, overmixing after adding pasta, or using too much liquid. Always melt cheeses gently into the warm sauce, stir just until combined, and let the dish rest before serving. For best results, use the exact measurements in the recipe.