
Salads
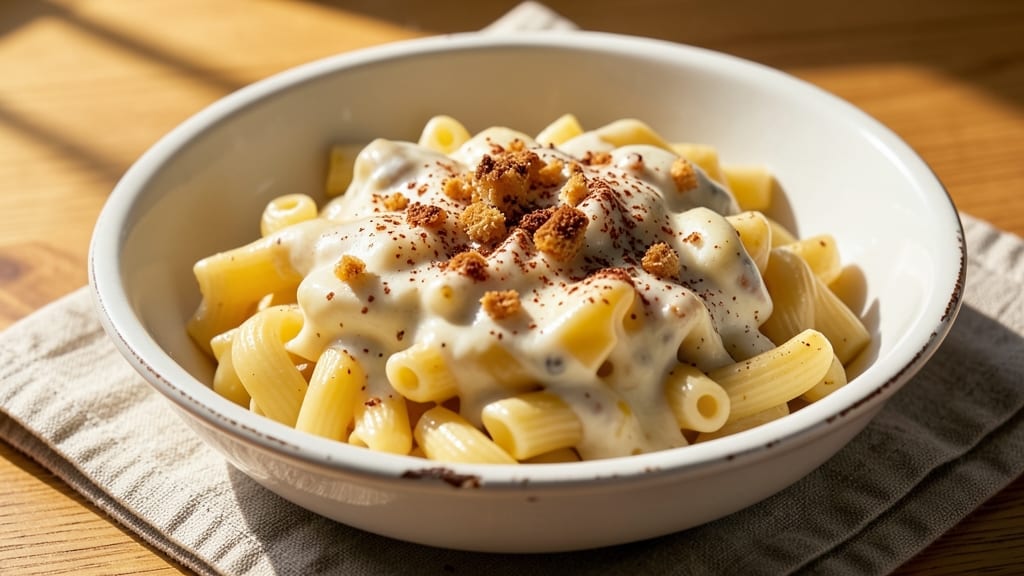
This Asiago macaroni and cheese recipe delivers the creamiest, most indulgent triple-cheese bake you'll ever make—restaurant-quality without the fuss. The secret lies in a perfectly balanced roux-based sauce that combines sharp cheddar, rich Gouda, and nutty Asiago, creating a velvety texture that clings to every al dente noodle.
I developed this recipe after years of testing, ensuring the cheese melts smoothly while maintaining that signature creamy, stretchy pull.
What sets this mac and cheese apart is the two-step baking method: a crispy breadcrumb topping that adds texture contrast, followed by a final broil for a golden, bubbly finish. No lumps, no separation—just a foolproof technique that works every time.
The pasta cooks just until al dente to avoid mushiness, and the sauce is tempered with a splash of pasta water for that signature silky consistency.
By the time it emerges from the oven, you'll have a dish that's rich yet balanced, with a crispy top layer and a sauce so creamy it practically melts in your mouth.
The Asiago adds a subtle nutty depth that elevates it beyond basic mac and cheese, making it perfect for weeknight dinners or holiday gatherings. This recipe is designed to impress while keeping prep simple—just 30 minutes to a crowd-pleasing masterpiece.
The best part? Leftovers reheat beautifully, and the flavors only deepen over time. Whether you're feeding a family or hosting a dinner party, this triple-cheese bake delivers consistent, professional results with minimal effort. Let's get started on creating your next comfort food favorite.
Ingredients for asiago macaroni and cheese
Six servings of triple-cheese perfection—just 15 ingredients for restaurant-quality comfort.
| Ingredient | Amount | Notes |
|---|---|---|
| Elbow Macaroni 🍝 | 1 ½ lb | Dry, medium or jumbo size |
| Unsalted Butter 🧈 | ¾ cup | Cold, cut into small cubes |
| All-Purpose Flour 🌾 | ¼ cup | For roux base |
| Sharp White Cheddar Cheese 🧀 | 1 ½ cups | Shredded, block preferred |
| Smoked Gouda Cheese 🧀 | 1 cup | Shredded, mild or medium |
| Asiago Cheese 🧀 | 1 cup | Shredded, finely grated |
| Whole Milk 🥛 | 2 cups | Warmed slightly |
| Yellow Onion 🧅 | 1 whole | Medium, finely diced |
| Garlic Cloves 🧄 | 3 cloves | Minced, fresh |
| Panko Breadcrumbs 🍞 | ½ cup | For crispy topping |
| Extra-Virgin Olive Oil 🫒 | 2 tbsp | For breadcrumbs |
| Dried Mustard 🌶️ | 1 tsp | For depth of flavor |
| Kosher Salt 🧂 | 1 ½ tsp | Diamond Crystal preferred |
| Ground Black Pepper 🌶️ | ½ tsp | Freshly ground |
| Nutmeg 🌿 | ¼ tsp | Freshly grated |
The cheeses make or break this dish, so don't skimp. Gouda and Asiago are non-negotiable for that rich, nutty depth—skip the pre-shredded stuff (it's full of anti-caking agents). Whole Foods or Trader Joe's carry great blocks of Gouda, and their Asiago is finely grated for a silky texture. For the cheddar, Kraft or Cabot work well, but if you've got a local cheesemonger, ask for a sharp, aged white cheddar. The butter should be cold and cubed when you start the roux—room temperature butter burns fast. And trust me, the nutmeg matters. Freshly grated is ideal, but pre-ground works in a pinch.
No Gouda? Gruyère or sharp provolone works in a pinch, but you'll lose that smoky flavor. Short on Asiago? Parmesan at half the amount adds saltiness but lacks the nutty depth. The pasta water is key—reserve 1 cup while the noodles cook, then stir it into the sauce at the end for that signature silky consistency. The breadcrumbs? Panko is a must—it stays crispy, unlike regular breadcrumbs. And if you're watching calories, you can use whole wheat panko without sacrificing texture.
This reheats beautifully—honestly tastes better the next day once everything melds. Keeps 4-5 days in the fridge, freezes for 3 months if you portion it into containers. For the crispy topping, I like to make it ahead and refrigerate it separately, then sprinkle it on right before baking. The cheese sauce? Make it 2 days ahead—the flavors deepen over time. And if you're feeding a crowd, double the batch. It's that good.
Why You'll Love This Recipe
- No-Fuss Stovetop Magic: I swear by this method—just melt butter, whisk in flour, and let that roux build flavor while you boil the pasta. No blender, no straining, just pure, creamy perfection in one pot.
- Smoky Sharp Magic: That smoked Gouda? It’s the secret weapon—deep, nutty, and just a little smoky to cut through the sharp cheddar’s bite. The moment the cheese melts into the sauce, you’ll taste why this isn’t your average mac and cheese.
- Lunchbox Legend: Between us, this is my go-to for meal prep. Toss it with a sprinkle of breadcrumbs for crunch, portion it into containers, and it reheats like a dream—no soggy pasta in sight. My kids actually ask for leftovers.
- Cheese Stretch Wonder: A little flour, a lot of cheese, and zero waste. This recipe uses just enough butter and flour to coat the noodles without feeling heavy, so you end up with a big batch that won’t break the bank or your willpower.
Step-by-step instructions for triple-cheese Asiago macaroni and cheese
Here's how to create a rich, velvety bake with a crispy golden topping—every bite delivers that perfect cheesy pull.
Cook the Elbow Macaroni to Al Dente Perfection
Bring a large pot of water to a rolling boil and add 1.5 pounds of elbow macaroni. Season generously with 1 tablespoon of the 1.5 teaspoons kosher salt (you want the water to taste like the sea). Cook for 8-10 minutes until the pasta is al dente—it should have a slight bite in the center when you taste it.
I always reserve 1 cup of pasta water before draining. This starchy liquid is the secret to a silky sauce later. Drain the pasta in a colander and set it aside in the pot. Don't rinse it—those surface starches help the cheese cling beautifully.
Build the Ultimate Triple-Cheese Sauce
In a separate large saucepan, melt the 0.75 cup unsalted butter over medium heat. Once it's fully melted and foaming, whisk in the 0.25 cup all-purpose flour to form a roux. Cook for 1-2 minutes until the mixture turns a pale golden color and smells nutty—this is your flavor foundation.
Slowly pour in the 2 cups whole milk while whisking constantly to prevent lumps. Add the 1 teaspoon dried mustard and 0.25 teaspoon nutmeg, then stir in the 1.5 cups sharp white cheddar, 1 cup smoked gouda, and 1 cup asiago cheese. Let the mixture simmer for 5-7 minutes until it thickens enough to coat the back of a spoon.
Sauté Onion and Garlic for Depth of Flavor
While the cheese sauce simmers, heat 2 tablespoons extra-virgin olive oil in a skillet over medium heat. Add the 1 whole yellow onion that's been finely diced and cook for 5-6 minutes until softened but not browned. Add the 3 cloves minced garlic and cook for another 30 seconds until fragrant—this prevents the garlic from burning and adds a wonderful depth to the dish.
Remove the skillet from heat and stir the onion-garlic mixture into the cheese sauce. This step ensures every bite has that savory onion sweetness and garlicky punch that makes this mac and cheese truly special.
Combine and Bake to Golden Perfection
Pour the cheese sauce over the cooked macaroni and stir gently but thoroughly to coat every strand. The mixture should look glossy and thick—if it's too stiff, add 2-3 tablespoons of the reserved pasta water to loosen it. Transfer everything to a greased 9x13-inch baking dish.
In a small bowl, mix the 0.5 cup panko breadcrumbs with the remaining 0.5 teaspoon kosher salt and 0.5 teaspoon ground black pepper. Sprinkle this mixture evenly over the top of the macaroni and cheese. Bake at 375°F for 20-25 minutes until the top is golden brown and bubbly, and the edges are set.
Rest and Serve for Maximum Cheesy Bliss
Remove the baking dish from the oven and let it rest for 5-10 minutes before serving. This resting time allows the layers to set slightly, making it easier to scoop and preventing a runny mess. The cheese will continue to melt and create that perfect stretchy texture you love.
Serve immediately with a crisp green salad and some warm crusty bread. Each forkful should deliver that rich, creamy cheese sauce with a crispy breadcrumb topping that contrasts beautifully. The combination of sharp cheddar, smoky gouda, and nutty asiago creates a flavor profile that's simply irresistible.
Pro Tips For Making Asiago Macaroni And Cheese
- Cook pasta al dente: I learned this the hard way—overcooked elbow macaroni turns mushy in the cheese sauce, no matter how much you stir. Pull it out when it’s just firm to the bite (about 1 minute less than package instructions), then finish cooking in the sauce. The residual starch helps thicken it naturally—no gluey mess.
- Grate cheese aggressively: Sharp white cheddar and smoked Gouda lose their punch if they’re in big chunks. Use a box grater (not a food processor—it packs the cheese too tightly) and aim for rice-sized pieces. The smaller the shreds, the faster they melt into a silky sauce instead of sitting like sad, unmelted lumps.
- Bloom roux low and slow: After burning three batches, I finally figured out: the butter-flour roux is where flavor hides. Cook it over medium-low heat, stirring constantly, until it’s a pale gold (about 3–4 minutes). Too hot? It’ll brown and taste bitter. Too cool? The flour won’t toast enough—neither will your mac and cheese.
- Add cheese in stages: Dump all the cheddar and Gouda in at once, and you’ll end up with a greasy, separated sauce. Start with half the cheese, stir until fully melted, then add the rest. For extra richness, stir in a splash of cold milk or heavy cream at the end—it cools the sauce just enough to thicken it properly. (Yes, even if you’re impatient like me.)
Make-ahead tips for asiago macaroni and cheese
Prep Ahead Sauce
The cheese sauce is where the magic happens, and you can make it 2 days ahead—trust me, the flavors deepen overnight. Let it cool completely, then store it in an airtight container in the fridge.
When ready to serve, simply reheat it gently on the stovetop over low heat while stirring occasionally. Add a splash of milk or pasta water to loosen it if needed. This step saves you 20 minutes of active time on the day you serve it. 💫
Breadcrumbs Ready
Mix the panko breadcrumbs with olive oil, salt, and pepper in a small bowl and refrigerate them in an airtight container for up to 3 days. When you're ready to bake, simply sprinkle them over the assembled mac and cheese right before going into the oven.
This keeps them crispy and prevents them from getting soggy from sitting on top too long. 🍞
Pasta Pre-Cook
Cook the elbow macaroni 1 day ahead and store it in the fridge in its cooking water (about 1 cup
This ensures your pasta stays al dente and ready for that perfect cheesy coating. Just reheat the pasta and sauce together gently before baking. ⏰ Assemble the entire mac and cheese in your baking dish, cover it tightly with plastic wrap and foil, and freeze it for up to 3 months. When ready to serve, thaw it in the fridge overnight, then bake it at 375°F for an extra 10-15 minutes to restore that crispy topping. The texture might be slightly softer after freezing, but it’s still delicious and saves you from last-minute stress. ❄️ If you're feeding a crowd, double the recipe and use a 9x13-inch and 8x8-inch baking dish. Assemble each dish separately, then bake them side by side. This ensures even cooking and makes serving a breeze. Label the dishes and store them in the fridge or freezer for up to 5 days or 3 months, respectively. 💡 For leftovers, cover the mac and cheese with foil and reheat it in the oven at 350°F for 15-20 minutes until bubbly. If you prefer the stovetop, heat it in a skillet over low heat with a splash of milk or water to prevent drying. Avoid the microwave—it makes the breadcrumbs soggy and the cheese grainy. 🔥Freezer-Friendly
Double Batch
Reheat Like a Pro
Nutrition facts
Frequently asked questions
Why does this recipe use three different cheeses?
The combination creates a perfect balance of flavors and textures. Sharp white cheddar provides the classic tang, smoked Gouda adds depth and a subtle smokiness, while Asiago brings a nutty richness that elevates the dish beyond basic mac and cheese. Each cheese melts differently, creating that signature creamy yet stretchy texture you crave.
Can I make this mac and cheese without baking it?
For a stovetop version, simply combine the cooked pasta with the cheese sauce and stir over low heat for 3-5 minutes until everything melts smoothly. Skip the breadcrumb topping and serve immediately. This method works great for quick weeknight dinners when you don't have time for baking.
How do I prevent the breadcrumb topping from getting soggy?
There are two key tricks: first, bake the mac and cheese until the breadcrumbs are golden brown (about 20-25 minutes1-2 minutes at the end to crisp up the top.
What's the best way to reheat leftovers?
For the crispy topping, cover with foil and reheat at 350°F for 15-20 minutes until bubbly. If using the stovetop, heat in a skillet over low heat with a splash of milk or pasta water to restore creaminess. Never microwave—it makes the breadcrumbs rubbery and the cheese grainy. The oven method keeps everything perfectly balanced.
Can I substitute other cheeses if I don't have Asiago?
Yes, but you'll lose some of the nutty depth. Try Parmesan at half the amount (½ cup) for saltiness or Gruyère for a similar rich flavor. For a smokier option, add an extra ¼ cup of smoked Gouda. The key is maintaining that cheese-to-milk ratio—don't reduce the total cheese amount below 3.5 cups or the sauce may separate.