
Appetizers
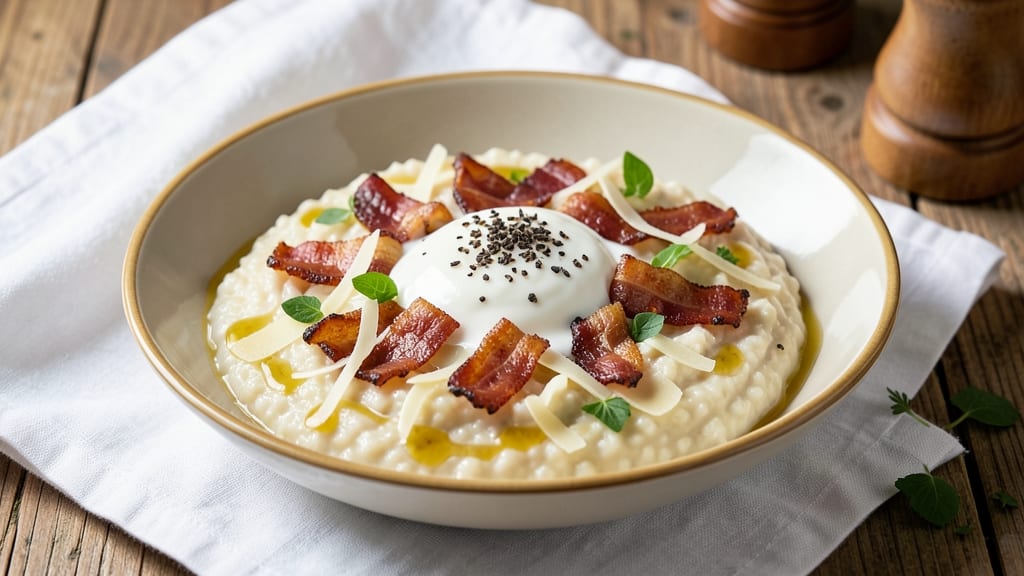
This Asiago cheese grits recipe transforms a classic Southern staple into something unexpectedly luxurious. 💛 The rich, nutty flavor of aged Asiago cheese elevates creamy stone-ground grits to new heights, creating a dish that's both comforting and sophisticated.
What makes this recipe special is the perfect balance of textures—silky grits, crispy bacon, and fresh herbs—all coming together in a single, impressive dish.
The secret to achieving that velvety, restaurant-quality consistency lies in slow cooking the grits with plenty of liquid and stirring constantly. Meanwhile, crispy bacon adds a smoky depth that cuts through the richness, while a final touch of parsley brightens the dish.
This recipe delivers on both comfort and elegance, making it ideal for brunch, a hearty appetizer, or even a light dinner when paired with a crisp green salad.
By the time you're done, you'll have a bowl of creamy, indulgent grits that are impossibly smooth and packed with flavor. The Asiago cheese melts into the grits, creating a luxurious mouthfeel that's hard to resist.
This dish is perfect for feeding a crowd or treating yourself to a special meal at home—without the fuss of a complicated recipe.
Whether you're serving it as a standalone dish or pairing it with roasted vegetables, this Asiago cheese grits recipe is sure to impress. The combination of rich cheese, smoky bacon, and fresh herbs makes it a versatile dish that works for any occasion.
Let's get started on creating this creamy, cheesy delight!
Ingredients for asiago cheese grits
The perfect blend of Southern comfort and Italian richness—just 13 ingredients transform grits into a restaurant-worthy dish.
| Ingredient | Amount | Notes |
|---|---|---|
| Stone-Ground Grits 🌾 | 1 ½ cups | Uncooked, coarse grind preferred |
| Aged Asiago Cheese 🧀 | 1 ½ cups | Freshly grated, 36-month aged |
| Unsalted Butter 🧈 | ½ cup | Cold, cut into small cubes |
| Heavy Cream 🥛 | 1 ½ cups | Full-fat for richness |
| Chicken Broth 💧 | 4 cups | Low-sodium preferred |
| Bacon 🥓 | 8 oz | Thick-cut, smoked preferred |
| Fresh Parsley 🌿 | ¼ cup | Chopped, for garnish |
| Garlic Cloves 🧄 | 3 cloves | Minced, for bacon cooking |
| Salt 🧂 | 1 tsp | Diamond Crystal preferred |
| Black Pepper 🌶️ | ½ tsp | Freshly ground |
| White Pepper 🌶️ | ¼ tsp | For subtle seasoning |
| Muscovado Sugar 🍯 | 1 tbsp | Optional, for depth |
| Nutmeg 🌿 | ¼ tsp | Freshly grated |
The Asiago cheese is non-negotiable here. Grab a wedge from a specialty cheese shop—the 36-month aged variety has that incredible depth of flavor. Whole Foods or local Italian markets usually carry it, but check the deli section at Kroger or Wegmans too. For the grits, stone-ground is essential—it cooks up silky smooth. I always buy mine in bulk from Bob's Red Mill or Stone Ground Grits Company online. The bacon should be thick-cut; Applegate or Maple Leaf Farms are my go-tos for quality without the nitrates.
No aged Asiago? Parmigiano-Reggiano at half the amount works in a pinch, but you'll lose that nutty complexity. For the bacon, turkey bacon or smoked turkey bacon keeps it lighter if you're watching calories. The chicken broth can be swapped for vegetable broth if you prefer, though the flavor will shift slightly. Fresh parsley is ideal, but dried parsley at one-third the amount gets you close. The muscovado sugar is optional but adds a caramel note—Trader Joe's or Whole Foods carry it. If you can't find it, dark brown sugar works too.
Store the cooked grits in an airtight container with a thin layer of butter on top to keep them creamy. They reheat beautifully—just add a splash of warm milk or broth and stir. The bacon stays crispy for 3 days in the fridge if stored separately. For best results, make the grits fresh and serve immediately—they're at their peak texture right out of the pot. If prepping ahead, cook the bacon first and store it separately to maintain crispness.
Why You'll Love This Recipe
- One-Pot Magic: I swear by this recipe when I’m too tired to wash another dish. Stone-ground grits cook right in the broth with butter and cream—no straining, no fuss—just stir and savor.
- Nutty, Rich Comfort: That aged Asiago? It melts into the grits like a warm hug, with sharp, caramelized notes that make every bite feel indulgent. Honestly, I’ve gone back for seconds without even trying.
- Weeknight to Weekend: Serve it as a creamy side for steak or roasted chicken, or pile it high for a lazy brunch with a fried egg on top. It’s my go-to when I need something that works for dinner and breakfast.
- Leftovers That Don’t Suck: Unlike some grits recipes, this one reheats beautifully—just add a splash of broth and a pat of butter. I make a big batch on Sundays and have it ready for three days straight. Budget win.
Step-by-step instructions for Asiago cheese grits
Here's how to create velvety grits with rich Italian depth—smooth, luxurious, and perfectly balanced.
🔥 Step 1: Cook the Bacon and Sauté Aromatics
Cut the 8 oz bacon into ½-inch pieces and cook in a large skillet over medium heat until crispy, about 8-10 minutes. Use a slotted spoon to remove the bacon and set it aside on paper towels, leaving the rendered fat in the pan.
In the same skillet, add the 3 cloves minced garlic and cook for 30 seconds until fragrant—don't let it brown. This step builds the flavor foundation for your grits. The bacon fat will carry the garlic's aroma beautifully, so don't drain it. Keep the heat at medium for the next step.
🍳 Step 2: Toast the Grits for Depth of Flavor
Add the 1.5 cups stone-ground grits to the skillet with the bacon fat and garlic. Stir constantly for 2-3 minutes until the grits turn a light golden color. This toasting step develops nutty flavors and prevents a raw, starchy taste in the finished dish.
Here's the thing—don't walk away. The grits can burn quickly, and you want them just toasted, not browned. You'll see them begin to puff slightly as they release their natural starch. This is your signal they're ready for liquid. Keep the heat at medium throughout this process.
🥘 Step 3: Slowly Add Broth and Cream for Creamy Texture
Gradually whisk in the 4 cups chicken broth and 1.5 cups heavy cream, about ½ cup at a time, allowing each addition to absorb before adding more. This slow incorporation prevents lumps and ensures a silky, creamy consistency. The mixture will bubble vigorously—keep stirring gently to avoid splattering.
Once all liquid is added, bring to a gentle simmer over low heat. The grits will thicken as they cook, which typically takes 15-20 minutes. Stir occasionally to prevent sticking, but don't over-stir—this can make the grits gummy. You'll know they're done when they reach a thick, pudding-like consistency that coats the back of a spoon.
👨🍳 Step 4: Finish with Cheese and Seasonings
Remove the skillet from heat and stir in the 1.5 cups freshly grated aged asiago cheese, 0.5 cup unsalted butter, 1 tbsp muscovado sugar, 0.25 tsp nutmeg, 1 tsp salt, 0.5 tsp black pepper, and 0.25 tsp white pepper. The cheese should melt completely, creating a luxurious, stretchy texture. If the mixture seems too thick, whisk in 2-3 tablespoons of warm chicken broth to reach your desired creaminess.
Taste and adjust seasoning—this is where the magic happens. The aged asiago brings nutty depth, while the muscovado sugar adds a subtle caramel note. The white pepper adds a sophisticated touch without overpowering. Let the grits sit off heat for 2-3 minutes to thicken slightly before serving.
🍽️ Step 5: Serve with Crispy Bacon and Fresh Parsley
Transfer the grits to a serving bowl and top with the crispy bacon pieces and 0.25 cup chopped fresh parsley. The contrast of crispy bacon against the creamy grits is what makes this dish truly special. Serve immediately while hot, as the texture continues to improve as it sits for a few minutes.
For the ultimate experience, pair with a simple arugula salad or grilled chicken. Each bite should deliver rich, cheesy comfort with a sophisticated Italian twist. The grits should be velvety smooth with no graininess, and the asiago should melt completely into the texture—no lumps allowed.
Pro Tips For Making Asiago Cheese Grits
- STIR CONSTANTLY FIRST 10 MINUTES: Stone-ground grits turn to glue if you walk away—especially with heavy cream in the mix. After adding broth, keep that spoon moving until the grits are thick enough to cling to the back of a wooden spoon. I learned this the hard way when my first batch split like cement.
- GRATE THE ASIAGO FINE: Pre-grating aged Asiago (even if it’s labeled “shredded”) means it melts faster and blends smoother. Use the small holes on your box grater—big chunks will sit like rocks in your grits. (Yes, even if you’re impatient like me.)
- SALT THE BROTH: Skip the extra salt if your chicken broth is unsalted—aim for 1 tsp per cup. Unsalted butter and heavy cream are neutral, so the grits will taste bland if you rely on cheese alone. Trust me, your taste buds will notice.
- STOP BEFORE IT LOOKS DONE: Grits finish cooking off the heat. Pull them from the stove when they’re just thick enough, then stir in the butter and cream while still hot. The residual heat will emulsify everything—no lumps, no scrambling. (Your future self will thank you.)
Make-ahead tips for leftovers
Prep Ahead Strategy
Cook the grits completely and let them cool to room temperature before refrigerating. Store in an airtight container with a thin layer of cold butter pressed on top to prevent drying. The butter creates a moisture barrier that keeps the grits creamy for up to 3 days in the fridge.
This is my secret for restaurant-quality reheating—no one will guess they were made ahead! 🥄
Bacon Prep Tip
Cook the bacon 24 hours ahead and store it in a paper towel-lined airtight container to maintain crispness. Reheat in a 350°F oven for 3-5 minutes before serving—this restores that perfect crunch without making it soggy.
I always double the bacon batch if I'm prepping for a crowd, since it disappears fast.
Cheese Prep Shortcut
Grated Asiago cheese loses moisture quickly, so measure and grate it right before mixing into the grits. For make-ahead convenience, grate 1.25 cups and store in a resealable plastic bag in the fridge—just add the remaining 0.25 cup fresh when reheating.
This two-step approach keeps the cheese from turning oily during storage. 🧀
Reheating Perfection
Reheat grits on the stovetop over low heat with 2-3 tablespoons warm chicken broth per serving. Stir constantly to prevent scorching—this method restores creaminess without breaking the texture.
For microwave reheating, use 50% power for 2 minutes, then stir and add 1 tablespoon broth if needed. The key is gentle heat to avoid graininess.
Make-Ahead Serving Ideas
Transform prepped grits into brunch by topping with poached eggs and crispy prosciutto—just reheat and assemble. For a dinner party, serve in pre-warmed ramekins with a side of sautéed mushrooms and wilted spinach.
The grits reheat beautifully while keeping their luxurious mouthfeel, making them perfect for meal prep Sundays. 🍳
Freezer-Friendly Hack
For longer storage, freeze cooked grits in single-serving portions in silicone molds or small containers. Thaw overnight in the fridge, then reheat with 1 tablespoon broth per serving. The texture remains silky when frozen properly—just avoid freezing with the bacon topping.
I label my containers with dates since they keep well for up to 2 months in the freezer. ❄️
Nutrition facts
Frequently asked questions
Can I substitute regular cheddar for Asiago in this recipe?
While cheddar will work, it won't provide the same rich, nutty depth that aged Asiago offers. For a similar flavor profile, try Parmigiano-Reggiano or a blend of Pecorino Romano and Asiago. The aged Asiago's complexity is what makes these grits truly special—it melts smoothly while adding that sophisticated Italian touch.
How do I fix grits that turned out too thick or too thin?
For too thick grits, whisk in 2-3 tablespoons warm chicken broth at a time until creamy. If they're too thin, cook uncovered over medium-low heat for 3-5 minutes, stirring constantly, to evaporate excess liquid. The key is patience—rushing can make them gummy. Always taste as you go!
Can I make this recipe without bacon?
For a vegetarian version, sauté 1 tbsp olive oil with 3 cloves minced garlic instead, then add ½ cup diced mushrooms or sun-dried tomatoes for extra flavor. Top with fresh herbs like parsley or thyme. The bacon adds smoky depth, but these alternatives work beautifully too.
Why did my cheese not melt completely into the grits?
This usually happens when the cheese is too cold or added too quickly. Always use freshly grated cheese and stir it in off the heat to let it melt smoothly. If lumps remain, whisk in 1 tablespoon warm heavy cream to help emulsify. The grits should be at 165°F when adding cheese for best results.
What's the best way to serve these Asiago grits?
These grits shine as a brunch centerpiece with poached eggs and crispy prosciutto, or as a hearty appetizer with sautéed greens. For a lighter meal, pair with a simple arugula salad and grilled shrimp. The creamy texture makes them perfect for any occasion—just