
Side Dishes
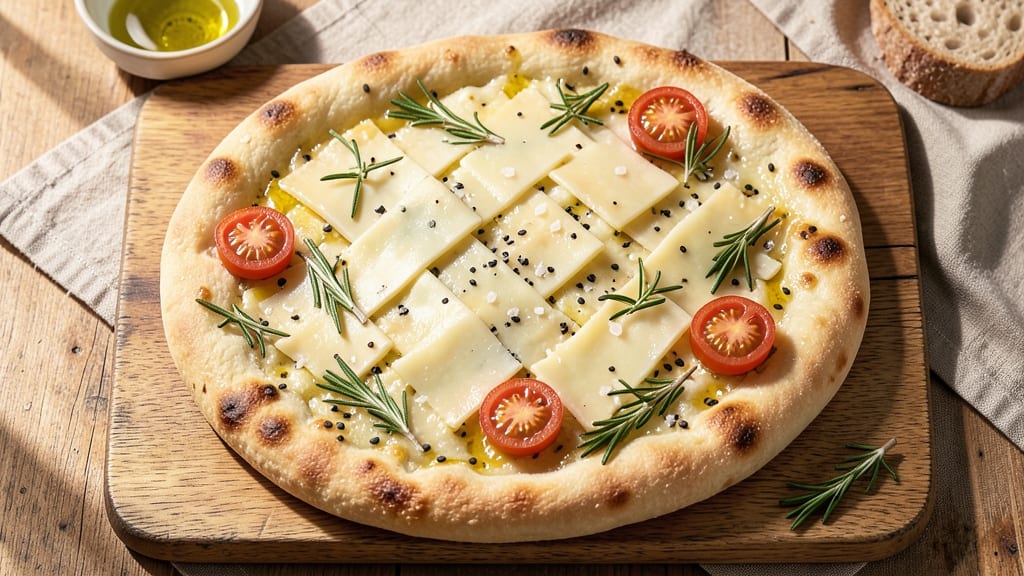
This Asiago cheese focaccia bread delivers the perfect balance of chewy crust and gooey, melty cheese streaks that pull apart with every bite. The golden-brown top crackles under your fingertips while the interior stays soft and airy, creating a texture that’s impossible to resist.
What makes this recipe stand out is the way the nutty Asiago cheese transforms simple focaccia into something extraordinary—each bite is rich, savory, and just slightly tangy.
The secret to achieving that signature pull-apart crust lies in the dough itself: a simple yeast-based mixture that rises slowly for maximum flavor and texture. You’ll work the cheese into the dough for a marbled effect, ensuring every slice has those coveted melty pockets.
This recipe is designed to be beginner-friendly, with precise measurements and clear steps that guide you through shaping, dimpling, and baking to perfection.
By the time you pull this focaccia from the oven, your kitchen will be filled with the irresistible aroma of freshly baked bread and melted cheese.
The crust will be crisp and golden, while the interior remains soft and pillowy—ideal for serving warm with olive oil, balsamic glaze, or as a base for sandwiches. The Asiago cheese adds a depth of flavor that elevates this classic Italian bread into something truly special.
Whether you're hosting a dinner party or simply craving a comforting side dish, this focaccia bread is sure to impress. It’s versatile enough to pair with soups, salads, or even as a standalone appetizer. Ready to master the art of pull-apart perfection? Let’s get started.
Ingredients for asiago cheese focaccia bread
Pantry staples plus one special cheese—this focaccia delivers restaurant-worthy pull-apart perfection.
| Ingredient | Amount | Notes |
|---|---|---|
| Active Dry Yeast 🍞 | ¼ oz | Or 2 1/4 tsp (1 packet) |
| Warm Water 💧 | 1 cup | 110°F for activating yeast |
| Granulated Sugar 🍚 | 1 tbsp | Feeds yeast for activation |
| Extra-Virgin Olive Oil 🫒 | ¾ cup | High quality, fruity variety |
| All-Purpose Flour 🌾 | 4 cups | Plus extra for dusting |
| Kosher Salt 🧂 | 1 ½ tsp | Diamond Crystal preferred |
| Asiago Cheese 🧀 | 1 ½ cups | Shredded, block preferred |
| Fresh Rosemary 🌿 | ¼ cup | Finely chopped, stems removed |
| Fresh Thyme Leaves 🌿 | 2 tbsp | Or 1 tsp dried thyme |
| Garlic Cloves 🧄 | 3 cloves | Minced, for extra flavor |
| Coarse Sea Salt 🧂 | ½ cup | For topping before baking |
| Extra-Virgin Olive Oil 🫒 | ¼ cup | For drizzling after baking |
The Asiago cheese is non-negotiable here—block cheese from the deli counter shreds best (pre-shredded gets clumpy). Whole Foods or Trader Joe's carry the good stuff. For the flour, King Arthur is my go-to—it's got that perfect balance of protein and texture. Rosemary and thyme should smell vibrant, not dusty. If you're buying fresh, grab bunches and use half now, half later. The yeast? Check the expiration date—old yeast won't activate properly, and you'll end up with flat bread. Saf-Instant is my backup if I forget to activate it first.
No Asiago? Parmesan or Gruyère work in a pinch, but the nutty flavor is what makes this focaccia special. Short on rosemary? Fresh sage at half the amount gives a similar earthy note. For the olive oil, California Olive Ranch or Bertolli are solid mid-range options—just avoid the cheap stuff that tastes like soap. The minced garlic can be pre-minced from a jar (the good kind, not the pasty kind), but fresh is always better if you've got it. If you're making this ahead, pre-shred the cheese and chop herbs—it saves time when you're ready to shape the dough.
This dough needs time to rise—at least 2 hours at room temp, or overnight in the fridge. The longer it rests, the more flavor develops. Store any leftovers wrapped in a clean kitchen towel at room temp for 2 days, or freeze for 3 months. To reheat, wrap in foil and warm at 350°F for 10 minutes. The best part? It tastes even better the next day once the cheese has fully melted and set. I always make a double batch—one for dinner, one for breakfast toast the next morning.
Why You'll Love This Recipe
- No-Knead Magic: I swear by this dough—just mix, let it rise, and forget it. The yeast and olive oil do all the work while you sip coffee, and honestly? That’s my kind of baking.
- Melty Gold Crust: The moment that crispy, golden-brown edge gives way to gooey asiago? It’s like biting into a warm hug. The cheese pulls and stretches, and that’s when you know you’ve hit the jackpot.
- Weeknight Hero: This bread is my go-to when I’m too tired to fuss. Toss it in the oven while dinner simmers, and suddenly you’ve got a showstopper that feeds a crowd—or just you, no judgment.
- Budget-Friendly Luxury: A few dollars’ worth of pantry staples turns into something that feels fancy. Freeze the leftovers for toast later, or slice it thin for sandwiches—it’s the kind of recipe that makes you feel like you’re eating well without breaking the bank.
Step-by-step instructions for Asiago cheese focaccia bread
Here's how to create a golden, cheesy focaccia with that perfect pull-apart texture and melty Asiago streaks.
Activate the Yeast for Maximum Rise
In a small bowl, combine the 1 cup warm water (it should feel like bathwater—110°F) with the 1 tbsp granulated sugar and 0.25 oz active dry yeast. Let it sit for 5-10 minutes until it becomes frothy and bubbly. This tells you the yeast is alive and ready to work.
If it doesn't bubble, your yeast might be dead—start over with fresh yeast. Once it's active, stir in 0.75 cup extra-virgin olive oil until fully combined. This oil-rich mixture will give your focaccia that signature tender, moist crumb. Let it rest for another 5 minutes while you prepare your workspace.
Mix the Dough and Incorporate Cheese
In a large mixing bowl, whisk together the 4 cups all-purpose flour and 1.5 tsp kosher salt. Create a well in the center and pour in the yeast mixture. Using a wooden spoon, gently combine until a shaggy dough forms. This is where the magic starts—don't overmix yet.
Add the 1.5 cups shredded Asiago cheese, 0.25 cup finely chopped fresh rosemary, 2 tbsp fresh thyme leaves, and 3 minced garlic cloves. Mix again until the cheese is evenly distributed throughout the dough. The cheese should melt beautifully during baking, creating those gooey streaks you're craving. Once combined, knead the dough on a lightly floured surface for 5-7 minutes until smooth and elastic.
First Rise and Shape the Pan
Place the dough in a lightly greased 9x13-inch baking pan, covering it completely. Let it rise in a warm place for 1-2 hours until it puffs up and nearly doubles in size. I like to use my oven with the light on for consistent warmth—this helps the dough rise evenly.
While it rises, preheat your oven to 400°F. This is crucial because you want the oven piping hot when you bake. Once the dough has risen, use your fingers to dimple the surface all over—press gently to create those classic focaccia dimples. This not only looks beautiful but also helps the bread bake evenly and develop that crispy crust.
Top and Bake to Golden Perfection
Drizzle the risen dough with 0.25 cup extra-virgin olive oil, letting it pool in the dimples. Sprinkle evenly with 0.5 cup coarse sea salt—this is what creates that amazing crust. Bake for 25-30 minutes until the top is deep golden brown and the edges are crispy.
Here's the thing—don't overbake. You want that crust to be crispy but the inside to remain tender and chewy. The bread is done when it sounds hollow when tapped on the bottom. Let it cool in the pan for 10 minutes before serving—this helps the cheese set slightly and makes it easier to slice.
Pro Tips For Making Asiago Cheese Focaccia Bread
- Bloom Yeast Slowly: Don’t rush the yeast activation—wait until you see steady, foamy bubbles (about 5-7 minutes) before adding flour. I used to dump everything in too fast, and the dough would turn dense. Let it foam first, then proceed.
- Use Olive Oil Generously: The focaccia’s signature chew comes from olive oil, not just sprinkling it on top. Mix ½ cup into the dough itself, then drizzle another ¼ cup before baking. Skip this, and you’ll miss that rich, tender texture.
- Stretch Dough, Don’t Punch It: After the first rise, stretch the dough by hand instead of punching it down—this opens up pockets for the asiago to melt into. I learned this the hard way after a dense, cheesy brick instead of airy bread.
- Bake Until Golden: Don’t pull it out at the first sign of color—wait until the crust is deep golden (about 230–240°F internally). The asiago needs time to soften, not just brown. A toothpick test works, but check the underside too.
Make-ahead tips for this recipe
Dough Prep Ahead
Mix your focaccia dough up to 24 hours ahead and let it rise in the fridge overnight. The cold slows fermentation, intensifying flavors and improving texture. When ready to bake, let it sit at room temperature for 1-2 hours until it puffs up again.
I always do this—it saves time and makes the bread taste even better. 💫
Cheese Pre-Shredding
Shred your Asiago cheese yourself the night before and store it in an airtight container. Pre-shredded cheese gets clumpy and loses flavor. I find the block cheese from Whole Foods shreds perfectly with a box grater. Keep the cheese cold until ready to use for maximum meltiness. ❄️
Herb Prep Shortcut
Chop all your rosemary and thyme at once and store in a small jar with a splash of olive oil. This keeps them fresh for up to 5 days in the fridge.
I make a big batch and use these herbs in multiple recipes—so efficient! The oil helps preserve their vibrant flavors. 🌿
Pan Prep Trick
Lightly grease your 9x13-inch baking pan with olive oil before shaping the dough. This prevents sticking and makes cleanup a breeze. I also sprinkle a tiny bit of flour inside for extra insurance. A well-prepped pan ensures your focaccia comes out intact and golden. 🧼
Bake Day Timeline
On baking day, take your dough out of the fridge 2 hours before baking. This gives it time to warm up and rise properly. Preheat your oven to 400°F while the dough rises—this ensures it hits the oven at peak temperature for that perfect crust.
I set a timer so I don't forget this crucial step. ⏰
Storage Solutions
Store any leftovers wrapped in a clean kitchen towel at room temperature for 2 days. For longer storage, freeze slices individually in a bag for up to 3 months.
To reheat, wrap slices in foil and warm at 350°F for 5-10 minutes until crispy again. The cheese stays melty and delicious! 🧊
Nutrition facts
Frequently asked questions
Why does my focaccia turn out dense instead of light and airy?
The most common causes are overmixing the dough or skipping the proper rise time. Focaccia should be gently mixed until just combined, and the dough needs at least 1-2 hours to rise at room temperature. If your kitchen is cold, try placing the bowl near a warm oven (with light on) to help it rise properly.
Can I substitute Asiago cheese with something else?
For a similar nutty flavor, try Parmesan or Gruyère, but use 1 cup less since they're saltier. If you prefer milder cheese, mozzarella works well for meltiness, though it won't have the same depth of flavor. Just be sure to shred it yourself for the best texture.
How do I get the perfect crispy crust without burning the inside?
Preheat your oven to 400°F for 30 minutes before baking to ensure it's fully hot. Use a baking sheet on the lower rack to reflect heat upward, and bake for 25-30 minutes. The bread is done when it sounds hollow when tapped on the bottom—this prevents overbaking while achieving that crispy crust.
Can I make this focaccia without yeast?
Not for traditional focaccia—yeast is essential for that signature airy texture. However, you could make a flatbread version by replacing the yeast with 1 tsp baking powder and 1 tsp baking soda, but it won't have the same pull-apart quality. For best results, stick with the yeast method for authentic focaccia.
What's the best way to serve this focaccia?
Serve it warm with a drizzle of extra-virgin olive oil and a sprinkle of flaky sea salt. It pairs perfectly with soups, salads, or as a base for sandwiches. For a gourmet touch, add a balsamic glaze or serve with marinated grilled vegetables. The cheese gets even gooier when reheated!