
Main Courses
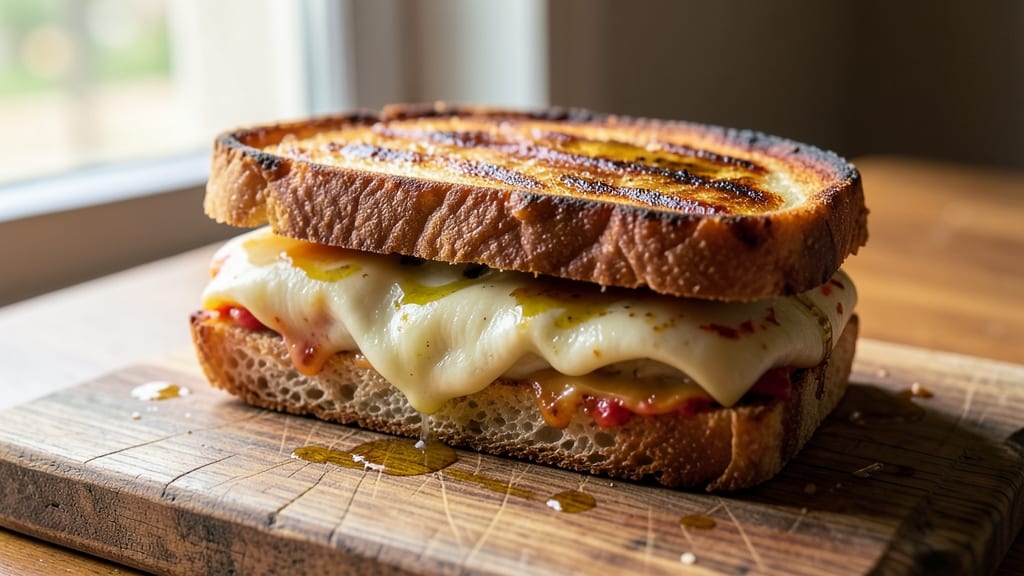
This artisan grilled cheese recipe transforms a childhood classic into a crispy, golden masterpiece with rivers of melted cheese. 🔥 The secret lies in aged cheddar and Gruyère layered on sourdough, pressed under perfect heat until the crust crackles like autumn leaves.
I've spent years perfecting this technique—no soggy bread, no uneven melting, just restaurant-quality results at home.
What sets this apart is the method: we start with cold butter to render slowly, creating that signature caramelized crust while keeping the cheese perfectly gooey inside. The right pan matters too—cast iron retains heat like a pro, while a nonstick skillet ensures easy release.
This isn't just comfort food; it's a textural experience with each bite delivering crispy edges and molten centers.
You'll need just five ingredients buttery sourdough, sharp aged cheddar, nutty Gruyère, a touch of Dijon mustard for depth, and that all-important butter—but the technique is where the magic happens.
Pressing the sandwich gently with a weight ensures even melting, while the right heat balance prevents burning while achieving that golden crust.
The finishing touch? A drizzle of truffle oil or flaky sea salt that elevates this sandwich from classic to artisanal. Perfect for a cozy night in or an impressive lunch with friends, this recipe delivers on every promise of crispy perfection.
Let's get started with the steps that make all the difference.
Ingredients for artisan grilled cheese
Five simple ingredients transform into restaurant-quality grilled cheese perfection.
| Ingredient | Amount | Notes |
|---|---|---|
| Sourdough Bread 🍞 | 8 slices | Thick-cut, crusty sourdough preferred |
| Sharp Aged Cheddar Cheese 🧀 | 1 cup | Aged 2+ years for maximum flavor |
| Gruyère Cheese 🧀 | 1 cup | Finely shredded, nutty variety |
| Unsalted Butter 🧈 | ½ cup | Cold, cut into 8 equal pieces |
| Dijon Mustard 🍯 | 1 tbsp | For depth and slight tang |
| Extra-Virgin Olive Oil 🫒 | 1 tbsp | For brushing bread slices |
| Flaky Sea Salt 🧂 | ½ tsp | For finishing touch |
| Truffle Oil 🍄 | ½ tbsp | Optional finishing drizzle |
The cheese makes all the difference here. Aged cheddar—look for blocks labeled 2+ years—brings that sharp, tangy bite, while Gruyère adds nutty depth. Whole Foods or specialty cheese shops carry the best aged cheddar, but Kroger's pre-shredded works in a pinch if you're short on time. For Gruyère, avoid pre-shredded (it gets gummy)—buy a wedge and shred it yourself. The bread? Crusty sourdough is non-negotiable—it holds up to the butter better than soft white bread. I grab mine from the bakery section at Trader Joe's—their loaves stay fresh for days.
No aged cheddar? Extra-sharp white cheddar works in a bind, though it lacks the complexity. Gruyère too pricey? Comté or Emmental add similar nutty notes. The butter must be cold—cut it into equal pieces so each slice gets the same amount. For the mustard, Dijon is essential—it adds that perfect tang that cuts through the richness. No truffle oil? Freshly cracked black pepper adds sophistication. And if you're using nonstick pans, a light brush of olive oil prevents sticking without adding bulk.
Store your cheeses wrapped in parchment paper in the fridge for up to 2 weeks. Sourdough keeps best at room temperature in a bread bag for 3-4 days, or freeze slices for 3 months. The butter stays fresh in its original packaging for 6 months in the fridge. Once assembled, make your sandwiches 1 hour ahead and refrigerate—they crisp up even better when cold. Leftovers? Wrap tightly and reheat in a 350°F oven for 5 minutes to restore crispiness.
Why You'll Love This Recipe
- Five-Ingredient Magic: I swear by this combo—sourdough’s chewy bite, sharp cheddar’s punch, and Gruyère’s nutty melt. That Dijon mustard? Just a swipe on the bread before buttering, and suddenly it’s next-level without extra work.
- Crispy-Gold Perfection: The secret’s in the butter—generously spread, then toasted until the edges are caramelized. No flipping required, just one perfect side per sandwich. (Yes, even my picky husband stops mid-sentence to take a bite.)
- Weeknight to Dinner Party: Make four for Tuesday, reheat two for Thursday, and save the last for guests. The sourdough holds up better than your average bread, and the cheese combo feels fancy without the fuss. I’ve served it at book club—no one guessed it was 30 minutes of work.
- Budget Luxury: Sharp cheddar and Gruyère stretch farther than you’d think, especially when you’re only using two slices per sandwich. That sourdough loaf lasts a week if you’re smart about it, and the butter? A little goes a long way when you’re melting it right into the cheese. Comfort food that doesn’t break the bank.
Step-by-step instructions for artisan grilled cheese
Here's how to achieve that perfect balance of crispy crusts and gooey cheese rivers every time.
🍳 Step 1: Prepare the Cheese Filling
In a medium bowl, combine the 1 cup sharp aged cheddar cheese and 1 cup gruyère cheese. Use your fingers to break up any large chunks, ensuring you have an even, finely shredded mixture. The sharp cheddar provides depth of flavor while the gruyère adds nutty richness and perfect melting qualities.
Add the 1 tablespoon Dijon mustard to the cheese mixture and stir well to distribute evenly. The mustard adds a subtle tang that cuts through the richness of the cheeses and helps create those signature cheese rivers when melted. This step is where the magic begins—don't skip it.
👨🍳 Step 2: Assemble the Sandwiches
Lay out 4 slices of sourdough bread on your work surface. Using a pastry brush, lightly coat one side of each slice with the 1 tablespoon extra-virgin olive oil. This creates a barrier that prevents the bread from absorbing too much butter later and ensures a crispy crust. I like to work with two sandwiches at a time to keep things organized.
Spread a generous layer of the cheese mixture onto the oiled side of 4 slices of bread, leaving about a ½-inch border around the edges. Then place the remaining 4 slices on top, oiled-side down. Press down gently but firmly to help the cheese adhere—this prevents fillings from sliding out during cooking. Here's where precision matters: even cheese distribution means even melting.
🔥 Step 3: Master the Butter Sear
Cut the ½ cup unsalted butter into 8 equal pieces (about 1 tablespoon each). Heat a non-stick skillet over medium heat until it's hot but not smoking. Place one butter piece on each sandwich—this is your secret to that perfect golden crust. The butter should melt quickly but not burn.
Press down gently on each sandwich with a spatula during the first 1-2 minutes—this prevents curling and ensures even contact with the pan. You'll know you're doing it right when you see the butter bubbling and the edges starting to turn golden brown. Don't walk away. This is the moment that matters: maintain consistent pressure and watch for that perfect crust formation.
⏰ Step 4: Cook to Perfect Crispiness
Once the first side is deep golden brown (about 3-4 minutes total), carefully flip the sandwiches using a thin spatula. Add another butter piece to the second side and cook for another 3-4 minutes until the second side is equally crispy and the cheese is fully melted with visible rivers.
Here's the thing—your pan should be hot but not screaming. If the butter burns before the bread crisps, reduce the heat slightly. The ideal sandwich should have a crispy exterior that gives way to molten cheese inside. Remove from heat when the cheese is just beginning to pull away from the edges—it'll continue melting as it rests.
🍽️ Step 5: Finish and Serve
Transfer the completed sandwiches to a wire rack and let them rest for 2 minutes. This resting period allows the cheese to set slightly and makes cutting easier. While they rest, drizzle each sandwich with ½ tablespoon truffle oil and sprinkle with ⅛ teaspoon flaky sea salt (about 0.5 teaspoon total).
Cut each sandwich diagonally in half and serve immediately. The crusts should be crispy enough to stand up while the cheese inside remains creamy with those beautiful rivers. Pair with a simple tomato soup or a crisp green salad for the full artisan experience. The first bite should deliver that perfect contrast of textures and flavors—crispy, gooey, tangy, and rich all at once.
Pro Tips For Making Artisan Grilled Cheese
- USE A SKIMMER FOR BREAD: I learned this the hard way—skipping a bread slicer or serrated knife leaves uneven edges that burn before the center melts. A thin metal skimmer (or even a wide spatula) glides right under the sourdough, giving you perfectly flat, crispy slices every time.
- MIX THE CHEESES FIRST: Sharp cheddar and Gruyère play different roles—one needs to melt fast, the other adds texture. Grate them together, toss with a pinch of salt, then let sit at room temp for 10 minutes. This ensures even melting and prevents that dreaded "cheese clump" in the middle.
- LOWER THE HEAT AFTER SEALING: Your pan’s screaming hot at first, but once the cheese starts bubbling and the edges turn golden, drop the heat to medium-low. I’ve watched too many grilled cheeses turn into hockey pucks when left on high—this keeps the sourdough crisp without burning the mustard-buttered insides.
- BUTTER THE OUTSIDE, NOT THE INSIDE: That Dijon-mustard spread belongs inside the sourdough, but the butter goes on the outside only—just enough to coat the bread surfaces. Buttering the cheese side creates steam instead of a crust, and trust me, you want that golden barrier. (Yes, even if you’re impatient like me.)
Pro cooking tips for great artisan grilled cheese
Pan Selection Matters
Your choice of pan makes all the difference. I swear by a 10-inch Lodge cast iron skillet for that perfect sear—it retains heat like a dream and creates crispy crusts every time. But if you don’t have cast iron, a nonstick skillet works beautifully too, especially for beginners.
Just make sure it’s well-seasoned or lightly oiled to prevent sticking. A heavy-bottomed stainless steel pan also works if you prefer that classic look, though it requires more attention to heat control. 🔥
Cold Butter Technique
The secret to that signature golden crust is using cold butter. Cut your butter into 8 equal pieces (about 1 tablespoon each) and keep them chilled until ready to use.
When you place a cold butter pat on each sandwich, it melts slowly, creating steam that helps the bread crisp up evenly. If your butter melts too quickly, reduce the heat slightly—you want a gentle sizzle, not a flame.
Trust me, this step transforms your grilled cheese from ordinary to extraordinary.
Press for Even Melting
Don’t skip pressing your sandwiches! Use a spatula or small plate to apply gentle but firm pressure during the first 1-2 minutes of cooking. This ensures even contact with the pan and prevents the cheese from oozing out the sides.
I like to press down just enough to hear a satisfying squelch—that’s the sound of perfect adhesion. Without pressure, you’ll end up with uneven melting and soggy spots. Think of it like making a perfect pancake: consistent pressure = consistent results.
Heat Control is Key
Medium heat is your best friend here. Too hot, and your butter burns before the bread crisps. Too low, and you’ll end up with a sad, greasy mess. The ideal temperature should be hot enough to sizzle gently but not smoke.
If you’re unsure, start at medium-low and adjust as needed. Pro tip: A thermometer (like the ThermoWorks Smoke) helps—aim for 325-350°F inside the pan. This range ensures crispy crusts without burning the butter or bread.
Resting Prevents Mess
Let your sandwiches rest for 2 minutes on a wire rack before cutting. This might seem counterintuitive, but it’s crucial—resting allows the cheese to set slightly, making it easier to slice without losing fillings. It also lets the crust firm up just enough to hold its shape.
Skip this step, and you’ll end up with a cheese avalanche when you cut. Think of it like resting a steak: patience pays off in the end. 💫
Finishing Touches Elevate
The final flourish makes all the difference. Drizzle with truffle oil for an instant gourmet touch—just ½ tablespoon per sandwich—and sprinkle with flaky sea salt for a burst of texture. For extra flair, add a pinch of smoked paprika or fresh cracked black pepper.
These finishing touches aren’t just for show; they balance the richness and add depth. And if you’re feeling fancy, a sprinkle of microgreens or crumbled bacon takes it to the next level. Small details, big impact.
Nutrition facts
Frequently asked questions
Can I make this recipe with regular cheddar instead of aged cheddar?
You can use regular cheddar, but you'll lose that deep, complex flavor that aged cheddar provides. For best results, choose an extra-sharp cheddar—it has more aged characteristics than mild cheddar. The Gruyère will still give you that nutty richness, but the overall flavor profile will be less sophisticated. If you're in a pinch, it'll still taste delicious, just not quite as refined.
What's the best way to reheat leftover grilled cheese?
Warm your leftovers in a 350°F oven for 5-7 minutes on a wire rack to restore crispiness. For a quick fix, use a skillet over medium-low heat with a fresh butter pat—just 1-2 minutes per side. Microwaving is possible, but it'll always be less crispy. The oven method is the most reliable for bringing back that perfect texture.
Can I make these sandwiches ahead of time?
Assemble the sandwiches (without butter) and refrigerate them for up to 1 hour before cooking. The cold butter technique works even better with chilled sandwiches—they'll crisp up beautifully. For longer storage, wrap assembled sandwiches in parchment and freeze them for up to 1 month. Thaw overnight in the fridge before cooking.
Why is my cheese oozing out the sides?
This usually happens when you don't press the sandwiches firmly enough during cooking. The cheese needs that gentle pressure to stay contained. Also, make sure you're using enough bread to contain the cheese—about a ½-inch border around the edges. If you're still having issues, try reducing the cheese amount slightly or using a slightly smaller pan.
What other cheeses work well in this recipe?
For a similar flavor profile, try Comté or Emmental instead of Gruyère. For something different, add fontina for extra creaminess or pecorino romano for a sharp, salty kick. Just remember that pre-shredded cheeses tend to get gummy—always shred your own for best results. The key is choosing cheeses with good melting properties and complementary flavors.