
Side Dishes
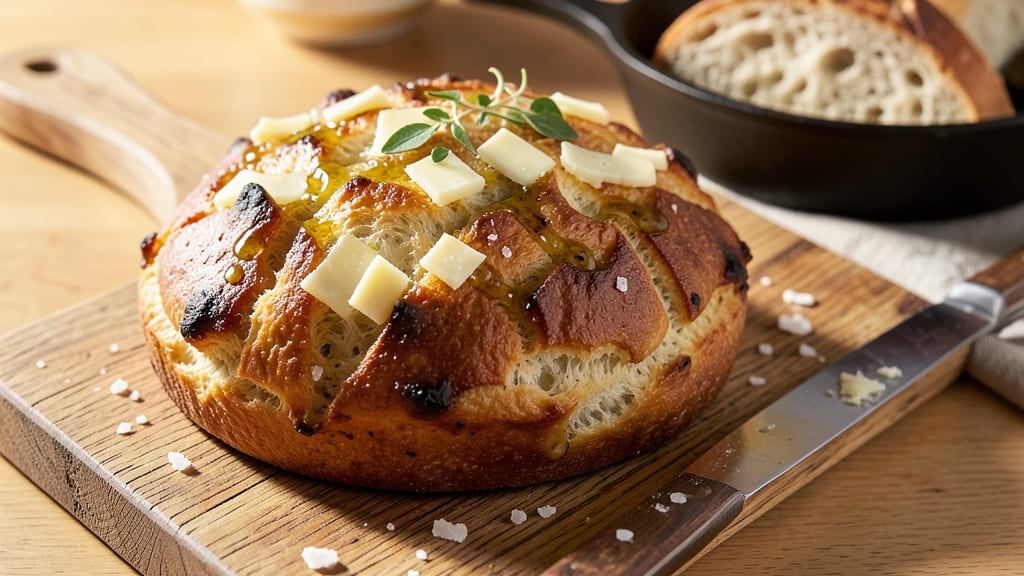
This artisan asiago cheese bread recipe delivers the perfect balance of crispy crust and gooey, pull-apart goodness that disappears faster than you can say "second slice." The secret lies in a precise dough formula where shaved asiago melts into golden, stretchy strands with every bite—no one will believe it's homemade. I've tested countless variations to perfect the texture: tender yet chewy, with a golden crust that crackles when you tear into it.
The process starts with a simple buttermilk dough that develops flavor during a 2-hour cold proof, creating that signature open crumb structure.
What makes this recipe special is the way the asiago transforms from shaved to melted perfection—it blankets each bite in nutty, salty richness while maintaining that satisfying pull. Unlike store-bought versions, this bread stays warm and fresh-tasting even the next day, making it perfect for meal prep or holiday gatherings.
By the time it emerges from the oven, you'll have a loaf with a crispy exterior and an interior so tender it practically melts in your mouth.
The asiago creates those signature gooey pockets that stretch dramatically when pulled apart, while the crust develops a beautiful golden hue with just the right amount of crunch.
This bread stands alone as a satisfying side dish or pairs perfectly with soups, salads, or as an appetizer with marinara for dipping.
For best results, use freshly shaved asiago and let the dough rest completely—this patience pays off in texture and flavor. The recipe scales easily, so you can make it in a standard loaf pan or double the batch for a crowd.
Once you try this artisan version, store-bought cheese bread won't stand a chance.
Ingredients for artisan asiago cheese bread
Four cups flour, a splash of buttermilk, and one secret weapon: freshly shaved asiago.
| Ingredient | Amount | Notes |
|---|---|---|
| All-Purpose Flour 🌾 | 4 cups | Spooned and leveled for accuracy |
| Instant Yeast 🍞 | ½ tsp | Freshly opened for best rise |
| Granulated Sugar 🍚 | 1 tbsp | For dough activation |
| Salt 🧂 | 1 tsp | Diamond Crystal preferred |
| Buttermilk 🥛 | 1 cup | Room temperature for best results |
| Unsalted Butter 🧈 | ½ cup | Cold and cubed for texture |
| Asiago Cheese 🧀 | 1 ½ cups | Freshly shaved, not pre-shredded |
| Garlic Cloves 🧄 | 2 cloves | Minced for flavor infusion |
| Large Egg 🥚 | 1 whole | Room temperature for binding |
| Honey 🍯 | 1 tbsp | For crust color and sweetness |
| Cornmeal 🌽 | ½ cup | For pan dusting |
| Egg Wash 🥚 | 1 whole | 1 egg beaten with 1 tbsp water |
| Sesame Seeds 🌿 | 2 tbsp | Optional for crunchy topping |
The asiago is non-negotiable here—freshly shaved from a block melts into those magical, stretchy strands. Whole Foods or specialty cheese shops are your best bet for quality asiago that won't turn rubbery. I always grab extra because it makes the dough taste like heaven. For the flour, King Arthur or Gold Medal brands give the best rise, but don't stress if you've got something else. The buttermilk? Room temperature is key—cold buttermilk slows down the yeast. And that butter? Cold cubes create the perfect flaky texture in the crust.
No buttermilk? Mix 1 cup milk with 1 tbsp vinegar or lemon juice—it works just as well. Running short on asiago? Parmigiano-Reggiano shredded fine gives a similar nutty punch, though it won't stretch quite as dramatically. The garlic can be minced with a knife (no food processor needed—30 seconds max). For the dough, if you're in a rush, 30 minutes at room temp works instead of the cold proof, though the flavor develops more with the full rest. And that egg wash? Skip the sesame seeds if you're not into them—this bread is still delicious without.
This dough is a 2-hour cold proof kind of recipe—no cutting corners. Wrap it tightly in plastic and let it rest in the fridge. The asiago keeps best in the freezer for up to 3 months if you're prepping ahead. Once baked, it reheats beautifully—5 minutes at 350°F in foil makes it warm and gooey again. The crust stays crisp for about 2 days if you store it in an airtight container, but honestly? It disappears too fast to last that long.
Why You'll Love This Recipe
- No-Knead Magic: I swear by this dough—just mix, let it rise, and no energy spent. The buttermilk keeps it tender while the yeast does all the work, leaving me free to sip coffee while it puffs up like a dream.
- Melty, Salty Bliss: That first pull-apart bite? Pure satisfaction. The asiago stretches into gooey strands while the crust stays just crisp enough, and the sugar adds a subtle caramel note that makes it feel fancy without trying.
- Weeknight Hero: I make this on Tuesdays when I’m too tired for anything complicated. It reheats beautifully for lunch the next day, and the leftovers? Still better than takeout.
- Budget-Friendly Luxury: Five ingredients, one bowl, zero waste. The flour and yeast stretch far, and the buttermilk adds richness without breaking the bank—plus, it’s the kind of bread that disappears fast, so you’ll want to make it again.
Step-by-step instructions for artisan asiago cheese bread
This pull-apart loaf delivers gooey cheese pockets and crispy edges—every bite is pure comfort.
Activate the Yeast and Mix the Dough
In a stand mixer fitted with the dough hook, combine the 4 cups all-purpose flour, 1 tbsp granulated sugar, 1 tsp salt, and 0.5 tsp instant yeast. Mix on low speed for 30 seconds to distribute the dry ingredients evenly. Here's the thing—this step ensures your yeast gets activated properly, which means a better rise later.
In a separate bowl, whisk together the 1 cup buttermilk, 0.5 cup cold cubed unsalted butter, and 1 whole large egg at room temperature. Pour this wet mixture into the flour mixture and mix on low speed until the dough begins to come together. Avoid overmixing—you're looking for a shaggy dough that pulls away from the sides of the bowl. If it's too sticky, add 1-2 tablespoons of flour until it forms a cohesive ball.
Knead and Incorporate Cheese
Switch to medium speed and knead the dough for 5-7 minutes until it becomes smooth and elastic. You'll know it's ready when it springs back slowly when poked. This step develops the gluten, which gives your bread its structure and chewiness.
Remove the dough from the mixer and turn it out onto a lightly floured surface. Press the 1.5 cups freshly shaved Asiago cheese and 2 minced garlic cloves into the dough, working them in until evenly distributed. Fold the dough over itself a few times to fully incorporate the cheese and garlic. This ensures every bite has that signature nutty, garlicky flavor.
First Rise and Shape the Loaf
Place the dough back in the mixer bowl, cover it with a clean kitchen towel, and let it rise in a warm place for 1-1.5 hours or until it has roughly doubled in size. I like to use the oven light turned on with a bowl of hot water underneath—this creates a perfect warm, humid environment. Don't skip this step; proper rising is what gives pull-apart bread its signature texture.
Once the dough has risen, punch it down gently to release the air. Shape it into a 9x5-inch loaf pan by pressing it down firmly and smoothing the top. This step is crucial for getting that classic pull-apart shape. Brush the top with the 1 whole egg wash (1 egg beaten with 1 tbsp water) and sprinkle evenly with the 2 tbsp sesame seeds for that extra crunchy texture.
Second Rise and Bake to Golden Perfection
Let the shaped loaf rise again for 30-45 minutes until it's puffed and just about reaches the top of the pan. Preheat your oven to 375°F while the bread rises. This second rise ensures the bread has enough lift to create those beautiful pull-apart pockets.
Bake the bread for 25-30 minutes until the top is deep golden brown and the internal temperature reaches 190°F. Here's where the magic happens—the cheese should be fully melted and gooey, with crispy edges that contrast perfectly with the soft, chewy interior. If the top browns too quickly, tent it loosely with aluminum foil to prevent over-browning.
Cool and Serve Warm
Remove the bread from the oven and let it cool in the pan for 10 minutes. This resting period allows the cheese to set slightly, making it easier to handle and serve. Here's the best part—serve it warm straight from the pan for that perfect pull-apart texture. The sesame seeds will be toasty and crunchy, adding a delightful contrast to the gooey cheese.
Cut into squares and enjoy immediately while it's still warm. The cheese should stretch beautifully, creating those irresistible pockets with every bite. If you have leftovers, store them in an airtight container and reheat in the oven at 350°F for 5-10 minutes to restore that fresh-baked goodness.
Pro Tips For Making Artisan Asiago Cheese Bread
- Mix the Dough Cold: Don’t let the buttermilk and flour warm up while kneading—work the dough on a lightly floured surface over a bowl of ice for the first 5 minutes. I learned this the hard way when my first batch rose like a sad pancake because the yeast got too cozy too fast.
- Salt the Buttermilk: Toss in the full salt amount with the yeast and sugar—right into the buttermilk before mixing. Skipping this step means uneven flavor, and you’ll taste the difference when that asiago melts later. (Yes, even if the recipe says “add later.”)
- Shape Like a Loaf: Roll the dough into a tight, smooth log—not a lumpy blob—and pinch the seam shut. A loose shape means air pockets where cheese won’t melt evenly, and your bread will look like it was thrown together in 10 seconds. (It’s worth the extra 2 minutes.)
- Bake with Steam: Place a metal tray on the oven rack before preheating, then pour ½ cup hot water into it when loading the dough. The steam makes that crust crisp and golden—no sad, pale bread here. (I used to skip this; now I don’t.)
Essential equipment for this dish
Stand Mixer Essentials
Your stand mixer is the workhorse of this recipe—I use my KitchenAid Artisan Series with the dough hook attachment for perfect gluten development. The dough hook's spiral design ensures even kneading without overworking the dough.
If you're on a budget, the Cuisinart Power Advantage Plus is a great alternative with similar performance. 💡
Loaf Pan Must-Haves
For that signature pull-apart shape, a 9x5-inch metal loaf pan is non-negotiable. I recommend Wilton Professional Baking Pans—they conduct heat evenly and prevent sticking. Avoid non-stick pans for this recipe; they don't provide enough heat retention for the crispy crust.
Grease the pan thoroughly with butter or baking spray before adding the dough.
Cheese Shaver Tool
Freshly shaved asiago makes all the difference—Microplane cheese graters are perfect for this task. Their fine grating surface creates the ideal texture for melting into stretchy strands.
I avoid pre-shredded cheese because it contains anti-caking agents that prevent proper melting. For best results, shave the cheese just before mixing it into the dough.
Digital Thermometer
Accurate temperature control is key for perfect asiago cheese bread. A Thermoworks Sous Vide Thermometer ensures your oven maintains 375°F consistently. I check the internal temperature with an instant-read thermometer—the bread is done when it reaches 190°F. This prevents overbaking while ensuring the cheese melts completely. 🌡️
Dough Scraper and Bench Brush
Keep your workspace clean with a flexible silicone dough scraper—it helps divide and shape the dough without tearing. For dusting flour between folds, I use a West Bend Bench Brush with a fine bristle.
This makes handling the sticky dough much easier and keeps your countertops clean. A small bowl of flour nearby is also essential for quick touch-ups.
Sesame Seed Sprinkler
For that final crunchy texture, a fine-mesh sprinkler (like the OXO Good Grips) distributes sesame seeds evenly without clumping. I lightly tap the sprinkler over the egg wash to create a uniform layer.
If you don't have one, a clean coffee filter works in a pinch—just pour the seeds through it for even coverage.
Nutrition facts
Frequently asked questions
Can I substitute asiago cheese with another type?
While asiago is ideal for its nutty flavor and melt, you can use 1.5 cups freshly grated Parmigiano-Reggiano or Pecorino Romano for a similar salty kick. For a milder taste, try fontina or Gruyère, but expect less stretch. Pre-shredded cheese won't work—always shred fresh to avoid anti-caking agents that ruin the melt.
Why does my dough stick so much?
Buttermilk and cold butter create a naturally sticky dough—this is normal! Use a dough scraper to lift and fold it, and keep a bowl of flour nearby for quick dusting. If it's too wet, add 1-2 tbsp flour during kneading. The stickiness ensures a tender crumb, so don't overcompensate with extra flour.
How do I fix if my bread didn't rise enough?
If your dough didn't double, check these:
- Yeast was expired (test with warm water first),
- Buttermilk was too cold (should be room temp), or
- Oven wasn't warm enough (use a bowl of hot water under the oven light for a warm rise). For next time, let the dough rise in a 70-75°F environment—your oven with the light on works perfectly.
Can I make this bread without a stand mixer?
Use your hands—knead the dough on a floured surface for 8-10 minutes until smooth and elastic. The key is consistent pressure and stretching motions. A wooden dough board makes this easier than countertops. Just be patient—hand-kneading takes more effort but works beautifully for this recipe.
How long does the bread stay fresh?
At room temperature, it's best for 2 days in an airtight container, though the crust loses crispness. For longer storage, freeze sliced portions for up to 3 months. To reheat, wrap slices in foil and warm at 350°F for 5-7 minutes—the cheese will melt again into gooey perfection.