
Desserts
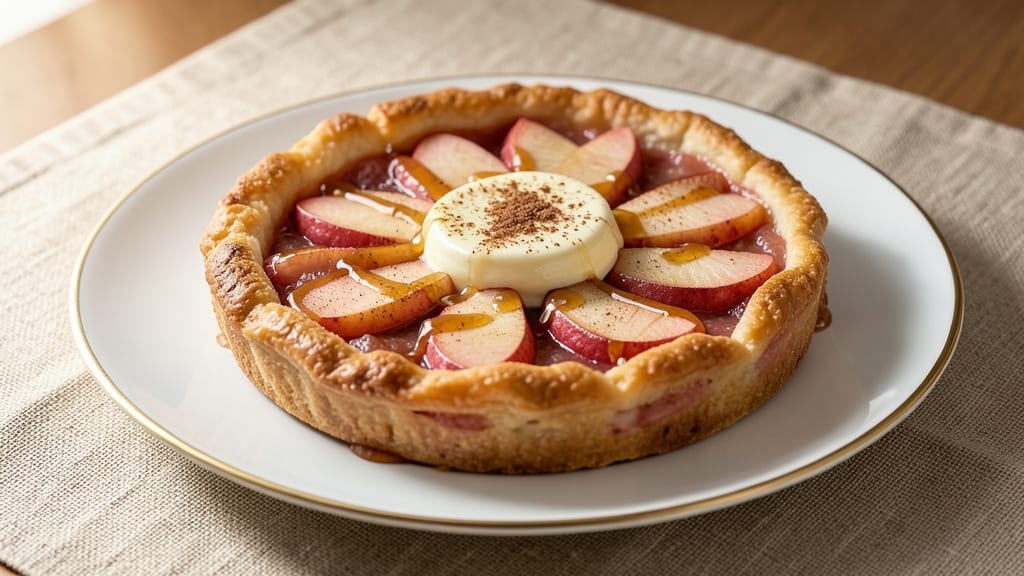
This apple cream cheese dessert recipe delivers the perfect balance of creamy, tangy, and caramelized flavors in every bite. 🍏 The secret lies in layering soft vanilla swirls with tender apple filling, topped with a crunchy streusel that adds just the right texture contrast.
I developed this recipe after years of experimenting with apple desserts, and it's now my go-to for fall gatherings or cozy weeknight treats.
The foundation of this dessert is a rich cream cheese filling swirled into vanilla cake layers, creating pockets of velvety cheesecake flavor. Thinly sliced apples are baked until tender and caramelized, adding natural sweetness that pairs beautifully with the tangy cream cheese.
The soft crunch topping, made with oats and brown sugar, provides a delightful contrast to the creamy base.
What makes this dessert truly special is how the flavors come together—each forkful offers a mix of creamy, tangy, and slightly crispy textures.
The apples add a subtle tartness that cuts through the richness of the cream cheese, while the streusel topping adds a satisfying crunch that keeps every bite interesting. It's the kind of dessert that feels indulgent yet balanced, perfect for satisfying cravings without being too heavy.
Ready in just 60 minutes, this recipe is designed for home cooks who want restaurant-quality results without complicated techniques. The layers are simple to assemble, and the baking process ensures everything comes together beautifully.
Serve it warm with a scoop of vanilla ice cream for the ultimate comfort dessert experience.
Ingredients for apple cream cheese dessert
Here's everything you need to create this dreamy apple cream cheese dessert with layers of flavor!
| Ingredient | Amount | Notes |
|---|---|---|
| All-Purpose Flour 🌾 | 2 ½ cups | Sifted for light texture |
| Granulated Sugar 🍚 | 1 ½ cups | White or light brown |
| Baking Powder 🧂 | 2 tsp | Aluminum-free preferred |
| Salt 🧂 | ½ tsp | Fine sea salt |
| Unsalted Butter 🧈 | 1 cup | Room temperature, full-fat |
| Large Eggs 🥚 | 2 whole | Room temperature |
| Vanilla Extract 🍯 | 2 tsp | Pure vanilla preferred |
| Cream Cheese 🧀 | 8 oz | Full-fat, room temp |
| Apples 🍏 | 4 medium | Honeycrisp or Fuji, peeled |
| Lemon Juice 🍋 | 1 tbsp | Freshly squeezed |
| Cinnamon 🌿 | 1 tsp | Ground, not cassia |
| Old-Fashioned Oats 🌾 | 1 cup | Quick or rolled |
| Brown Sugar 🍚 | ½ cup | Packed firmly |
| Chopped Walnuts 🥜 | ½ cup | Toasted lightly |
| Vanilla Ice Cream 🍦 | 1 ½ cups | For serving, optional |
The apples are the star—Honeycrisp or Fuji are perfect because they stay tender without turning mushy. Buy them a day ahead so they ripen slightly for better texture. Peeled or not? I peel mine (no brown spots), but leave the skin on for extra fiber if you prefer. The cream cheese needs to be full-fat and room temperature—cold lumps ruin the swirl. Philadelphia brand is my go-to, but any block-style cream cheese works. For the cake layers, sift the flour to avoid dense texture. Trust me, it makes all the difference.
No vanilla extract? Vanilla sugar or imitation vanilla works in a pinch, but real vanilla is worth the splurge. Running low on cream cheese? Substitute mascarpone—it's richer and equally creamy. The oats in the streusel can be rolled or quick oats—just toast them first for extra flavor. No walnuts? Pecans or almonds add a nice crunch too. The apples need to be thinly sliced (about 1/8-inch thick) so they caramelize perfectly. If you're short on time, pre-sliced apples from the produce section work fine—they're already peeled and ready to go.
The cake layers keep well for 3 days in the fridge, wrapped tightly. The streusel topping stays fresh for 5 days if stored in an airtight container. Freeze the whole assembled dessert (without ice cream) for up to 2 months—just thaw overnight in the fridge. For serving, I always warm slices briefly in the oven (350°F for 5 minutes) to bring out the caramelized apple flavors. Double the recipe if you're feeding a crowd—it disappears fast!
Why You'll Love This Recipe
- No-Fuss Mixing: I swear by this recipe because you just fold the ingredients—no food processor, no weird techniques. The butter and sugar cream together in seconds, and the apples? Just slice and layer. My kids help with the stirring, and somehow it still turns out golden and tender.
- Sweet-Savory Magic: That creamy apple filling with the buttery crust? It’s the kind of combo that makes you pause mid-bite. The sugar caramelizes just enough to balance the tartness, and the baking powder gives it a light lift—like a hug in dessert form.
- Weeknight or Holiday: Between us, I’ve served this at book club meetings and after school bake sales. It’s simple enough for a Tuesday but feels fancy enough for guests. Plus, the leftovers? Still just as good the next day—no sad, dry desserts here.
- Budget-Friendly Luxury: You’re using pantry basics—flour, sugar, butter—but it tastes like you spent hours. Honestly, the only “special” ingredient is the cream cheese, and even that’s a stretch if you buy it on sale. Feeds four for under $5, and everyone leaves happy.
Step-by-step instructions for apple cream cheese dessert
This layered dessert delivers perfect vanilla swirls and a crunchy topping every time—here's how!
👨🍳 Step 1: Make the Cream Cheese Swirl Filling
In a large bowl, beat the 1 cup unsalted butter and 1.5 cups granulated sugar together until light and fluffy—about 3-4 minutes with an electric mixer. This creaming process incorporates air for that signature tender texture. Add the 2 whole large eggs, one at a time, mixing well after each addition.
In a separate bowl, whisk together the 8 oz cream cheese, 2 tsp vanilla extract, 1 tsp cinnamon, and 0.5 tsp salt. Gradually add this mixture to the butter-sugar mixture, mixing on low speed until just combined. The filling should be smooth but thick—almost like a soft cookie dough. Here's the thing—don't overmix or you'll develop gluten and lose that delicate crumb we're after.
🍳 Step 2: Prepare the Apple Filling
While the filling cools slightly, peel and finely dice the 4 medium apples (about 4 cups diced). Toss them with 1 tbsp lemon juice and 1 tbsp granulated sugar from your ingredients. This prevents browning and adds just the right balance of sweet-tart flavor. The apples should be uniform in size—this ensures even cooking and distribution in the layers.
Place the apple mixture in a small saucepan over medium heat and cook for 5-7 minutes until softened but still holding shape. You want them to release their juices but not turn mushy. Stir occasionally, and if they release too much liquid, cook it off until just slightly syrupy. This concentrated apple flavor will make all the difference in your dessert.
🥘 Step 3: Assemble the Layers
Preheat your oven to 350°F. In a medium bowl, combine the 2.5 cups all-purpose flour, 2 tsp baking powder, and 0.5 cup brown sugar. Cut in the 1 cup unsalted butter using a pastry cutter or your fingers until the mixture resembles coarse crumbs with pea-sized butter pieces—this creates that perfect crumbly texture we want.
Press half of this mixture into a 9-inch springform pan to form the base. Spread half of the cream cheese filling over the base, then add half of the apple mixture. Repeat with the remaining layers, ending with the cream cheese filling on top. This layering creates those beautiful swirls when baked.
🔥 Step 4: Create the Crunch Topping
In a separate bowl, mix together the 1 cup old-fashioned oats, 0.5 cup chopped walnuts, and 0.5 cup brown sugar. Sprinkle this mixture evenly over the top of your layered dessert. The oats and nuts will create that perfect crunchy contrast to the soft layers below. Here's where it gets fun—press down gently on the topping so it stays in place during baking.
Bake for 45-50 minutes until the top is golden brown and a toothpick inserted comes out clean. The edges should be set but the center should still have a slight jiggle—this indicates perfect doneness. Let the dessert cool in the pan for 15 minutes before releasing the springform ring. This resting period helps everything set properly for clean slicing.
🍽️ Step 5: Serve with Ice Cream
Once cooled, slice the dessert into wedges and serve immediately with 1.5 cups vanilla ice cream on the side. The warm dessert pairs perfectly with the cold ice cream for that ultimate contrast. Each bite should deliver tender vanilla swirls, sweet apple chunks, and that satisfying crunch from the oat topping. Don't skip the ice cream—it takes this dessert from good to amazing!
Pro Tips For Making Apple Cream Cheese Dessert
- Chill the Butter First: Cream cheese desserts rely on cold butter for flaky layers, but I learned this the hard way—room temp butter makes the dough greasy and tough. Cut that block into cubes, pop it in the freezer for 10 minutes, then grate it directly into the flour. The cold bits melt just enough to coat the flour without turning the dough into a sticky mess.
- Sift the Dry Mix: Baking powder and salt love to clump, and nothing ruins a tender crumb like uneven distribution. Sift the flour, sugar, baking powder, and salt together in a bowl—yes, even the sugar—before cutting in the butter. I skip this sometimes, and the texture suffers. Trust me, your dessert will thank you.
- Underbake the Crust: This isn’t a pie crust; it’s a base for a filling that’ll cook further. Pull the crust out of the oven when the edges are just golden and the center still looks slightly pale. It’ll firm up as it cools, and overbaking turns it into a sad, dry shell. (I’ve done this. It’s not pretty.)
- Prep Apples Last: Sliced apples oxidize fast, turning your dessert into a sad, brown muddle. Keep them in a bowl of cold water with a splash of lemon juice until you’re ready to layer them in. I used to toss them in raw, and by the time the filling baked, they looked like they’d been sitting out for a week. Not ideal.
Make-ahead tips for this apple cream cheese dessert
Layer Prep Ahead
Assemble the entire dessert (except the crunch topping) up to 24 hours in advance and refrigerate uncovered. This allows flavors to meld beautifully—especially the apple and cream cheese layers. I always wrap the assembled pan tightly in plastic wrap and refrigerate.
The cream cheese filling stays perfectly smooth when chilled, and the apples develop deeper caramelized notes. Just add the streusel topping and bake straight from the fridge for 5-10 extra minutes at 350°F to account for the cold start. 🍏
Freezer-Friendly Layers
Freeze individual components separately for maximum flexibility. The cake base freezes beautifully for 1 month—wrap tightly in plastic and foil. The cream cheese filling can be frozen for 2 weeks in an airtight container.
For the apple mixture, spread it on a parchment-lined tray, freeze until solid, then transfer to a bag. Thaw all components overnight in the fridge before assembly. The texture remains perfect when properly thawed and baked. ❄️
Make-Ahead Serving
Prepare individual portions the night before gatherings by slicing the baked dessert and storing in an airtight container. Reheat slices at 350°F for 5 minutes to revive the crunch topping and enhance apple flavors. I keep extra ice cream in the freezer too—just scoop and serve when ready.
This approach saves 30 minutes of last-minute prep while keeping everything fresh. The warm dessert pairs perfectly with cold ice cream for that ultimate contrast. 🍦
Streusel Shortcut
Make the crunch topping a day ahead and store it in the fridge. The oats and nuts stay fresh for 5 days in an airtight container. For extra flavor, toast the oats and nuts separately before mixing—this takes 5 minutes in a dry skillet over medium heat.
Sprinkle the pre-made topping right before baking for that perfect crunch. I always double the recipe because it disappears fast! 🥜
Portion Control
Divide the assembled dessert into individual ramekins before baking for perfect single servings. Use 6-ounce ramekins and bake at 350°F for 35-40 minutes. These portion-controlled desserts reheat beautifully in the microwave for 20 seconds or in the oven for 5 minutes.
Great for meal prep or office parties—just grab and go! The individual portions keep well for 3 days in the fridge. 📅
Nutrition facts
Frequently asked questions
Can I substitute tart apples for sweet varieties in this recipe?
Tart apples like Granny Smith work beautifully—they add more zing to balance the cream cheese's richness. Just reduce the added sugar by 1 tbsp since tart apples need less sweetening. The key is to cook them until tender but still holding shape, about 5-7 minutes on medium heat.
What if I don't have vanilla ice cream for serving?
No problem! Try vanilla bean ice cream for extra flavor, or use whipped cream with a drizzle of caramel sauce. For a lighter option, serve with Greek yogurt or a scoop of dairy-free vanilla sorbet. The warm dessert still shines—it's all about that perfect contrast of temperatures.
Can I make this dessert without baking?
While this recipe relies on baking for the perfect texture, you can create a no-bake version using store-bought vanilla cake layers and cream cheese filling. Layer them with the apple mixture and top with the oat crumble, then chill for 4 hours before serving. The texture will be more like a trifle than a baked dessert.
How do I prevent the cream cheese filling from cracking?
Cracking happens when the filling gets too warm. Keep your cream cheese and butter at room temperature, and don't overmix the filling—just combine until smooth. Also, don't overbake! Remove the dessert when the center still has a slight jiggle (45-50 minutes at 350°F). Let it cool gradually in the pan.
Can I make this dessert gluten-free?
Yes! Replace the all-purpose flour with a 1:1 gluten-free baking flour blend and use gluten-free oats for the topping. The cream cheese and apple layers will stay the same. For best results, let the batter rest for 10 minutes before baking to help the gluten-free flour hydrate properly.