
Main Courses
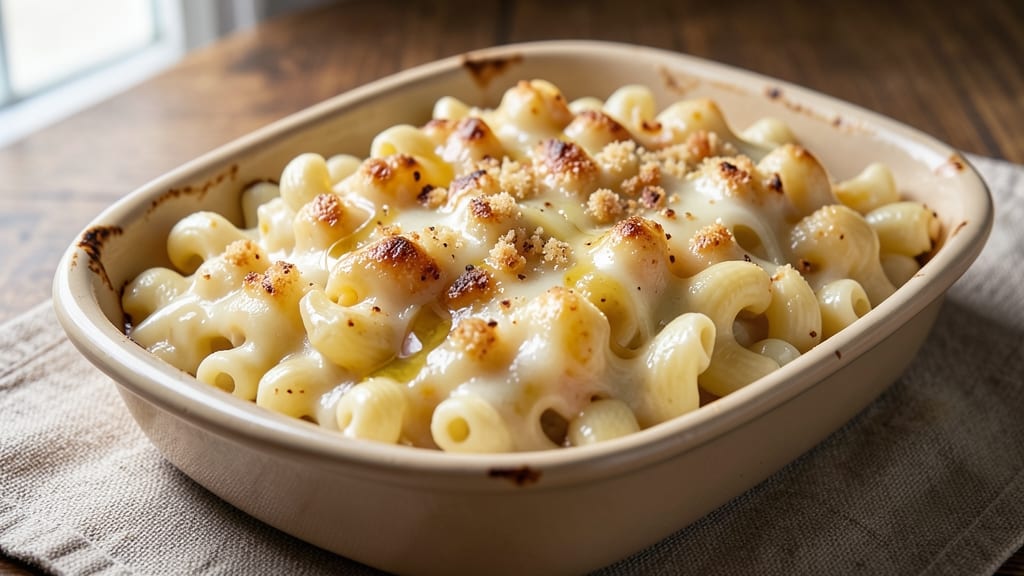
Annie's baked mac and cheese delivers that perfect balance of crispy golden edges and an impossibly gooey, melty center—every bite is pure comfort food magic. 🔥 The secret lies in a two-stage baking process that transforms ordinary mac and cheese into something restaurant-worthy, with a breadcrumb topping that crackles with each forkful.
I've perfected this recipe over years of testing, ensuring the sauce never breaks and the pasta stays perfectly al dente even after baking.
What sets this recipe apart is the technique: we start with a rich, velvety cheese sauce made from sharp cheddar, Gruyère, and cream cheese for depth, then layer it with cooked pasta and a crispy breadcrumb topping.
The high-heat bake creates that coveted contrast—crunchy on top, creamy inside—while keeping the dish simple enough for weeknight dinners. This isn't your childhood boxed mac and cheese; it's a foolproof method that delivers professional results at home.
The moment you pull it from the oven, your kitchen will fill with that unmistakable cheesy aroma, and the first bite will confirm why this has become a family favorite.
The sauce clings to every noodle, the breadcrumbs stay crisp, and the cheese pulls just enough to create that signature stretch. Whether you're serving it as a main dish or holiday side, this mac and cheese will disappear faster than you can say "extra cheese."
Ready to master this technique? The instructions walk you through every step—from boiling the pasta to achieving that perfect bake—with tips for customization, like adding bacon or swapping cheeses. Let's get started on creating your most impressive baked mac and cheese yet.
Ingredients for annie's baked mac and cheese
Pantry staples plus a few cheesy upgrades—this is comfort food at its finest.
| Ingredient | Amount | Notes |
|---|---|---|
| Elbow Macaroni 🍝 | 12 oz | Uncooked, medium or small shape |
| Sharp White Cheddar Cheese 🧀 | 2 cups | Shredded, aged 2+ years preferred |
| Gruyère Cheese 🧀 | 1 cup | Shredded, nutty flavor |
| Cream Cheese 🧈 | 8 oz | Full-fat, room temperature |
| Heavy Whipping Cream 🥛 | 1 cup | Full-fat for richness |
| Unsalted Butter 🧈 | ½ cup | Cold, cubed for sauce |
| All-Purpose Flour 🌾 | 2 tbsp | For thickening sauce |
| Yellow Onion 🧅 | 1 whole | Medium, finely diced |
| Garlic Cloves 🧄 | 4 cloves | Peeled, minced |
| Panko Breadcrumbs 🍞 | 1 cup | For crispy topping |
| Bacon Bits 🥓 | ½ cup | Optional, crispy preferred |
| Dried Mustard 🌶️ | ½ tsp | Adds depth to sauce |
| Salt 🧂 | 1 ½ tsp | Kosher or sea salt |
| Black Pepper 🌶️ | ½ tsp | Freshly ground |
| Nutmeg 🌿 | ¼ tsp | Freshly grated |
The cheeses are non-negotiable for that signature gooey texture. Sharp white cheddar gives the tang, while Gruyère adds nutty depth—don't skimp on either. I grab mine at Whole Foods or Trader Joe's for the best quality. For the cream cheese, Philadelphia brand is my go-to, but any full-fat will work. The onion and garlic? Fresh is best, but frozen diced will save time. Panko breadcrumbs are key for that crispy topping—Japanese panko stays crunchy better than regular breadcrumbs.
No sharp cheddar? Extra-sharp or pepper jack works in a pinch. Gruyère hard to find? Parmesan or Gouda can stretch it, but taste will change. The bacon bits are optional but add a smoky punch—Trader Joe's crispy bacon is my secret weapon. Swapping cheeses? Monterey Jack adds creaminess while pepper jack brings heat. For the sauce, if you're nervous about breaking it, add the flour to cold butter first before melting. And always use full-fat cream—low-fat versions break the sauce.
This keeps beautifully for 3-4 days in the fridge, though it's best within 2 days. For leftovers, reheat covered at 350°F for 15 minutes—the breadcrumbs stay crispy. Freeze portions for up to 2 months by wrapping tightly in foil. I always make a double batch—half goes in the freezer for lazy weeknights. The sauce thickens as it cools, so don't worry if it looks loose right after baking.
Why You'll Love This Recipe
- One-Pot Magic: I swear by this recipe when I’m too tired to dirty more than one pan. Toss the cooked macaroni right into the Gruyère-cheddar cream sauce, bake it all together, and—voilà—no straining, no extra bowls. The heavy cream and cream cheese blend so smoothly, you’ll forget how little effort went in.
- Cheese Lover’s Dream: That sharp white cheddar and nutty Gruyère combo is next level. The cream cheese adds this velvety richness, while the Gruyère gives it that perfect melt—crispy on top, gooey inside. Honestly, I’ve made mac and cheese before, but this one actually makes me close my eyes and sigh.
- Game for Any Night: Between us, this is my go-to for lazy Sundays, post-game hangouts, or even a fancy-ish dinner when I don’t want to cook. Add a sprinkle of breadcrumbs for crunch, or keep it simple—either way, it’s always a hit. My kid even requests it for school lunches (yes, really).
- Budget-Friendly Leftovers: A big batch costs less than takeout, and the flavor only gets better the next day. The creamy sauce thickens just right, so it reheats like a dream—no soggy pasta here. I’ll be real: I’ve eaten this cold from the fridge, and it’s still my favorite.
Step-by-step instructions for annie's baked mac and cheese
Here's how to build that perfect golden crust over creamy, melty goodness—every time.
🍳 Step 1: Cook the Pasta Al Dente
Bring a large pot of salted water to a rolling boil—it should taste like the ocean. Add the 12 oz elbow macaroni and cook for 1 minute less than the package directions. I aim for 12-13 minutes total for perfect al dente texture. You want the pasta to have a slight bite—it'll finish cooking in the oven.
Drain the pasta and immediately transfer it to a large mixing bowl. Toss with 2 tablespoons all-purpose flour to prevent clumping and help thicken the sauce later. This step is crucial—don't skip it! The flour will absorb some of the pasta's moisture and create a better texture in the final dish.
👨🍳 Step 2: Build the Creamy Cheese Sauce
In the same pot you cooked the pasta, melt the ½ cup unsalted butter over medium heat. Add the finely diced yellow onion and cook for 5 minutes until soft and translucent. Stir in the minced garlic cloves and cook for another 30 seconds until fragrant—don't let it brown or it'll turn bitter.
Reduce heat to low and gradually whisk in the 1 cup heavy whipping cream, 8 oz cream cheese, 2 cups sharp white cheddar cheese, and 1 cup gruyère cheese. Stir constantly until completely melted and smooth—this usually takes about 3 minutes. Add the ½ tsp dried mustard, 1.5 tsp salt, ½ tsp black pepper, and ¼ tsp nutmeg, mixing well to combine.
🥘 Step 3: Combine Pasta and Sauce
Pour the cheese sauce over the floured pasta in the mixing bowl. Using a rubber spatula, fold everything together until fully coated and creamy. The mixture should look thick and glossy. If it seems too thick, add 1-2 tablespoons of pasta water to loosen it—you want a smooth, pourable consistency that still clings to the pasta.
Here's the thing—this is where the magic happens. The residual heat from the pasta will help melt all the cheese completely. If any cheese doesn't melt smoothly, place the bowl over a pot of barely simmering water (double boiler) for 1-2 minutes to gently finish melting it. The sauce should be silky and luxurious at this point.
🔥 Step 4: Assemble and Bake for Crispy Perfection
Preheat your oven to 375°F. Grease a 9x13-inch baking dish with butter or oil—this prevents sticking and makes cleanup easier. Transfer the pasta mixture to the prepared dish and spread it out evenly. The surface should be smooth—use a spatula to create gentle swirls if needed.
In a small bowl, mix together the 1 cup panko breadcrumbs and ½ cup bacon bits. Sprinkle this mixture evenly over the top of the mac and cheese, pressing down gently with the back of a spoon. This creates that coveted crispy crust we're after. Bake for 20-25 minutes until the top is deep golden brown and bubbly around the edges.
⏰ Step 5: Rest and Serve Warm
Remove the mac and cheese from the oven and let it rest for 5-10 minutes before serving. This resting period allows the cheese to set slightly and the flavors to meld together. The dish will be hot and bubbly—wait until the edges firm up a bit before cutting.
Serve immediately with a side salad or steamed vegetables. The contrast between the crispy golden top and the creamy, melty interior is what makes this dish truly special. And trust me, the first bite is worth every minute of effort!
Pro Tips For Making Annie'S Baked Mac And Cheese
- TOAST THE PASTA: After burning three batches, I finally figured out—drain the elbow macaroni, spread it in a single layer on a baking sheet, and toast it in a 400°F oven for 3-4 minutes. The starch caramelizes just enough to thicken the sauce later, and you’ll get that perfect bite instead of a mushy mess.
- GRATE CHEESE FINE: Sharp white cheddar and Gruyère lose their magic if they’re chunky. Use a box grater and pulse them in a food processor for 10 seconds—just until they’re small but still sharp. Cream cheese stays soft and blends smoothly, so add it last when the sauce is warm.
- SLOW THE SAUCE: I used to rush the sauce, and it’d turn greasy. Simmer the cheese mixture over low heat, stirring constantly, until it’s thick enough to coat the back of a spoon. If it splits, whisk in a splash of cold heavy cream to bring it back together.
- CRUST IT RIGHT: Skip the foil for the last 5 minutes—just broil on high for 2-3 minutes until the top turns golden and bubbly. Watch it like a hawk, or you’ll end up with a sad, pale top. A sprinkle of breadcrumbs or extra cheddar right before broiling adds crunch.
Troubleshooting great annie's baked mac and cheese
Sauce Too Thin?
If your cheese sauce looks too thin after combining with pasta, don't panic! The secret is to simmer uncovered for 3-5 minutes on the stovetop. This evaporates excess moisture while keeping the sauce smooth.
For extra insurance, I keep 1 tablespoon of flour on hand to stir in if needed—it thickens instantly. 💡
Top Not Crispy?
Your breadcrumb topping needs direct oven heat to crisp properly. Try these fixes: press the breadcrumbs firmly into the sauce before baking, or broil for 1-2 minutes at the end (watch closely!).
For extra crunch, toast the panko in a dry pan for 2 minutes before sprinkling. I also recommend using Japanese panko—it stays crispy longer than regular breadcrumbs.
Cheese Not Melting?
Cheese clumping happens when it's not fully melted. For stubborn lumps, lower the oven temperature to 350°F and bake for 5-10 extra minutes. If using a mix of cheeses, shred them freshly and mix them into the sauce gradually—this prevents separation.
For extra insurance, I sometimes add 1 tablespoon of milk to the sauce to help emulsify everything smoothly.
Pasta Too Soft?
Overcooked pasta ruins the texture. To fix this, undercook the pasta by 1 minute (it'll finish in the oven). If your baked mac and cheese still feels mushy, try draining the pasta better next time—use a colander and shake it gently.
For extra insurance, I add 1 tablespoon of cornstarch to the sauce to help absorb excess moisture and firm up the texture.
Bubbly but Burnt?
Uneven browning means your oven runs hot. Rotate the pan halfway through baking to ensure even cooking. If the edges brown too fast, cover them with aluminum foil for the last 5 minutes. For a foolproof method, I bake on the middle rack—this gives the best heat distribution.
A light spray of water on the top before baking can also help create steam for a smoother finish.
Sauce Breaks After Baking?
Sauce separation usually means too much moisture. Next time, reduce the cream by 1-2 tablespoons or add 1 extra tablespoon of flour to the sauce. For a quick fix, stir in 1 tablespoon of cold butter after baking—it helps re-emulsify the sauce.
I also recommend stirring constantly while melting the cheese to prevent curdling from heat shock.
Nutrition facts
Frequently asked questions
Why does your recipe use both sharp cheddar and Gruyère?
The combination creates the perfect balance of flavors and textures. Sharp cheddar delivers that classic tangy kick, while Gruyère adds nutty depth that keeps the sauce rich and complex. The Gruyère also melts more smoothly, preventing clumping while adding a sophisticated flavor that elevates this comfort food.
Can I make this mac and cheese ahead of time?
Assemble the dish up to 24 hours ahead and refrigerate uncovered. When ready to bake, cover with foil and bake at 375°F for 25-30 minutes (add 5-10 minutes if fully cold). For leftovers, reheat covered at 350°F for 15 minutes to maintain crispiness. The flavors actually improve overnight!
What's the secret to getting that perfect crispy top?
Three key factors: Japanese panko (it stays crispy longer), pressing the breadcrumbs firmly into the sauce before baking, and using medium-high heat for the final 5 minutes of baking. For extra insurance, broil for 1-2 minutes at the end—just watch closely to avoid burning!
Can I make this vegetarian or vegan?
For vegetarian, simply omit the bacon bits. For vegan, replace the dairy cheeses with vegan cheese alternatives (like Miyoko's or Violife) and use coconut cream instead of heavy cream. The technique remains the same—just ensure your substitutes melt properly. The texture will be slightly different but still delicious!
How do I prevent the pasta from getting mushy?
Cook the pasta 1 minute less than package instructions (it finishes in the oven) and drain it very well. Toss with 2 tablespoons flour before combining with sauce to absorb excess moisture. For extra insurance, add 1 tablespoon cornstarch to the sauce—it helps stabilize the texture. Always use freshly cooked pasta for best results!