
Main Courses
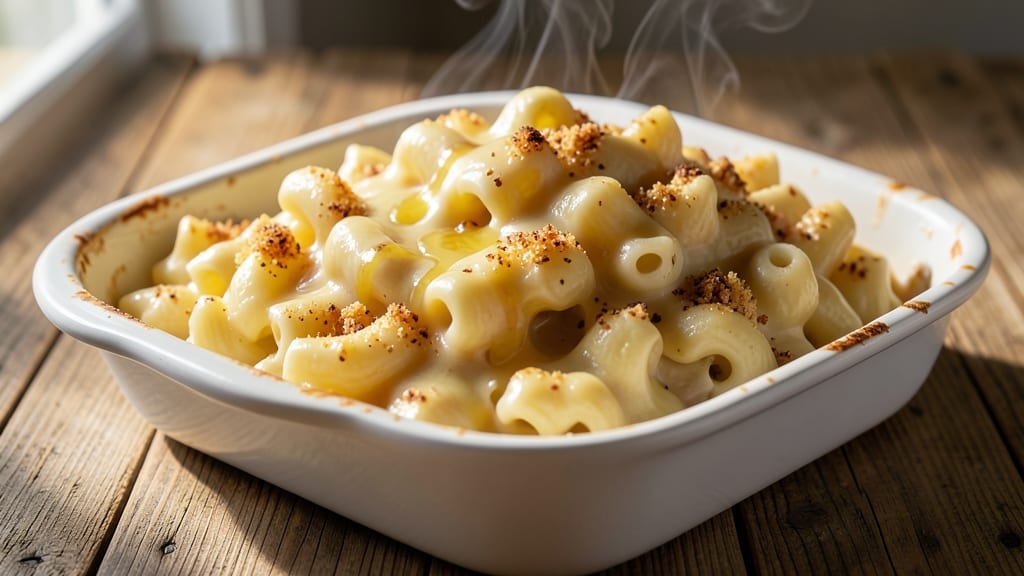
This American style mac and cheese recipe delivers the ultimate comfort food experience—ultra-creamy baked bites topped with a crispy golden crust that begs to be broken into.
The secret lies in a perfectly balanced cheese sauce, slow-cooked for maximum richness, and a breadcrumb topping that transforms into a satisfying crunch. After years of perfecting the technique, this version stays true to classic flavors while elevating the texture to restaurant-quality standards.
The foundation begins with a foolproof cheese sauce—equal parts sharp cheddar and mild varieties—melted in a rich butter base before being tempered with warm milk for a velvety finish. Elbow macaroni holds its shape beautifully, absorbing the sauce without turning mushy, while a crispy breadcrumb topping adds the perfect contrast.
This method ensures every bite delivers that creamy pull you crave, with just enough texture to keep it exciting.
What sets this apart is the two-stage baking process: an initial gentle bake to melt the cheese completely, followed by a broil to achieve that golden, crackly top without burning.
The result is a dish that’s impossible to resist—rich enough for a holiday table but simple enough for a weeknight dinner. Serve with crisp collard greens or a simple salad to balance the indulgence.
Whether you're feeding a family or treating yourself, this recipe delivers consistent, foolproof results every time. The key is patience—letting the sauce thicken properly and the topping crisp just right. Once mastered, you’ll wonder how you ever settled for anything less than homemade. Let’s get cooking!
Ingredients for american style mac and cheese
These twelve essential ingredients transform into restaurant-quality mac and cheese with a velvety sauce and crackly crust.
| Ingredient | Amount | Notes |
|---|---|---|
| Elbow Macaroni 🍝 | 1 ½ lbs | Dry, medium or #2 size preferred |
| Sharp White Cheddar Cheese 🧀 | 1 ½ cups | Shredded, block preferred |
| Mild Yellow Cheddar Cheese 🧀 | 1 ½ cups | Shredded, block preferred |
| Unsalted Butter 🧈 | ¾ cup | Cold, cut into tablespoons |
| Whole Milk 🥛 | 2 cups | Warm, not hot |
| All-Purpose Flour 🌾 | ¼ cup | Sifted, for thickening |
| Panko Breadcrumbs 🍞 | ½ cup | Japanese-style, for crisp topping |
| Extra-Sharp White Cheddar 🧀 | ¼ cup | Shredded, for topping |
| Freshly Ground Black Pepper 🌶️ | ½ tsp | Coarsely cracked |
| Kosher Salt 🧂 | 1 ½ tsp | Diamond Crystal preferred |
| Freshly Grated Nutmeg 🌿 | ¼ tsp | Fine, for subtle warmth |
| Garlic Powder 🧄 | ½ tsp | For depth of flavor |
| Heavy Cream 🥛 | ½ cup | For extra creaminess |
The cheese selection is non-negotiable for that authentic American flavor. Sharp white cheddar provides the tangy bite, while mild yellow cheddar delivers creaminess—both should be block cheese, freshly shredded (pre-shredded contains anti-caking agents that prevent smooth melting). For the best results, Whole Foods or specialty cheese shops offer the highest quality; if shopping at a standard grocery store, look for brands like Cabot or Sargento for consistency. The unsalted butter must be cold when added to create the proper roux—cut it into tablespoons and keep it chilled until ready to use. For the milk, warm it just enough to dissolve the cheese completely but not so hot it curdles the sauce.
No sharp cheddar? Pepper jack adds a mild kick, though it alters the classic flavor profile. Substituting milk? Half-and-half or whole milk works best—avoid reduced-fat options that can make the sauce grainy. For a richer texture, add an extra 0.25 cup heavy cream at the end. If you're avoiding gluten, almond flour can replace the all-purpose flour for thickening, though the texture will differ slightly. The breadcrumb topping is where the magic happens—Panko provides the ideal crispiness, but Italian-style breadcrumbs work in a pinch. For extra flavor, toast the breadcrumbs with a pinch of garlic powder before adding them to the top.
This dish reheats beautifully—simply cover with foil and warm in a 350°F oven for 15-20 minutes. For best results, assemble the casserole up to 24 hours ahead and refrigerate; bring to room temperature before baking to ensure even cooking. Leftovers keep for 4-5 days in the fridge, though the texture becomes slightly softer with each reheat. For longer storage, freeze individual portions in airtight containers for up to 3 months. The crispy topping loses its crunch when frozen, so it's best to reheat and broil briefly after thawing to restore it.
Why You'll Love This Recipe
- No-Fuss Pasta: I swear, this takes less effort than ordering takeout. Boil the elbows, melt the butter, grate the cheddars—no roux, no fuss, just that perfect creamy sauce. My lazy Sundays just got a whole lot easier.
- Cheese Love Bomb: Sharp white and mild yellow cheddar? That’s a flavor combo that hits different. The sharpness cuts through the richness while the mild keeps it smooth—like a warm hug in every bite. (Yes, even on a Tuesday night.)
- Leftovers That Win: This stuff actually improves the next day. Cold slices for lunch? Yes. Reheated with a crispy breadcrumb topping? Even better. My kids beg for it—proof it’s a keeper.
- Budget Magic: Elbows, butter, milk, and cheese? That’s it. No weird ingredients, no splurges—just a dish that feeds a crowd for under $10. My wallet and my family’s stomachs thank me every time.
Step-by-step instructions for American style mac and cheese
Here's the method for achieving that perfect balance of ultra-creamy interior and crispy golden top.
Cook the Elbow Macaroni to Al Dente Perfection
Bring a large pot of water to a rolling boil and add 1.5 lbs elbow macaroni. Season the water generously with salt—it should taste like the sea. Cook the pasta until it's 1 minute shy of the package directions for al dente. You want it to have a slight bite when you test it, as it will finish cooking in the oven.
Reserve 1 cup of the starchy pasta water before draining. This liquid is essential for creating a silky sauce later. Drain the pasta and return it to the pot, giving it a gentle toss with a wooden spoon to prevent clumping. Keep it warm while you prepare the cheese sauce.
Create the Ultra-Creamy Cheese Sauce
In a large saucepan, melt 0.75 cup unsalted butter over medium heat. Once melted, whisk in 0.25 cup all-purpose flour to form a roux. Cook for 2-3 minutes, stirring constantly, until the mixture turns a light golden color and smells nutty.
Gradually whisk in 2 cups warm whole milk, ensuring no lumps form. Add 1.5 cups sharp white cheddar cheese and 1.5 cups mild yellow cheddar cheese, stirring until completely melted and smooth. Remove from heat and stir in 0.5 cup heavy cream, 0.5 tsp garlic powder, 0.25 tsp freshly grated nutmeg, 1.5 tsp kosher salt, and 0.5 tsp freshly ground black pepper. The sauce should be velvety and rich, with a beautiful golden hue.
Combine Pasta and Sauce for Maximum Creaminess
Add the cooked elbow macaroni to the cheese sauce in the saucepan. Stir gently but thoroughly to ensure every strand is fully coated. If the sauce appears too thick, add pasta water 1 tablespoon at a time until it reaches a creamy consistency that clings to the noodles without being watery. This step is crucial for achieving that signature ultra-creamy texture.
Transfer the macaroni mixture to a 9x13-inch baking dish, spreading it evenly. The dish should be about ¾ full—this allows room for the crispy topping without overflowing. Use a rubber spatula to smooth the top, ensuring an even surface for baking.
Prepare the Crispy Topping Layer
In a small bowl, combine 0.5 cup panko breadcrumbs and 0.25 cup extra-sharp white cheddar cheese. Sprinkle this mixture evenly over the top of the macaroni, pressing down gently with your fingers to help it adhere. The panko will create a delightful crunch while the sharp cheddar adds an extra layer of flavor.
Place the baking dish on a rimmed baking sheet to catch any potential drips. Bake at 375°F for 20-25 minutes, until the top is deep golden brown and the edges are bubbling. The center should still be slightly jiggly when you test it—this indicates the perfect balance of creamy interior and crispy exterior.
Rest and Serve for Optimal Texture
Remove the mac and cheese from the oven and let it rest for 5-10 minutes before serving. This resting period allows the sauce to set slightly, making it easier to slice and serve without losing its creamy consistency. The crispy topping will maintain its crunch while the interior remains velvety smooth.
Slice into 6 equal portions and serve immediately. Each bite should deliver that perfect combination of creamy, cheesy goodness with a satisfying crunch from the crispy top. For extra flair, garnish with additional cracked black pepper and a sprinkle of freshly grated nutmeg.
Pro Tips For Making American Style Mac And Cheese
- Boil Mac Until Firm: American-style mac needs a bite—test it at 11 minutes, not the 12-14 on the box. Undercooked pasta turns mushy when it hits the cheese sauce, and overcooked pasta gets gummy. Drain it just before it’s fully tender, then toss immediately with a splash of pasta water to reset the texture.
- Shred Cheese Coarse: Skip the food processor—your cheese sauce will turn gluey. Use a box grater or knife to shred the sharp white and mild yellow cheddar into uneven chunks (think rice-sized). The larger pieces melt slower, creating pockets of gooey cheese instead of a uniform paste.
- Melt Butter Slow: I used to rush this and end up with greasy, separated sauce. Melt the unsalted butter over medium-low heat, stirring constantly, until it’s just liquid but not browned. Then whisk in the milk—this keeps the sauce silky, not buttery or curdled.
- Reserve Starchy Water: Drain the pasta, but save a full ½ cup of the starchy water. When you mix in the cheese sauce, add it a little at a time—it’s the secret to a sauce that clings instead of sliding off. (Yes, even if you’re impatient like me, resist the urge to skip this.)
Common mistakes when making perfect results
Overcooking the Pasta
I’ve ruined more mac and cheese than I’d like to admit by overcooking the pasta. The key is stopping it 1 minute before the package directions say al dente. Pasta finishes cooking in the oven, and overcooking turns it mushy, which ruins that perfect creamy pull.
Always taste-test with a pinch of salt—it should have a slight bite. 🍝
Skipping the Roux
Many recipes skip the roux step, but I’ve found it’s non-negotiable for that ultra-creamy texture. The butter and flour combo creates a silky base that thickens the sauce properly. If you rush this step, your sauce will either be too thin or grainy.
Cook the roux for 2-3 minutes until it’s golden and smells nutty—this is where the magic happens. 🧈
Using Pre-Shredded Cheese
Pre-shredded cheese contains anti-caking agents that prevent smooth melting, leading to a grainy sauce. Always use block cheese and shred it yourself. For this recipe, I recommend sharp white cheddar and mild yellow cheddar—both should be freshly shredded.
If you’re in a pinch, Cabot or Sargento brands work well, but nothing beats freshly grated. 🧀
Ignoring the Pasta Water
Reserving 1 cup of starchy pasta water is crucial for adjusting the sauce’s consistency. If your sauce looks too thick, add it 1 tablespoon at a time until it’s creamy but still coats the noodles.
Skipping this step often results in a dry, clumpy mess. Think of it as the secret ingredient that keeps everything silky. 💡
Baking Too Hot or Too Fast
Baking at 375°F is ideal, but rushing the process can lead to a burnt top or undercooked center. The top should be deep golden brown with bubbling edges, but the center should still jiggle slightly.
If you broil too early, you’ll burn the topping before the inside is done. Patience is key—let it bake until the edges are bubbly but the center is just set. 🔥
Not Resting Before Serving
Skipping the 5-10 minute rest after baking can turn your perfect mac and cheese into a runny disaster. This resting time lets the sauce set slightly, making it easier to slice and serve without losing that creamy texture. Trust me, those extra minutes make all the difference. ✨
Nutrition facts
Frequently asked questions
Why does American-style mac and cheese use two types of cheddar?
The combination of sharp white cheddar and mild yellow cheddar creates the perfect balance—sharp cheddar adds tangy depth while mild cheddar delivers creamy richness. This classic pairing is what gives traditional American mac and cheese its signature complex flavor profile.
Can I make this mac and cheese without baking it?
For a stovetop version, simply assemble the pasta and sauce in a skillet, cover with a lid, and cook on low heat for 10-15 minutes until heated through. Skip the breadcrumb topping or sprinkle it on after heating for a crispy finish. The texture will be creamier without baking, but still delicious.
What's the best way to make it extra crispy on top?
For maximum crunch, toast the panko breadcrumbs in a dry skillet over medium heat for 2-3 minutes before adding them to the top. Also, broil for 1-2 minutes at the very end of baking—watch closely to avoid burning. The key is a deep golden brown color with visible bubbles.
How can I add protein to this recipe?
Try crispy bacon, pulled chicken, or diced ham for added protein. Cook the protein separately and mix it into the sauce before combining with pasta, or arrange it on top for presentation. For baked versions, add protein during the final 10 minutes of baking to prevent overcooking.
Can I make this ahead of time?
Yes! Assemble the dish up to 24 hours ahead and refrigerate. Bake as directed, but you may need to cover with foil for the first 15 minutes to prevent over-browning. For best texture, let it rest 5 minutes after baking before serving. The flavors actually improve overnight!