
Breakfast & Brunch
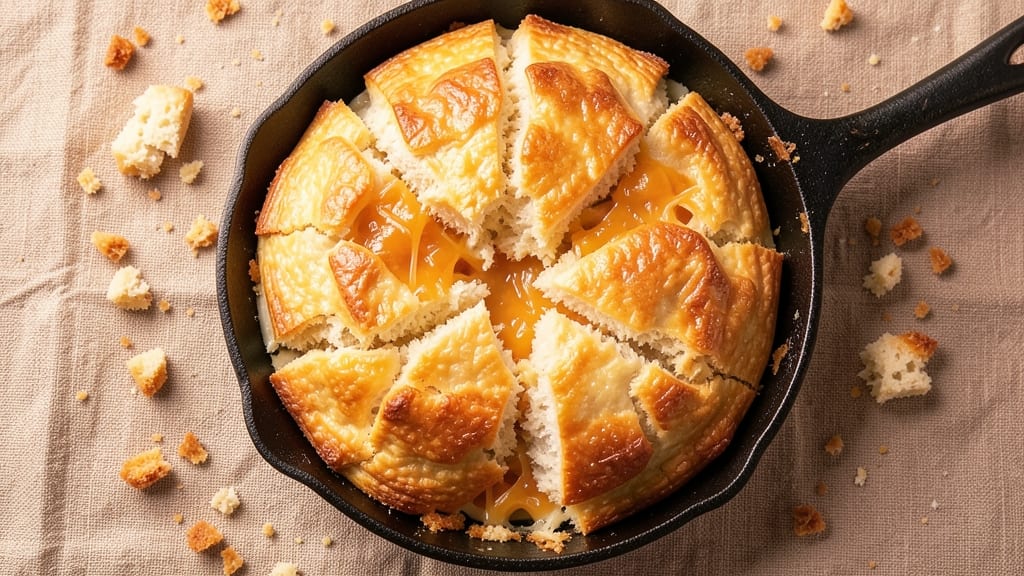
Mastering Abrams cheese biscuits transforms a simple breakfast into a showstopping meal—flaky layers of buttery dough wrapped around sharp cheddar, creating a crunch that disappears with every bite.
These biscuits aren’t just side dishes; they’re the star of your table, with a texture so tender it melts in your mouth while the cheese delivers a satisfying snap. The secret lies in cold butter and precise folding, techniques that elevate this Southern classic to restaurant-quality perfection.
What sets these biscuits apart is the balance: rich, buttery dough meets bold cheddar without overpowering the delicate layers. The process is straightforward—mix, fold, chill, and bake—but the results are anything but ordinary.
Each biscuit rises to a golden-brown crown, its interior fluffy and airy, while the cheese inside adds a salty crunch that keeps you reaching for another. This recipe delivers on every promise: crispy edges, tender centers, and that unmistakable cheddar punch.
Perfect for serving alongside fried chicken, sausage gravy, or a hearty breakfast spread, these biscuits turn any meal into an experience. The dough’s simplicity hides its magic—just flour, butter, and a pinch of salt—while the cheese transforms them into something extraordinary.
Whether you’re feeding a crowd or treating yourself to a weekend brunch, these biscuits are the kind of dish that leaves everyone asking for the recipe.
The key to success? Patience. Chilling the dough ensures layers that flake apart effortlessly, and baking at the right temperature guarantees a crisp exterior with a soft, pillowy interior. Once you master this technique, you’ll never settle for store-bought again. Let’s get started on creating biscuits that steal the show.
Ingredients for abrams cheese biscuit
These 9 ingredients create flaky, cheesy biscuits that steal every meal.
| Ingredient | Amount | Notes |
|---|---|---|
| All-Purpose Flour 🌾 | 4 cups | Sifted for light texture |
| Cold Unsalted Butter 🧈 | 1 cup | Cut into 1-inch cubes |
| Sharp Cheddar Cheese 🧀 | 1 ½ cups | Shredded, extra sharp preferred |
| Baking Powder 🧂 | 1 tbsp | Aluminum-free preferred |
| Granulated Sugar 🍚 | 1 tbsp | For subtle sweetness |
| Diamond Crystal Kosher Salt 🧂 | 1 tsp | Adjust to taste |
| Whole Milk 🥛 | ½ cup | Cold for best texture |
| Cold Water 💧 | ¼ cup | Chilled from fridge |
| Black Pepper 🌶️ | ½ tsp | Freshly cracked |
The butter is non-negotiable—cold cubes create those signature flaky layers. Grab Land O'Lakes or Plugrá from the dairy case, not the tub margarine. For cheese, sharp cheddar is key—Babybel or Wisconsin Sharp deliver that perfect crunch. Flour matters too: King Arthur or Bob's Red Mill give the best rise. Pre-sifted flour saves time, but if you're doing it yourself, use a fine-mesh sieve for no lumps. The baking powder? Clabber Girl works, but Aluminum-free is best for tender biscuits.
No cold butter? Freeze your butter cubes for 15 minutes—works in a pinch. Substituting cheese? Monterey Jack or pepper jack add different flavors, but stick with cheddar for classic Abrams. Short on milk? Buttermilk or heavy cream work too, but whole milk keeps it simple. The water should be ice cold—straight from the fridge. For extra flakiness, add 1 tbsp cornstarch to the flour mix. And if you're gluten-free? This isn't your recipe—traditional biscuits need that wheat magic.
Wrap the dough in plastic and chill for at least 1 hour—this is where the magic happens. The cheese keeps best in the fridge for 5 days or frozen for 3 months. Biscuits reheat beautifully—wrap in foil and warm at 350°F for 5-10 minutes. Make a double batch and freeze half on a tray before bagging—perfect for quick breakfasts. Leftovers? Toss in a paper bag and microwave for 20 seconds to revive that crispy edge.
Why You'll Love This Recipe
- No-Fuss Dough: I swear by the cold butter trick—just cut it into flour until it’s pea-sized. No food processor, no stress, and those flaky layers happen almost by magic.
- Cheese Lovers’ Dream: That sharp cheddar isn’t just an add-in; it’s the star. One bite and you’ll understand why I keep a block on hand—salty, tangy, and melty all at once.
- Breakfast or Snack: Serve them warm with honey butter for a lazy Sunday, or toss a few in a lunchbox for the kids. Honestly, I’ve eaten mine straight from the oven with just a sprinkle of flaky salt—no judgment here.
- Leftovers That Last: They crisp up perfectly the second day, whether reheated in the toaster or warmed in the oven. Between us, I’ve kept a batch in the freezer for weeks—because who has time to bake daily?
Step-by-step instructions for Abrams cheese biscuit recipe
Here's how to create flaky, buttery layers with sharp cheddar that'll make your biscuits the star of any meal.
Cut the Butter into the Flour Mixture
In a large bowl, combine the 4 cups All-Purpose Flour, 1 tbsp Baking Powder, 1 tbsp Granulated Sugar, 1 tsp Diamond Crystal Kosher Salt, and 0.5 tsp Black Pepper. Whisk gently to distribute the dry ingredients evenly. Add the 1 cup Cold Unsalted Butter cut into 1-inch cubes and use a pastry cutter or your fingers to work the butter into the flour until you reach pea-sized crumbs with some larger pieces remaining.
This texture is crucial—it creates those signature flaky layers. Don't overwork the butter or you'll end up with tough biscuits. The cold butter should still be firm when you finish, with only a few soft spots. If it feels too warm, return the bowl to the fridge for 5-10 minutes before proceeding.
Add the Cheese and Wet Ingredients
Next, fold in the 1.5 cups Sharp Cheddar Cheese using a silicone spatula. The cheese should be evenly distributed throughout the mixture. In a separate small bowl, combine the 0.5 cup Whole Milk and 0.25 cup Cold Water. Pour this liquid mixture into the center of the flour-butter-cheese mixture and gently stir with a fork until just combined.
You'll notice the dough will come together quickly—be careful not to overmix. The moment the dough forms a shaggy mass that holds together when pressed, it's ready. If it's still too crumbly, add 1-2 teaspoons more cold water. The dough should be soft but not sticky, and it should hold its shape when pressed gently.
Turn and Knead the Dough
Turn the dough out onto a lightly floured surface and knead it 6-8 times until smooth. The dough should be just slightly tacky to the touch but not sticky. If it's too sticky, add 1 tablespoon more flour at a time until it comes together properly. Shape the dough into a 1-inch thick rectangle and wrap it tightly in plastic wrap.
Refrigerate the dough for 30-60 minutes before shaping. This resting period allows the gluten to relax and the butter to firm up again, making it easier to roll out and cut clean biscuits. The longer it rests, the better the texture—up to 2 hours if you have time.
Roll and Cut the Biscuits
Preheat your oven to 425°F and line two baking sheets with parchment paper. On a lightly floured surface, roll the chilled dough to ½-inch thickness. Using a 2½-inch biscuit cutter, cut out circles and press straight down—don't twist the cutter or you'll seal the edges and prevent proper rising.
Place the cut biscuits on the prepared baking sheets, spacing them ½ inch apart. Gather any scraps, press them together, and roll out again to cut more biscuits. Bake for 12-15 minutes until the tops are golden brown and the biscuits sound hollow when tapped on the bottom.
Serve Warm for Maximum Flakiness
Remove the biscuits from the oven and let them cool on the baking sheet for 2-3 minutes. They'll be soft and tender when first baked, but they'll firm up slightly as they cool. Serve them warm with gravy, honey butter, or your favorite jam for that perfect Southern breakfast experience.
Here's the thing about these biscuits—they're best eaten fresh from the oven. The layers stay crispy for about 10 minutes after baking, so don't wait too long. If you need to reheat, pop them in a 350°F oven for 5-7 minutes to restore that buttery flakiness without drying them out.
Pro Tips For Making Abrams Cheese Biscuit
- Chill the Dough Properly: Cutting corners and skipping the 30-minute fridge rest? You’re asking for dense, flat biscuits. Wrap the dough in plastic and let it sit—this lets the gluten relax so the butter can spread properly when baking. (Yes, even if you’re impatient like me.)
- Cube the Cheese Small: Sharp cheddar’s the star here, but big chunks melt unevenly and leave you with a biscuit that’s more "surprise" than "delicious." Aim for ½-inch cubes—small enough to melt fast but big enough to keep texture. No food processor? A knife and a little elbow grease work fine.
- Don’t Overwork the Dough: Mix just until the dry ingredients disappear—overmixing turns your biscuits into tough, flavorless hockey pucks. Stir the cheese and butter into the flour in 3-4 quick folds, then stop. The dough should look shaggy, not smooth.
- Use a Mixer for Butter: I know, I know—hand-cutting butter feels traditional. But for consistent results, pulse the cold butter in a food processor until it’s pea-sized. This ensures even distribution in the dough, which means flakier layers and less fighting with stubborn lumps. (Your hands will thank you too.)
Storing and reheating this dish
Refrigerator Storage
Store your freshly baked Abrams cheese biscuits in an airtight container layered with parchment paper between each layer to maintain crispness. They’ll stay fresh at room temperature for 2-3 hours, but refrigerate leftovers for up to 3 days.
The key is to let them cool completely before storing—they’ll firm up slightly, making them easier to reheat later. 🥖
Freezer Prep
For long-term storage, freeze unbaked biscuits on a parchment-lined tray for 1 hour before transferring to a freezer bag with all air squeezed out. This prevents freezer burn and keeps them flaky.
Label with the date—they’ll keep for 3 months at 0°F or below. Thaw overnight in the fridge before baking as directed.
Reheating Perfection
Revive stale biscuits by wrapping them individually in foil and warming at 350°F for 5-7 minutes. For extra crispiness, place them directly on a baking sheet and bake for 3-4 minutes until golden.
Microwave reheating works in a pinch—cover with a damp paper towel and heat for 15-20 seconds on 50% power.
Make-Ahead Dough
Prepare the dough up to 2 days ahead and store it wrapped tightly in plastic in the fridge. When ready to bake, let it sit at room temperature for 30 minutes before rolling. This shortcut saves time without sacrificing texture.
For even more convenience, freeze shaped biscuits (unbaked) on a tray for 1 hour, then transfer to a bag for 2 months—bake straight from frozen, adding 2-3 extra minutes to the cooking time.
Cheese Handling
The sharp cheddar is the star—keep it refrigerated in its original packaging for up to 5 days or freeze for 3 months. If you’re prepping ahead, shred the cheese just before mixing it into the dough to prevent it from drying out.
For extra cheesy flavor, sprinkle ¼ cup extra shredded cheddar on top before baking—it’ll melt into a delicious, gooey crown. 🧀
Serving Warm
These biscuits are best served fresh from the oven, so plan ahead if you’re feeding a crowd. Keep them warm in a 200°F oven on a wire rack for up to 30 minutes while you finish serving.
Pair with warm sausage gravy or honey butter for the ultimate Southern breakfast. The contrast of warm biscuits with cool gravy is pure comfort food magic. ⏰
Nutrition facts
Frequently asked questions
Why does my Abrams cheese biscuit dough turn out sticky?
Sticky dough usually means too much liquid was added or the flour wasn't properly measured. Use spoon-and-level measurements for flour and keep the milk/water ratio precise. If it's too sticky, add 1 tablespoon flour at a time until it holds together when pressed. Overworking the dough can also release gluten, making it tacky—handle gently!
Can I substitute butter with something else?
Butter creates those signature flaky layers, but you can use cold vegetable shortening in a pinch (though texture will be slightly different). Never use margarine or melted butter—they contain water that steams instead of creating flakes. For a lighter option, try half butter/half shortening, but stick with cold fat for best results.
How do I get my biscuits to rise properly?
Proper rising depends on 3 key factors: cold butter, proper resting time, and oven temperature. Chill the dough for at least 30 minutes before baking, and preheat your oven to 425°F. If biscuits don't rise, check your baking powder (it loses potency after 6 months) and avoid overcrowding the baking sheet.
What's the best way to reheat leftover biscuits?
For crispy edges, wrap in foil and warm at 350°F for 5-7 minutes. For extra crunch, place directly on a baking sheet and bake for 3-4 minutes until golden. Microwave only as a last resort—cover with a damp paper towel and heat for 15-20 seconds on 50% power to avoid sogginess.
Can I make these biscuits gluten-free?
Traditional biscuits rely on wheat gluten for their signature texture, but you can try a 1:1 gluten-free flour blend with xanthan gum. Expect a denser result—these won't be as flaky. For best results, use a dedicated gluten-free biscuit recipe with proper binding agents. The cheese will still add great flavor, but the structure won't be identical.