
Appetizers
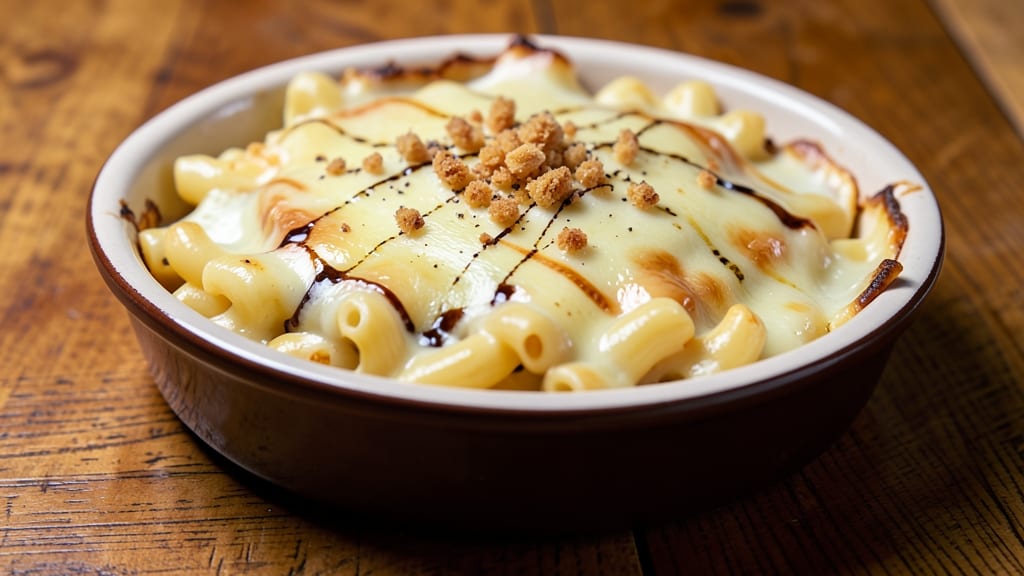
This 54th Street Mac Daddy and Cheese recipe delivers the ultimate comfort food experience with its signature crispy breadcrumb topping and layers of melty cheese. 🔥 The secret lies in perfectly cooked pasta, a rich cheese sauce, and the right mix of proteins and toppings to create a dish that looks as impressive as it tastes.
I've refined this recipe over years of testing, ensuring every bite delivers that satisfying crunch and creamy pull.
The foundation starts with al dente macaroni, tossed in a velvety cheese sauce made from a blend of sharp cheddar, Gruyère, and cream cheese for depth. Adding cooked bacon or ham not only enhances flavor but also creates a hearty, restaurant-style dish.
The real magic happens when you top it with a buttery breadcrumb crust that turns golden and crispy in the oven.
What sets this mac and cheese apart is the attention to detail—properly browning the breadcrumbs, layering the sauce just right, and baking until the top is perfectly crisp while the cheese stays gooey inside.
The result is a dish that's as satisfying to look at as it is to eat, with every element in perfect harmony.
Whether you're serving it as a main course or an appetizer for a crowd, this mac and cheese is designed to impress. The crispy top holds its shape, the cheese pulls in satisfying strands, and the bacon adds a smoky, savory bite.
Ready to make the best mac and cheese of your life? Let's get started.
Ingredients for 54th street mac daddy and cheese
Crispy topping, melty layers—this mac and cheese delivers restaurant-quality comfort in every bite.
| Ingredient | Amount | Notes |
|---|---|---|
| Elbow Macaroni 🍝 | 1 ½ lb | Al dente cooked, drained well |
| Sharp White Cheddar Cheese 🧀 | 2 cups | Shredded, block preferred |
| Gruyère Cheese 🧀 | 1 cup | Shredded, aged 12+ months |
| Cream Cheese 🧈 | 8 oz | Full-fat, room temperature |
| Heavy Whipping Cream 🥛 | 1 cup | Full-fat for richness |
| Unsalted Butter 🧈 | ½ cup | Melted, salted added later |
| Panko Breadcrumbs 🍞 | 1 ½ cups | Plain, not seasoned |
| Cooked Bacon 🥓 | 6 oz | Crumbled, thick-cut preferred |
| Garlic Cloves 🧄 | 4 cloves | Minced, fresh preferred |
| Yellow Onion 🧅 | 1 whole | Medium, finely diced |
| All-Purpose Flour 🌾 | 2 tbsp | For roux, all-purpose |
| Kosher Salt 🧂 | 1 ½ tsp | Diamond Crystal preferred |
| Ground Black Pepper 🌶️ | ½ tsp | Freshly ground |
| Mustard Powder 🌶️ | ½ tsp | Dry, for depth |
| Paprika 🌶️ | ½ tsp | Smoked, for color |
The cheeses are non-negotiable here. Sharp white cheddar gives that signature tang, while Gruyère adds nutty depth—don't skimp on the aged variety. Costco and Whole Foods carry the best blocks for grating yourself. Bacon matters too—thick-cut, Oscar Mayer or Applewood smoked if you're feeling fancy. The macaroni should be al dente, not mushy. Barilla or De Cecco are my go-tos, but any elbow mac works. Panko breadcrumbs are a game-changer—they toast up perfectly for that crispy top. Grab the plain kind at Trader Joe's if you want to save a few bucks.
No sharp cheddar? Pepper Jack at half the amount works in a pinch, though the flavor won't be identical. Swapping Gruyère for Parmesan? Add a splash of milk to prevent clumping. Running low on bacon? Crispy prosciutto or even cooked ham crumbles do the trick—just drain well. The mustard powder and smoked paprika are what give this dish that signature depth. No mustard powder? Dijon mustard at 1 tsp works too. And if you're making this ahead, freeze the assembled casserole before baking—it reheats beautifully with a crispy top every time.
This keeps 4 days in the fridge, but honestly? It's even better the next day once everything melds. For maximum crispiness, broil for 2-3 minutes right before serving. Store leftovers covered to keep that crunch. The sauce thickens as it cools, so a splash of milk when reheating helps loosen it up. Portion into individual ramekins for a crowd—each one gets that perfect crispy top without drying out.
Why You'll Love This Recipe
- One-Pot Magic: I swear by this recipe when I’m too wiped to do dishes. Toss everything—pasta, cheeses, cream—into one pot, stir, and let the stovetop do the work. No strainers, no extra pans, just pure, melty satisfaction waiting for you.
- Cheddar-Gruyère Dream Team: That sharp white cheddar? Crisp and tangy. Gruyère? Nutty, rich, and just right when melted. Add cream cheese for silkiness, and suddenly you’ve got a sauce that’s creamy but not heavy, salty but not overpowering. It’s the kind of flavor combo that makes you close your eyes and sigh.
- Leftovers That Don’t Suck: Between us, most mac and cheese leftovers are sad. Not this one. The creaminess holds up for days, and honestly? It’s even better the next day—cheeses meld more, edges get crispier if you reheat it right. I’ve packed this for lunches, frozen it for lazy nights, and never once regretted it.
- Weeknight Hero: I make this when I’ve got a house full of people who all say, “I’m not hungry” until they smell it. It’s the dish that disappears fast, feeds a crowd without fuss, and still feels special enough for company. Plus, the heavy cream keeps it luscious—no dry, gluey pasta here. Just pure, cheesy joy.
Step-by-step instructions for 54th Street mac daddy and cheese
Here's how to create that legendary crispy crust and ultra-creamy cheese blend.
🍳 Step 1: Cook and Prepare the Macaroni Base
Start by boiling a large pot of salted water—it should taste like the ocean. Add the 1.5 lb elbow macaroni and cook until al dente (about 1 minute less than package instructions). Drain immediately and give it a vigorous shake in the colander to remove excess moisture. This step is crucial—you want the pasta dry enough to absorb the cheese sauce but not so dry it turns to mush.
While the pasta cooks, melt the 0.5 cup unsalted butter in a large oven-safe skillet over medium heat. Add the finely diced yellow onion and cook for 5 minutes until soft and translucent. Stir in the minced garlic cloves and cook for 30 seconds until fragrant. Here's the thing—don't let the garlic burn, or you'll taste bitter notes in your final dish.
🥘 Step 2: Build the Creamy Cheese Sauce
In a separate bowl, combine the 2 cups sharp white cheddar cheese, 1 cup gruyère cheese, 8 oz cream cheese, and 1 cup heavy whipping cream. Microwave in 30-second bursts, stirring between each, until the mixture is smooth and fully melted. I like to do this in stages to prevent overheating the cream.
Pour the melted cheese mixture into the skillet with the onions and butter. Stir in the 2 tbsp all-purpose flour to create a roux that will thicken the sauce. Add the 1.5 tsp kosher salt, 0.5 tsp ground black pepper, 0.5 tsp mustard powder, and 0.5 tsp paprika. Cook for 2-3 minutes until the sauce thickens slightly and coats the back of a spoon. This is where the magic happens—your sauce should be silky and smooth.
👨🍳 Step 3: Combine Pasta and Cheese Mixture
Add the drained elbow macaroni to the skillet and toss everything together until the pasta is fully coated in the cheese sauce. Stir in the 6 oz crumbled cooked bacon and mix until evenly distributed. The bacon adds a smoky depth that balances the richness of the cheese. Taste and adjust seasoning if needed—sometimes the cheddar is extra sharp, so a pinch more salt might be necessary.
Here's a pro tip: If the mixture seems too thick, add 1-2 tablespoons of pasta water to loosen it. The sauce should be creamy but still coat the pasta evenly. Spread the macaroni mixture in the skillet into an even layer—this ensures the crispy topping cooks evenly.
🔥 Step 4: Create the Crispy Topping
In a small bowl, mix together the 1.5 cups panko breadcrumbs, 1 tbsp melted butter, and 0.5 tsp paprika. Sprinkle this mixture evenly over the top of the macaroni in the skillet. Press down gently with a spatula to help it adhere to the cheese. Here's the moment that matters: Place the skillet under the broiler for 3-5 minutes until the topping turns golden brown and crispy.
Watch it closely—broilers can vary wildly in heat. You want that topping to be golden and slightly toasted, not burnt. If it starts to brown too quickly, move the skillet back from the heat source. The crispy topping is what makes this dish legendary, so don't rush it.
⏰ Step 5: Rest and Serve with Confidence
Remove the skillet from the oven and let it rest for 5 minutes before serving. This resting time allows the cheese to set slightly, making it easier to scoop and serve. The macaroni will be piping hot, with that perfect contrast of creamy cheese and crispy topping in every bite.
Serve immediately with a side of garlic bread or a simple green salad. The crispy topping will start to soften as it cools, but that's okay—it's still the star of the dish. And real talk: This mac and cheese is so good, you might not even need sides. But we won't tell anyone if you skip the salad.
Pro Tips For Making 54th Street Mac Daddy And Cheese
- Boil pasta until al dente: I learned this the hard way—overcooked elbow macaroni turns to mush in the cheese sauce, no matter how much cream you add. Pull it out when it’s just firm to the bite (about 1 minute less than the package says), then finish cooking in the sauce. The starch from the pasta will thicken the sauce naturally—no extra cornstarch needed.
- Shred cheeses unevenly: Skip the food processor for sharp white cheddar and Gruyère—big, jagged shreds melt better and give that classic 54th Street texture. Use a box grater and toss in a few whole chunks for extra gooeyness. (Yes, even if it looks messy—it’s the point.)
- Warm cream cheese first: Cold cream cheese clumps like a brick in the sauce. Microwave it for 10 seconds, then stir it into the warm cream and heavy whipping cream until fully melted before adding the shredded cheeses. This keeps the sauce silky, not grainy.
- Cover and rest 5 minutes: After mixing everything, let the mac and cheese sit uncovered for 2 minutes to thicken, then cover with foil and rest another 3 minutes. This lets the cheeses set slightly—no more soupy, runny disaster when you serve it. (Your future self will thank you.)
Pro cooking tips for this dish
Cheese Sauce Perfection
For that ultra-smooth cheese sauce, melt your cheeses in 30-second microwave bursts—never all at once. I use a restaurant-style melter bowl (like the OXO Good Grips) to prevent overheating the cream.
Stir vigorously between each burst to avoid graininess. The Gruyère should fully dissolve, adding that nutty depth that separates this from basic mac and cheese. 🧀
Pasta Water Secret
Never drain your pasta completely! Reserve ½ cup pasta water while cooking—it's liquid gold for adjusting sauce consistency. When combining pasta and cheese, add 1-2 tbsp of this starchy water if the mixture looks dry.
The starch acts as a natural thickener and helps create that signature creamy texture. Trust me, this makes all the difference. 🍝
Bacon Timing Matters
Cook your bacon crispy and drain it thoroughly on paper towels before adding to the macaroni. The fat content is high, and you don't want soggy breadcrumbs later.
I like to add the bacon after the pasta is coated in sauce—this ensures even distribution and prevents the cheese from getting greasy. For extra flavor, use Applewood-smoked bacon if you're feeling fancy. 🥓
Broiler Watch
Broiling the breadcrumb topping is where most people mess up. Place your skillet 3-4 inches from the broiler element and watch like a hawk—3-5 minutes max. The topping should be golden brown, not burnt.
If your oven runs hot, reduce to 2 minutes and check frequently. A light-colored metal spatula helps press down breadcrumbs without marking them. 🔥
Layering Technique
Spread the macaroni mixture evenly in your skillet before adding the breadcrumb topping. Use a rubber spatula to create a ¼-inch thick layer—this prevents uneven cooking. For extra insurance, I sometimes sprinkle a thin layer of shredded cheese between the pasta and breadcrumbs.
This creates a double-cheese barrier that keeps the topping crispy while the center stays gooey. ✨
Make-Ahead Hack
Assemble the mac and cheese up to 24 hours ahead and refrigerate uncovered. The next day, broil for 5-7 minutes to restore that crispy texture. For freezing, assemble in a single layer on a tray, freeze solid, then transfer to a bag.
Reheat from frozen in the oven at 350°F for 30 minutes covered, then broil for 3-4 minutes uncovered. The texture comes back better than takeout! ❄️
Nutrition facts
Frequently asked questions
Can I make this mac and cheese without bacon? Swap the bacon for crumbled cooked ham, diced Italian sausage, or even chicken breast for a lighter option. For a vegetarian version, try mushrooms or sun-dried tomatoes for extra flavor. Just
Why did my breadcrumb topping get soggy?
Soggy breadcrumbs usually happen when the macaroni mixture is too wet or the topping isn't crisped enough. First,
How do I make this ahead of time?
Assemble the dish completely (including the breadcrumb topping) and refrigerate uncovered for 24 hours. The next day, broil for 5-7 minutes to restore that crispy texture. For freezing, assemble in a single layer on a tray, freeze solid, then transfer to a bag. Reheat from frozen at 350°F for 30 minutes covered, then broil 3-4 minutes uncovered. The texture comes back better than takeout!
What's the best way to reheat leftovers?
Leftovers keep for 4 days in the fridge. To reheat, cover with foil and warm in the oven at 350°F for 15-20 minutes. For extra crispiness, broil for 2-3 minutes at the end. Microwaving works too—just cover with a damp paper towel and heat in 30-second bursts until warmed through. The crispy topping will soften slightly, but it's still delicious!
Can I use a different type of pasta?
While elbow macaroni is traditional, you can use penne, farfalle, or shells for variety. Avoid long pasta like spaghetti—it won't hold the cheese sauce as well. If using shells, reduce the baking time to 20-25 minutes since they cook faster. Just